WHEN YOU DEMAND HIGH QUALITY AND ACCURACY, GO WITH........ SPEED CITY !
|
MOPAR |
"IN PROGRESS"
PAGE 3
On these pages you'll see how we create our master models,
so you can see the labor of love that goes into all our products.
Follow along
as we create a NEW
 ....
....
S/S CRAGAR MAG WHEELS
-
zero offset -
(with inner rims)

We're creating new S/S Cragar Front Funny Car Mag Wheels with zero off set.
Although the original CRAGAR mag's we were selling previously was a great
mag wheel,
it was made from an amt. rim and didn't match the new mpc. S/S Cragar Mag
Wheels we now sell.
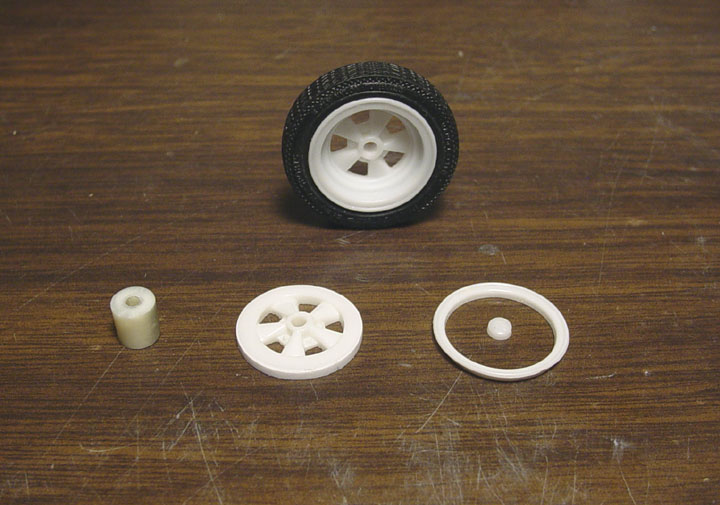 Starting with
an original mpc. Cragar Funny Car Mag Wheel, the mag was cut down the center,
Starting with
an original mpc. Cragar Funny Car Mag Wheel, the mag was cut down the center,
the rim ring was shortened as well as the mag wheel around the spokes.
A
new longer axle
mount was glued to the back, and an mpc. S/S Cragar Hub was glued the the
center of the mag.
Notice:
the original mpc mag wheel in the back ground, this mag just doesn't work
on a funny car tire !
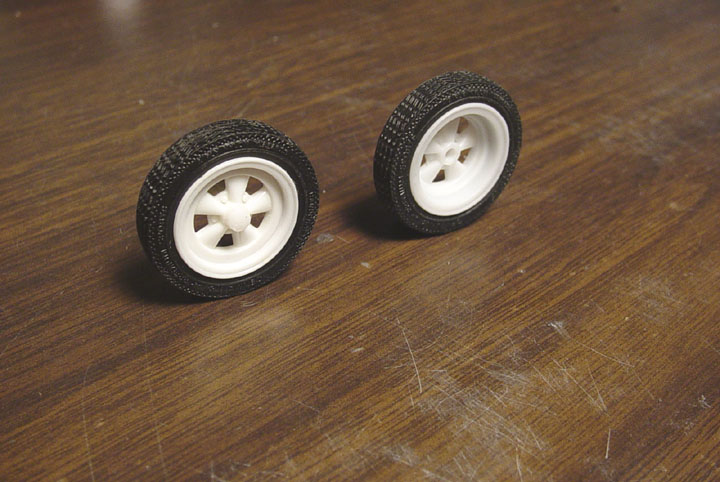 Here is the new S/S CRAGAR
mag wheel compared to the old mpc. funny car mag wheel.
Here is the new S/S CRAGAR
mag wheel compared to the old mpc. funny car mag wheel.
You can clearly see the difference and how much more accurate our new S/S
Cragar Front Mag will be !
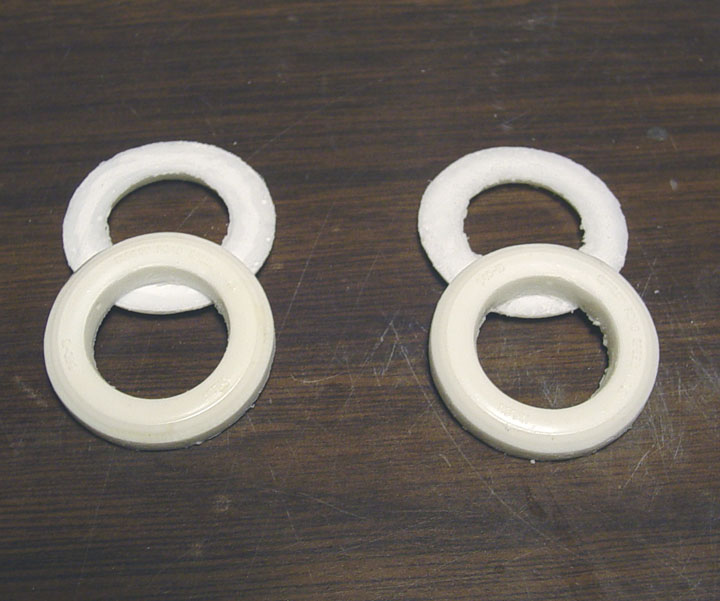
We're also adding new "matching inner rims" !

MASTER IS FINISHED !

NOW AVAILABLE !
AFX
SUPER STOCK FRONT TIRE
Dunlop
Super Speed
(4x15x26)
Never has there been a nice AFX or Super Stock Tire,
except the Revell "Thunderbolt" front tires.
The problem with the Revell T-BOLT tires, is that there is no tire tread
and once
you scuff them, the tread (or steps) are gone, leaving you with a skinny
front bald tire.
Other
than the tread surface, the side wall and size of the tire is period correct
!
 A Revell "Thunderbolt" vinyl tire was cast and a couple resin
duplicates were made.
A Revell "Thunderbolt" vinyl tire was cast and a couple resin
duplicates were made.
The Thunderbolt tire only has lettering on one side (the other side is blank).
So by cutting the 2 tires in half we were able to use 2 lettered sides.
These were then sanded down to 2 inches thick per side.
The new 2- piece tire tread surface was then sanded down smooth.
Originally, we were going to have tire treads done on a lathe, but after
several attempts,
we realized that that wasn't going to work, since tire
tire would get out of round when mounting to the lathe and created a bunch
of problems.
So, we're going back to the way we made the Cheater Slicks....... By hand
!
Five strips of .020" x .020" plastic were painstakingly wrapped
and glued around the tire, starting with the outer treads first.
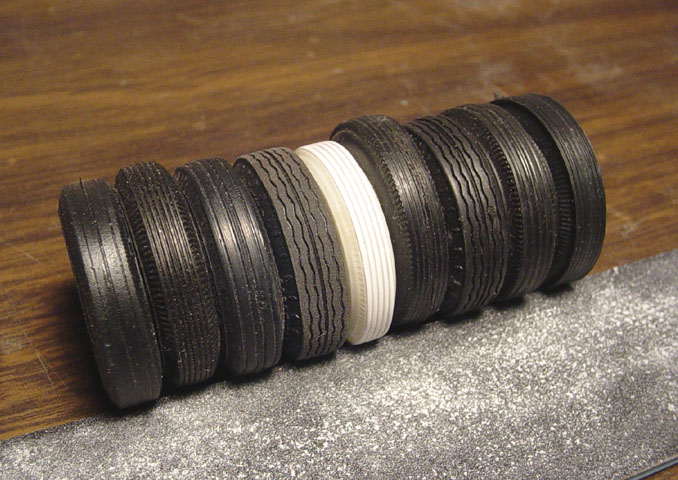 Here is the new "Super Stock Tire" compared to 8 other standard
stock tires.
Here is the new "Super Stock Tire" compared to 8 other standard
stock tires.
Our new tire is much smaller and thinner than any other tire available.........
only 4" wide and 26" tall !
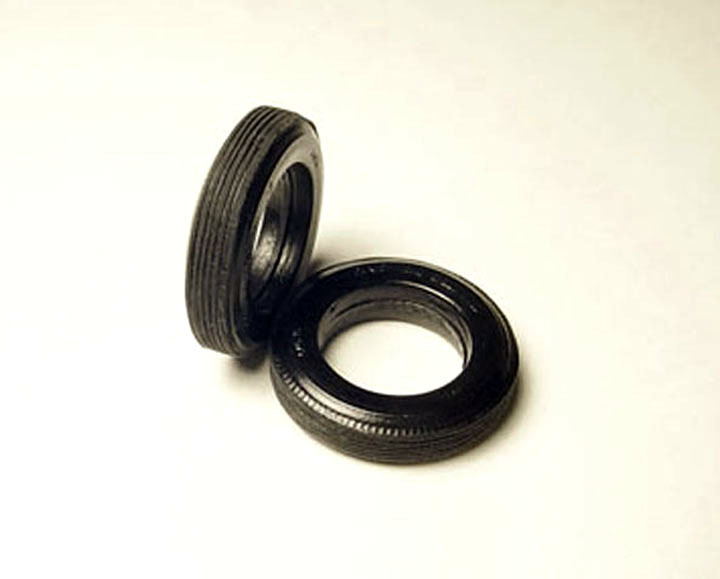
 Here it is compared to the original Revell "Thunderbolt" vinyl
tire.
Here it is compared to the original Revell "Thunderbolt" vinyl
tire.
Amazingly, it's a scale 1/4 inch smaller than the original.
 Now lettered on both sides and 5 new tire treads !
Note: the lack of tire treads on the original.
 This new "Super Stock Tire" will be perfect for the Dodge or Plymouth
AFXer's.
This new "Super Stock Tire" will be perfect for the Dodge or Plymouth
AFXer's.
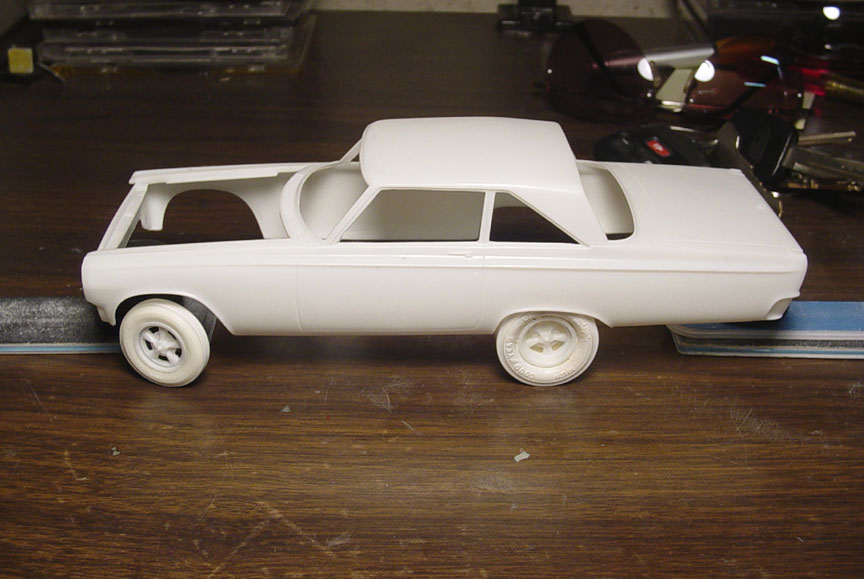
The rear, is a plastic slick that we made our AFX DRAG SLICKS out of......
although this one had glue slop on it.
They look look strange in white, but we wanted to show how they look and fit
on a body.
UPDATE ........ We redesigned this tire to have 6 tire treads !
The reason for adding an extra tread, was that the original treads were only .005 thick and .020 wide, and after a few months
of sitting around while getting other things done...... they melted !..... all that work down the drain.
All the treads were ripped off and 2 new strips of .010 plastic were added (custom made to fit) to fit the width of the tire.
It was then sanded smooth (back down to .005 and each line was hand scribed (with a razor knife) in the new plastic strips to make the 6 treads they have now.
These S/S tires took over the course of 3 years to get into production....... Hope you appreciate them as much as I do.
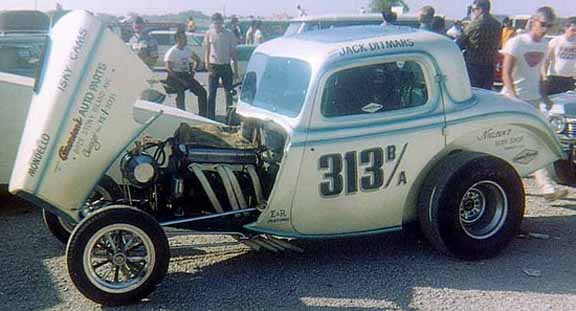
Jack
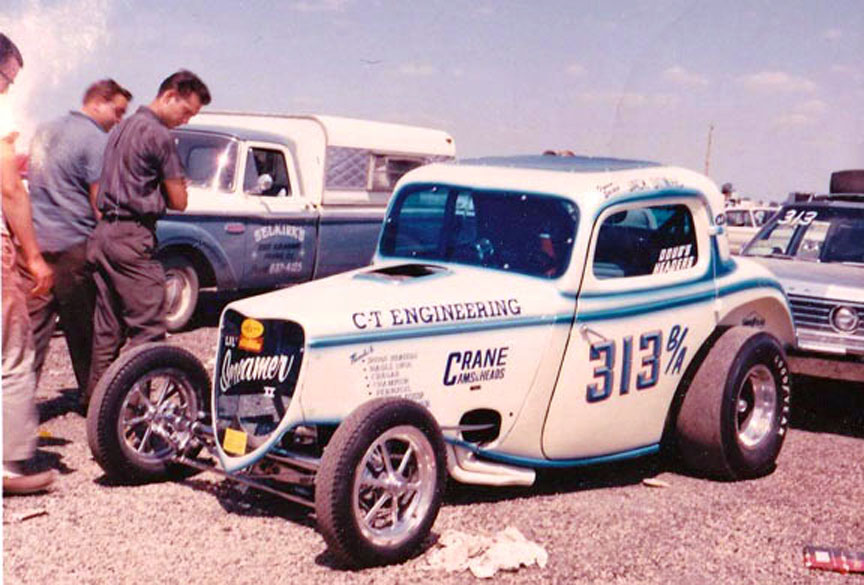
Ditmars'
Lil'
SCREAMER
'34 Ford
3-window Coupe
The Revell / Monogram
'34 Ford 3-window Coupe 1/24 scale would have been an easy alteration.
Since
there are no other altered models made in 1/24 scale this model should be made into 1/25 scale.
This will be a challenge!
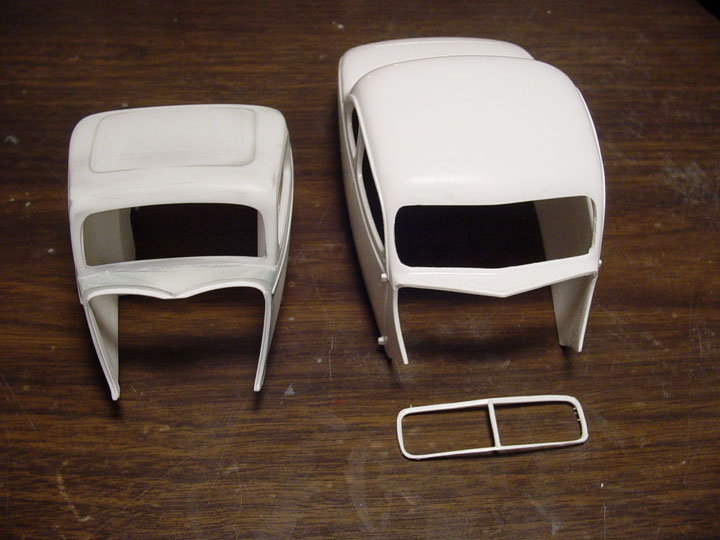
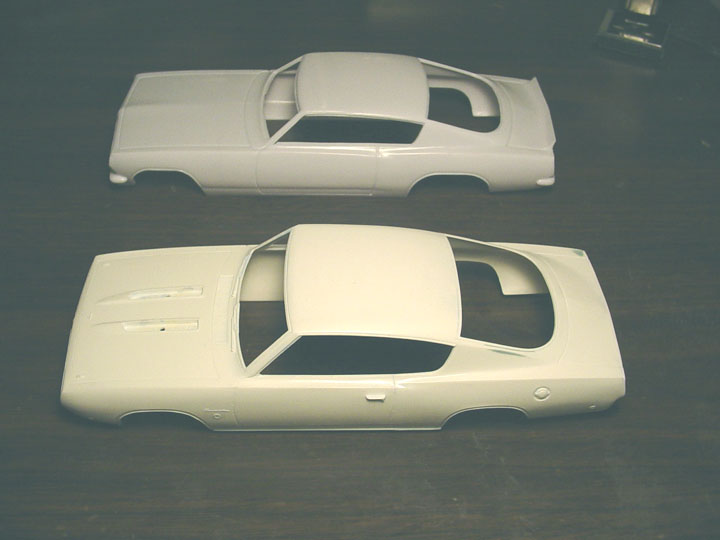
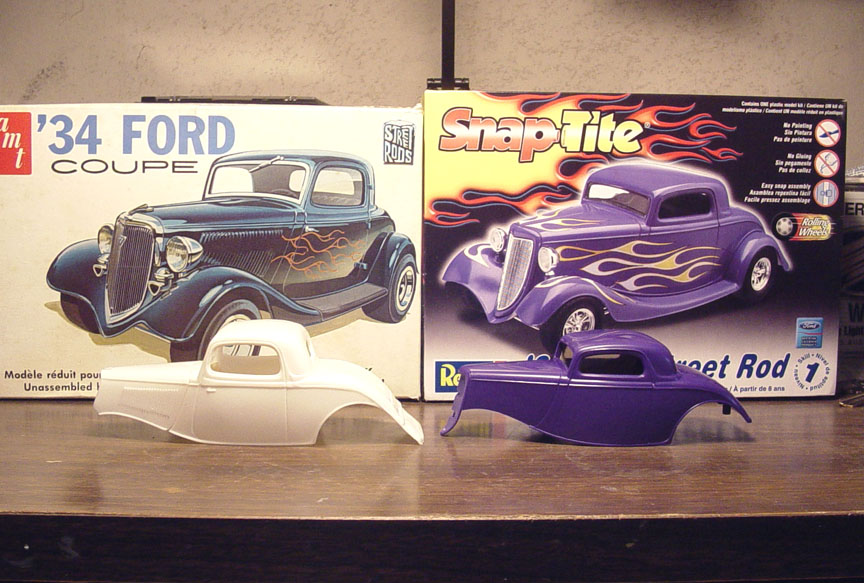 These are the two best
1/25 scale contenders for this project, but they both have their issues.
These are the two best
1/25 scale contenders for this project, but they both have their issues.
The Revell Snap-Tite has a chopped roof, that will need to be stock height
and the amt '34 Ford has poor body definition,
trim defects and an incorrect
fitting hood.
This model will need a lot of puttying and new trim around all the body
sides.
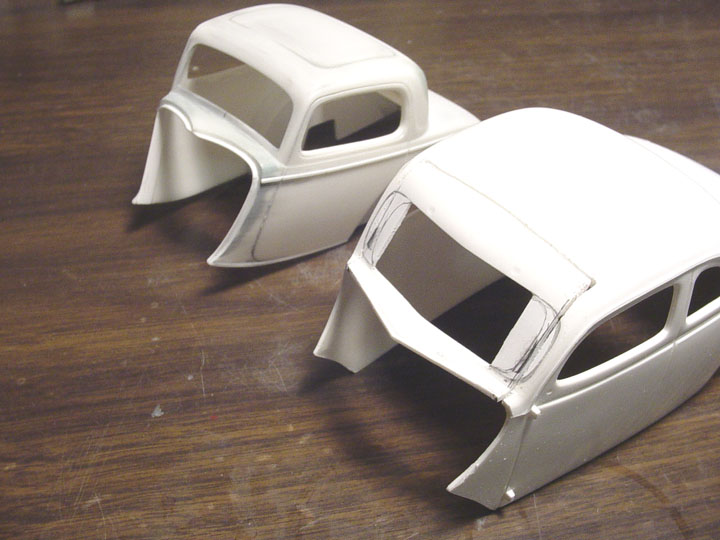
After wasting time &
money on re-altering the Snap-Tite roof to stock height, we discovered that
the door lines & roof pillar is on a wrong angle.
That project was scraped
and we moved back to the vintage amt '34 Ford kit.
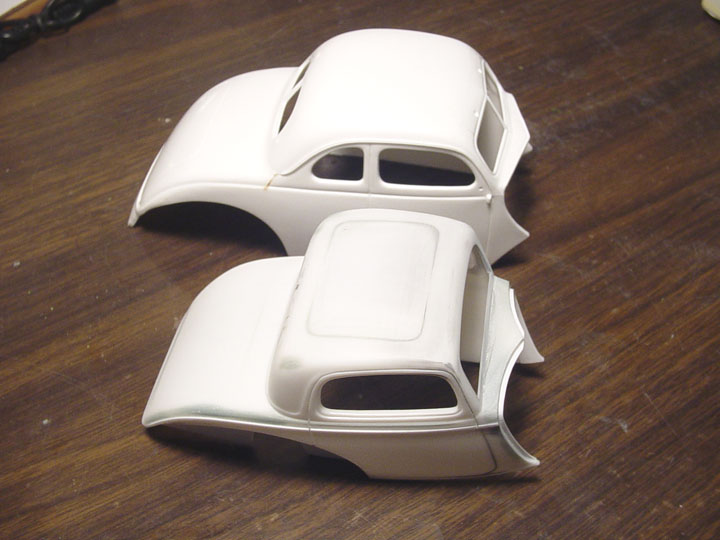
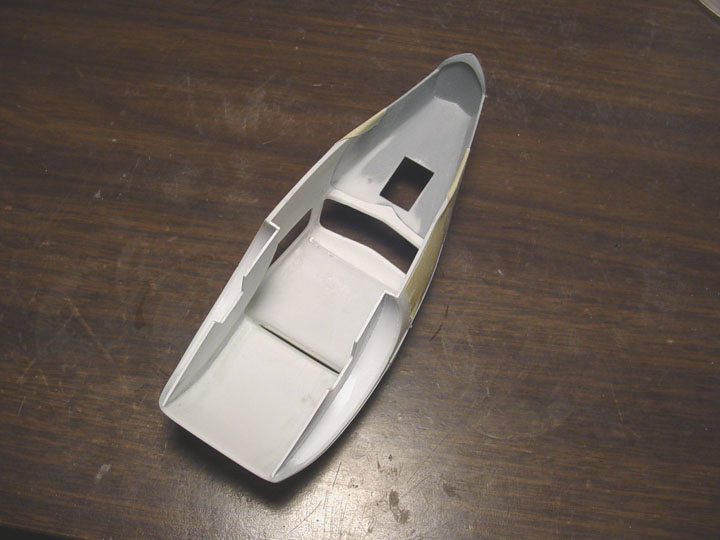
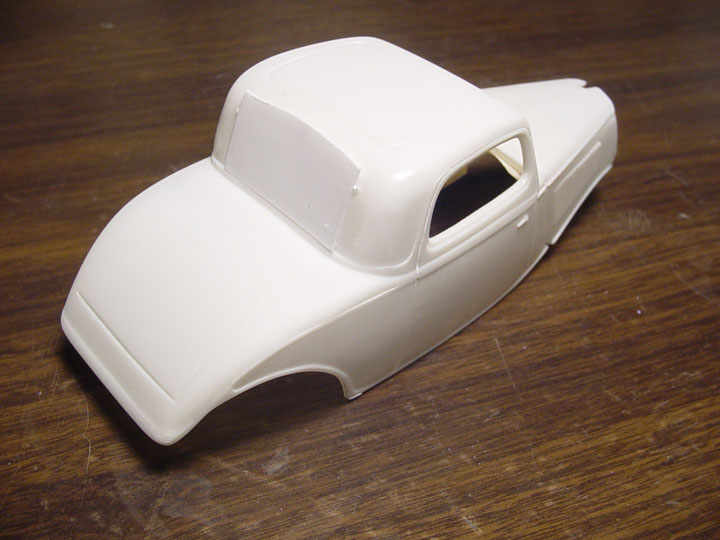 The first thing that needs to be fixed is the rear part of roof.
The roof
sinks in the middle (a factory flaw) and it will also make the rear pillar
look thicker, the original rear window had no detail anyway.
The poor looking trim was also sanded off from the body and the first application
of putty was used.
 More Putty !
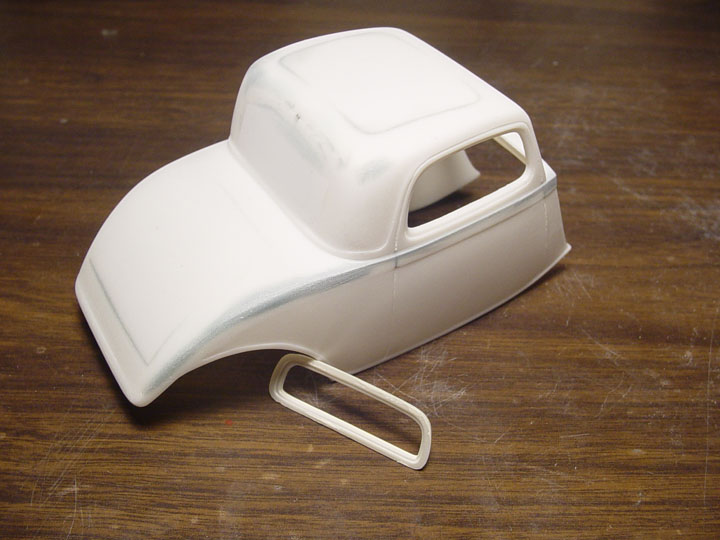 The window trim you see
is from an amt '34 Ford 5-window Coupe. This will be fitted into the roof.
The window trim you see
is from an amt '34 Ford 5-window Coupe. This will be fitted into the roof.
 The window trim needs to be raised another 2", so plastic square tube
was used.
The window trim needs to be raised another 2", so plastic square tube
was used.
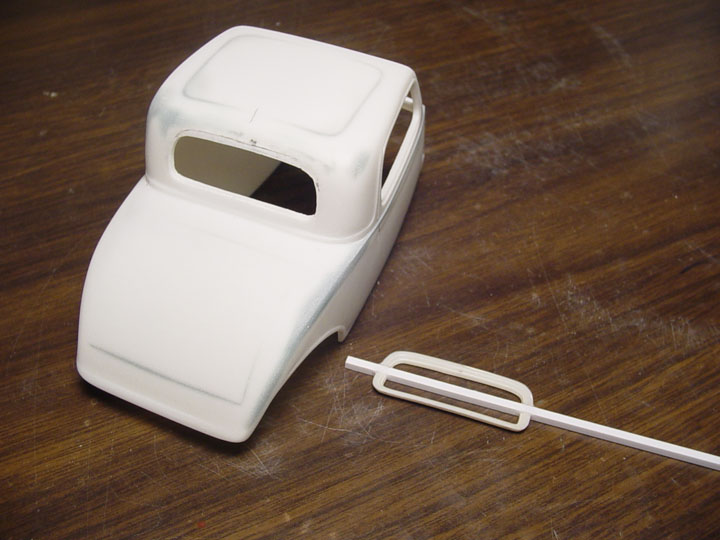
This will need a lot of attention !
Now I'm starting to get annoyed and am looking back at the other purple
'34............ what to do ?
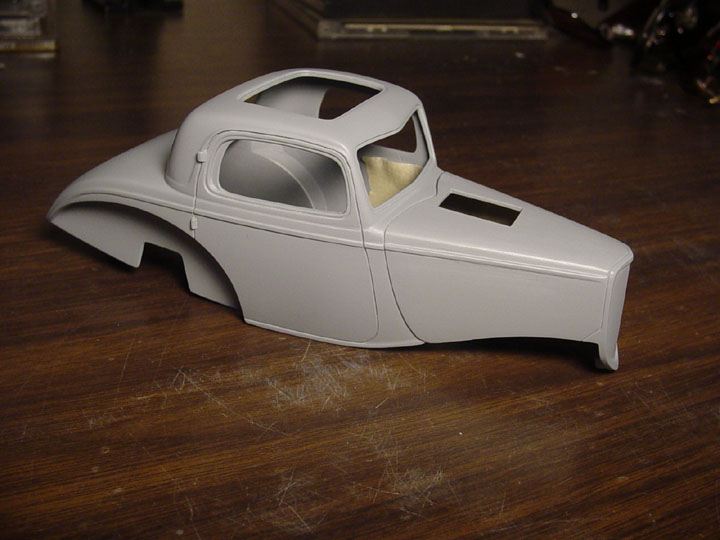
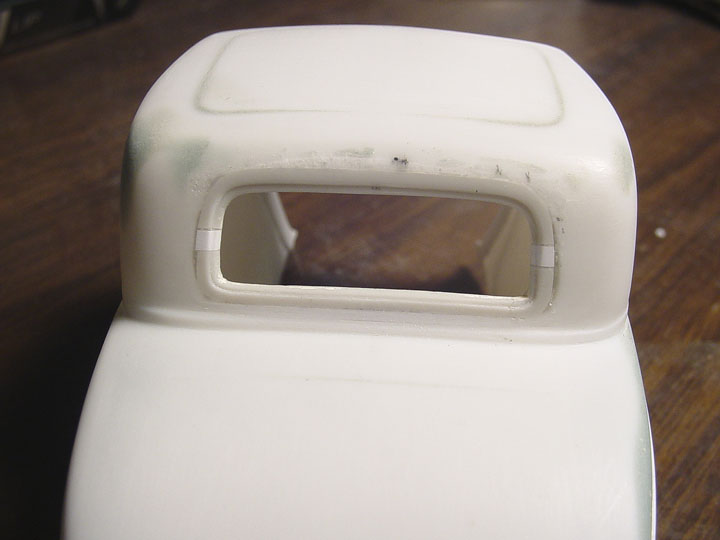 This new rear window trim will look more authentic than all the rest of
the '34 Ford models out there !
This new rear window trim will look more authentic than all the rest of
the '34 Ford models out there !
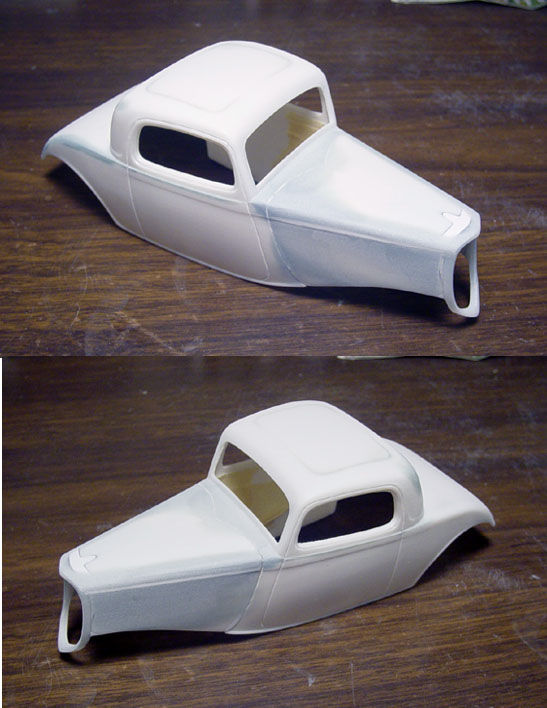
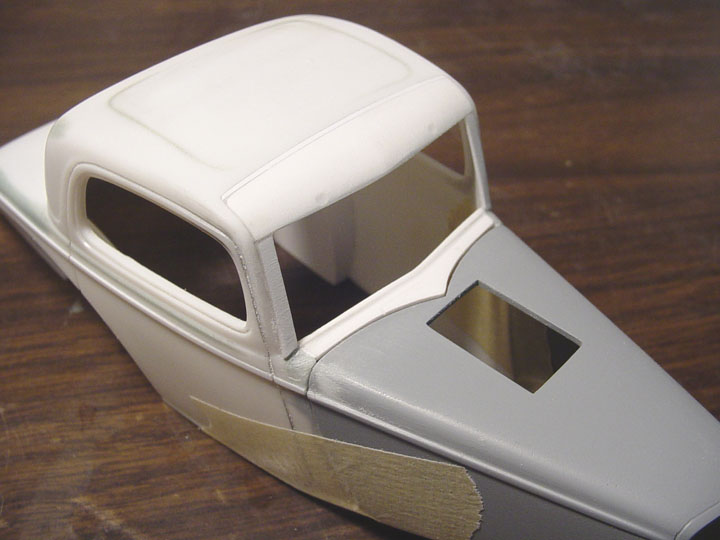
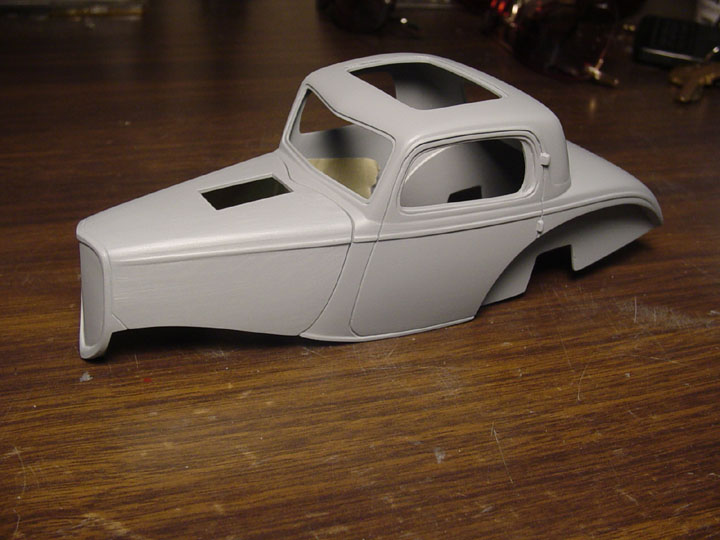
 Comparing this body to photos, the nose piece needs to be re-shaped.
 The lower half of the
hood needs to be re- sculpted....... more putty !
The lower half of the
hood needs to be re- sculpted....... more putty !
Again, I'm looking back at the purple '34 !
 8 coats of putty was applied to the hood, cowl and radiator shell, sanding
in between each coat.
8 coats of putty was applied to the hood, cowl and radiator shell, sanding
in between each coat.
6 scale inches were removed from the radiator shell.
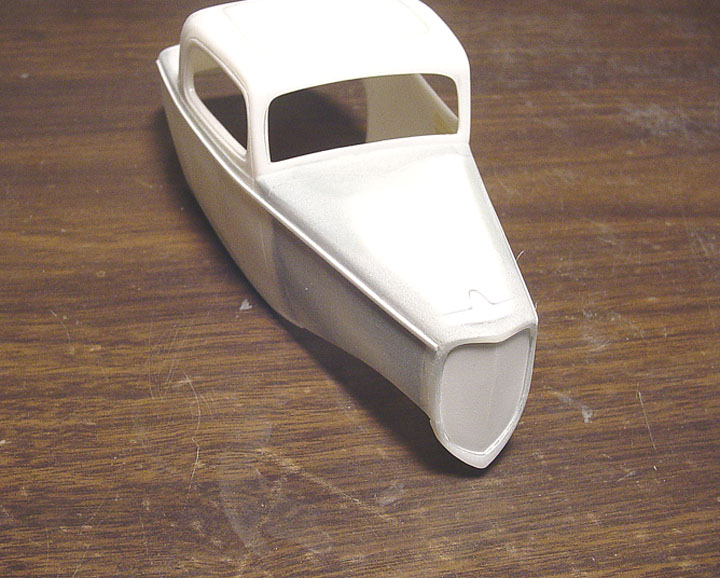 The Caricature Line or / Belt Line was then added with .020 X .040 plastic
strip and a grill filler was installed.
The Caricature Line or / Belt Line was then added with .020 X .040 plastic
strip and a grill filler was installed.
The Grill Filler was made from .010 plastic sheet and will need to be
cut out by the builder (leave a lip for gluing the clear grill).
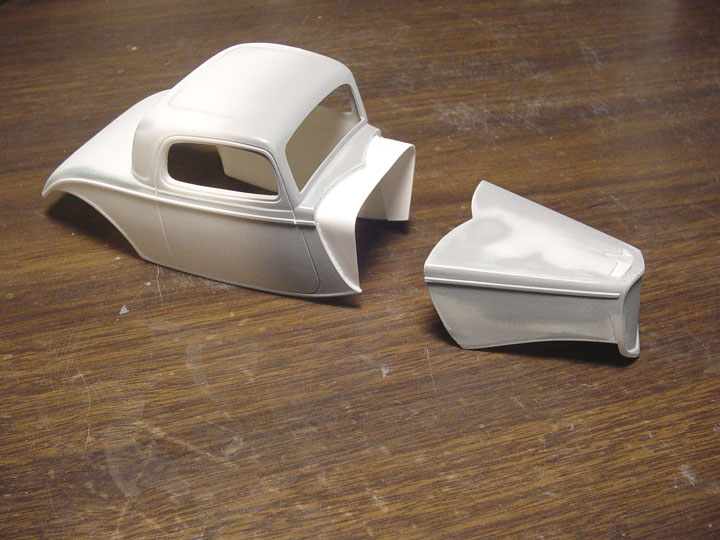 The Hood was removed from the body and plastic sheet was added to the inside
of the body for a hood support.
The Hood was removed from the body and plastic sheet was added to the inside
of the body for a hood support.
The radiator was re-cut and re-straitened.
The side of the grill was too curved, so it was cut and brought back to
being more straight.
 Wanting to add a correct "SCOOP" , I first needed to know the
size of the intake manifold and what small block Chevy Hilborn manifold
to use?
Wanting to add a correct "SCOOP" , I first needed to know the
size of the intake manifold and what small block Chevy Hilborn manifold
to use?
(another part that's missing from our hobby). I found an old Sprint
Car Manifold that could be modified. Studying photos I came up with a perfect
Hood Scoop.
 The Hood is finally finished with only some minor flaws to fix.
The Vintage Hilborn Manifold is for a small block 283 - 350 Chevy.
Unfortunately, I lost all my Small Block Chevy Manifold "In-Progress"
photos.
 Going back to the manifold,
16 set screws were added along with some mounting pins.
Going back to the manifold,
16 set screws were added along with some mounting pins.
 The Chevy Small Block Hilborn Injection Manifold Master is complete. This
part will be sold separately very soon.
The Chevy Small Block Hilborn Injection Manifold Master is complete. This
part will be sold separately very soon.
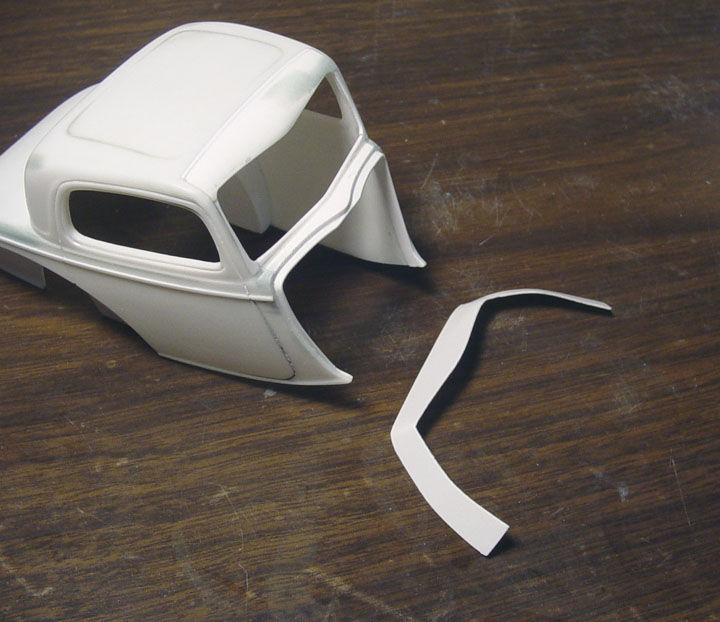
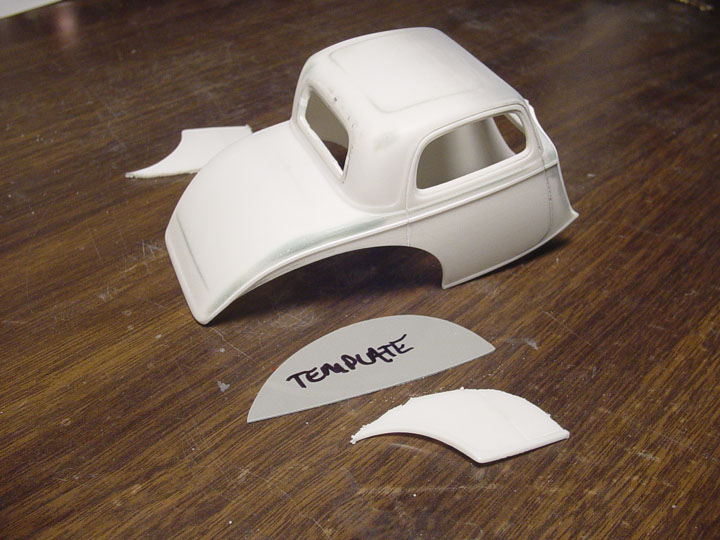 Directing attention back to the body, a template of the shape for the inverted
wheel well was made and used to cut out the original body panels.
Directing attention back to the body, a template of the shape for the inverted
wheel well was made and used to cut out the original body panels.
 Using the same template, new back panels were made with .040 sheet and .040
strip was used as the sides.
Using the same template, new back panels were made with .040 sheet and .040
strip was used as the sides.
These will need to be shaped to fit the inside of the body.
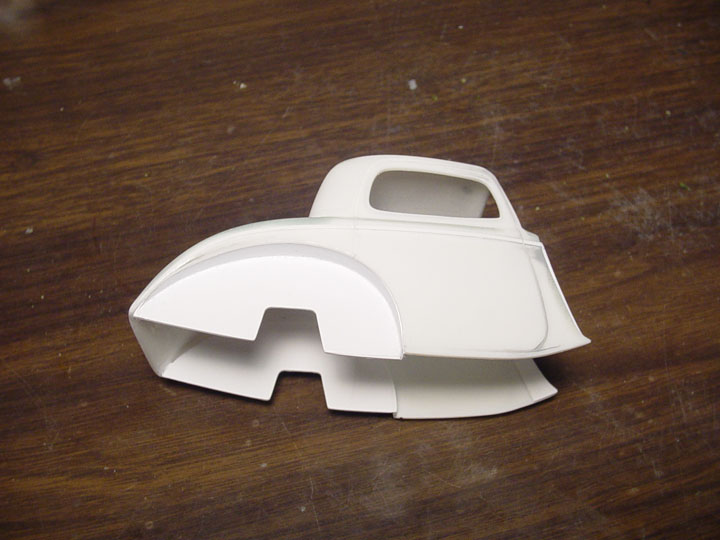 New wheel wells !
 The whole time I've been working on this build, I've been noticing the wind
shield.
The whole time I've been working on this build, I've been noticing the wind
shield.
It looks like it has a V- angle, and is more raked than a stock '34 Ford
Coupe........ (see photo).
 After reading a new article from Mike Sleeth & Mike Bridgeman's web site, the new owners that are restoring the Lil' Screamer.
www.lilscreamer2.com
It states
that the window and cowl was replaced with a '37 Ford.
What ? Really ? I wish I would have known that sooner, it would have been
my first alteration, so I could re-shape the '34 hood
to the '37 cowl, this
is really bad news as all the work to the original cowl was a waste of time..... AHHHHHH !
 The chrome wind shield ring was removed from the '37.
 The '37 Ford windshield is 6 inches wider than the '34, so rather than split
the window on each side to remove 3" per side,
The '37 Ford windshield is 6 inches wider than the '34, so rather than split
the window on each side to remove 3" per side,
its much easier to add
plastic to the sides and re-shape later.
 Getting ready for the new '37 Ford wind shield installation.
 Plastic strip was added to the sides of the windshield frame to correct
for the new raked angle.
Plastic strip was added to the sides of the windshield frame to correct
for the new raked angle.
The '37 Ford cowl needed to be re-shaped and the sides of the cowl were
re-puttied.
 Another new hood support had to be made......... This is the 2nd time !
 This is a very important process that was overlooked last time.
The hood, cowl and sides all had to be re-sanded to make it all even, so
the hood will lay down even all away around.
 A windshield support is being added......... this was no easy task !
But this way the builder can easily install clear blue tinted windows.
 Revell "MISS DEAL" Funny Car (Blue tinted glass) can be used in
case you don't have any
Revell "MISS DEAL" Funny Car (Blue tinted glass) can be used in
case you don't have any
"blue clear" plastic sheet around.
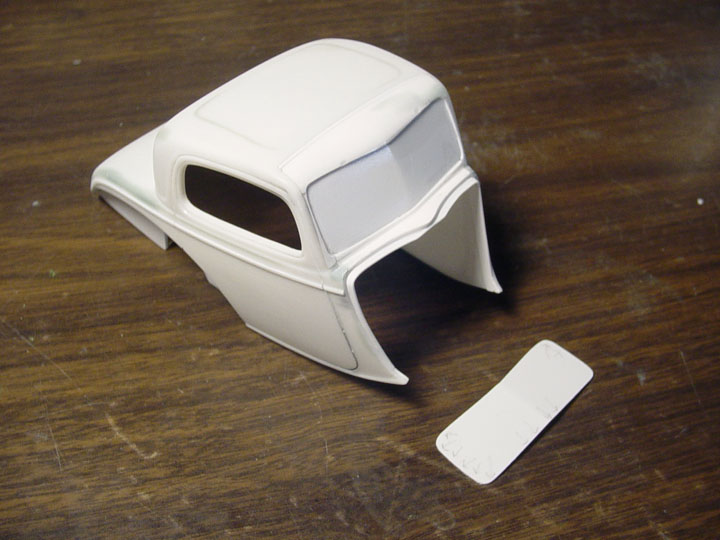
![]()
1. New Door
Hinges were installed.
2. New Drip Rails were installed.
3. New Side Window Arches were installed.
4. New Grill lines were scribed in.
5. Hole cut in roof and window support was added.
6. Body was cleaned up, and we have a new Master Model Body.
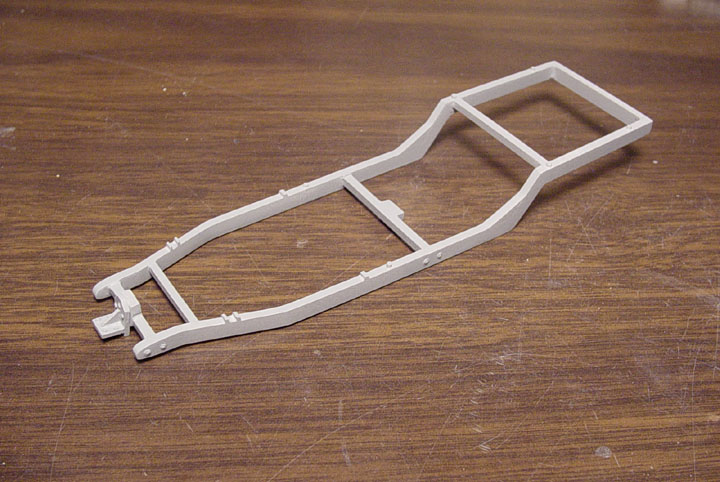
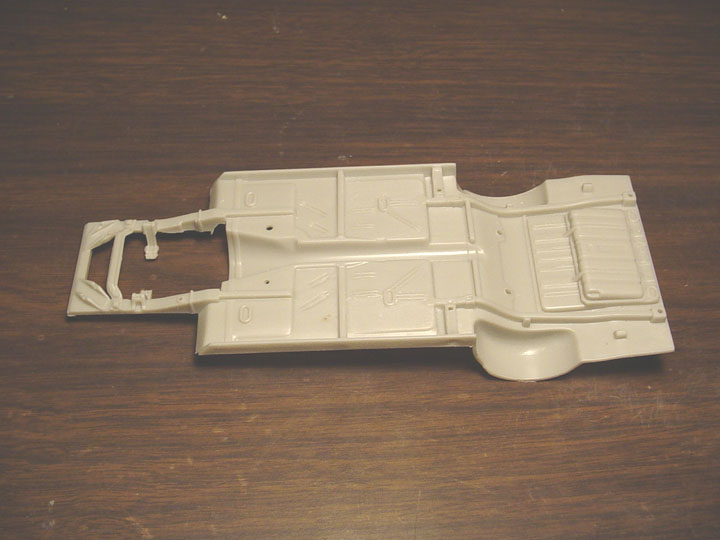
CHASSIS
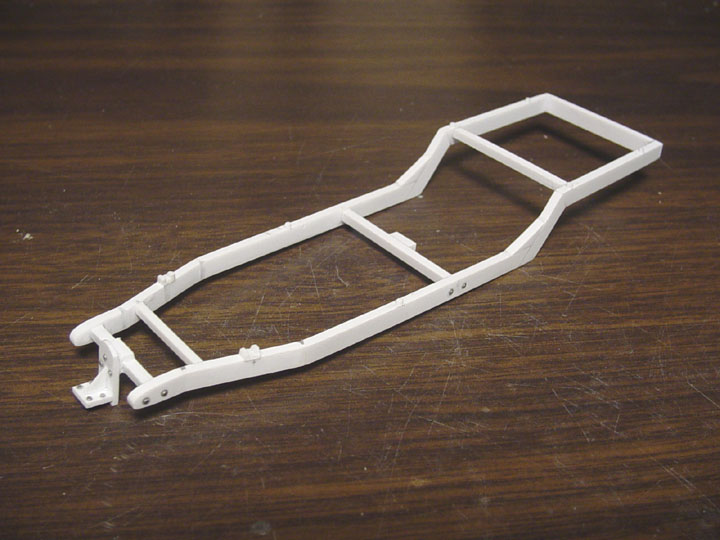 The
Chassis is 100% scratch build from plastic strip of various sizes.
The
Chassis is 100% scratch build from plastic strip of various sizes.
Mike Sleeth donated his time to give all us the measurements from the actual
1:1 Lil' Screamer chassis.
It doesn't get any more accurate than that !
Notice the shackle, nut & bolt details, motor & tranny mounts.
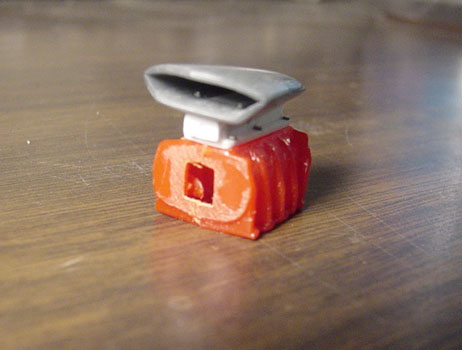
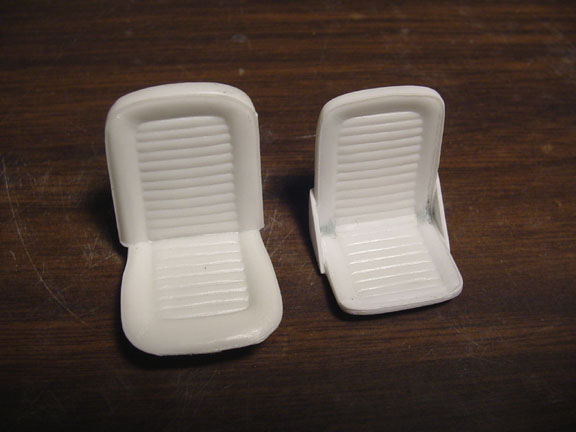 To create a new Racing Seat, we start with a Mustang seat.
1. The back, sides & bottom of the seat were thinned & re-shaped.
2. The front section of the seat was cut off and replaced with .040 plastic
strips to create 2 new "Tuck & Rolls.
3. The corners were filled with putty (to make a more rounded transition).
4. New "Seat Piping"was added all the way around the seat using
.010 round rod.
5. Finally, the seat side braces were added.
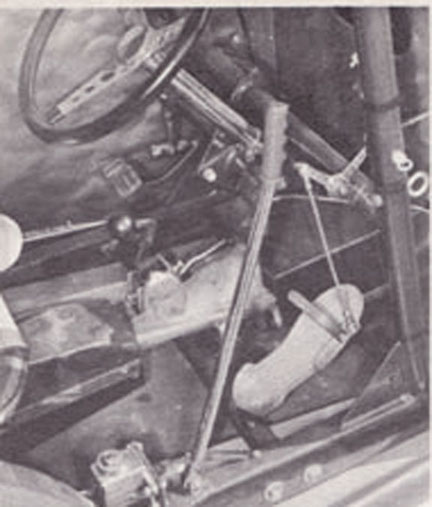 UPDATE: The Lil' Screamer
had a
belly pan floor made of sheet aluminum,
UPDATE: The Lil' Screamer
had a
belly pan floor made of sheet aluminum,
this can be made from sheet plastic or aluminum sheet from K&S.....
It will not be part of this kit.
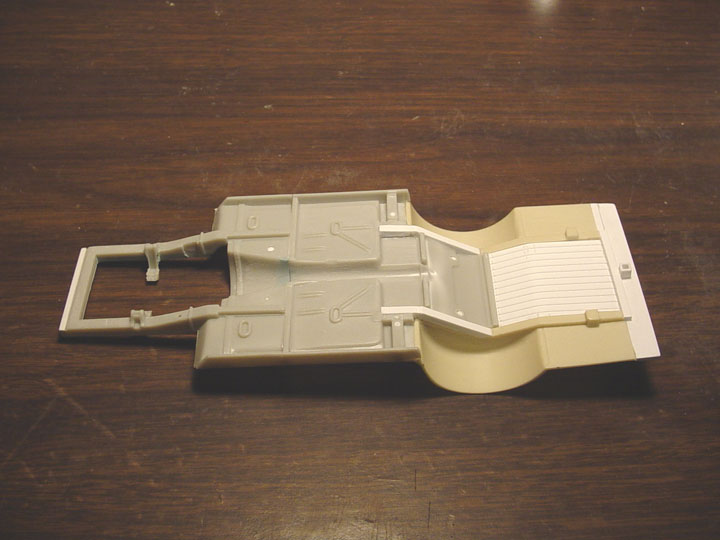
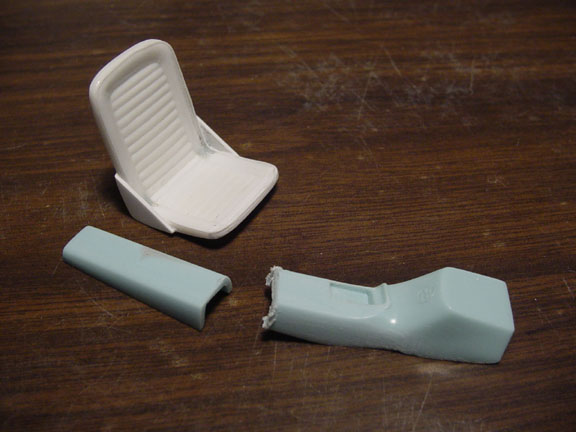 The "Drive Shaft Tunnel" was made from a '67 Mercury Comet Cyclone
tranny tunnel.
The "Drive Shaft Tunnel" was made from a '67 Mercury Comet Cyclone
tranny tunnel.
 The "Drive shaft Tunnel" will need to be mounted to the bottom
of the seat and glued
The "Drive shaft Tunnel" will need to be mounted to the bottom
of the seat and glued
to the frame and roll bar brace.
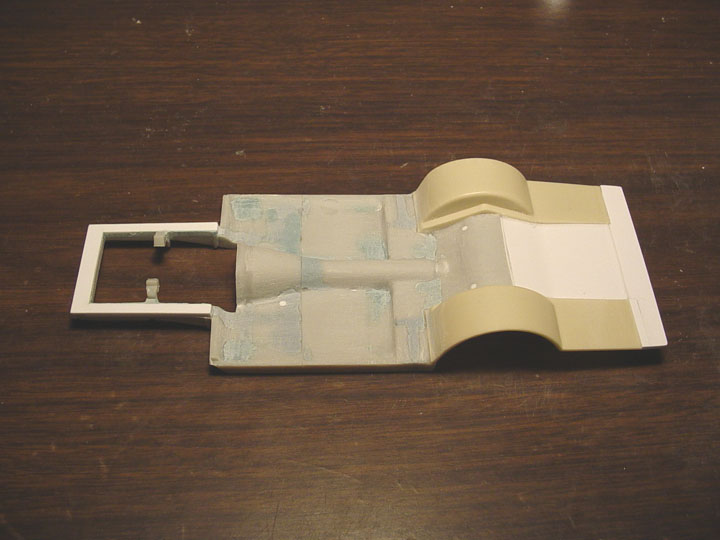
 UPDATE: The chassis has been revised
with a raised front shackle, to lower the car.
UPDATE: The chassis has been revised
with a raised front shackle, to lower the car.
This is the third revision to this chassis.......... 3 times the charm I
guess.
But, it is an exact match to the 1:1 car.
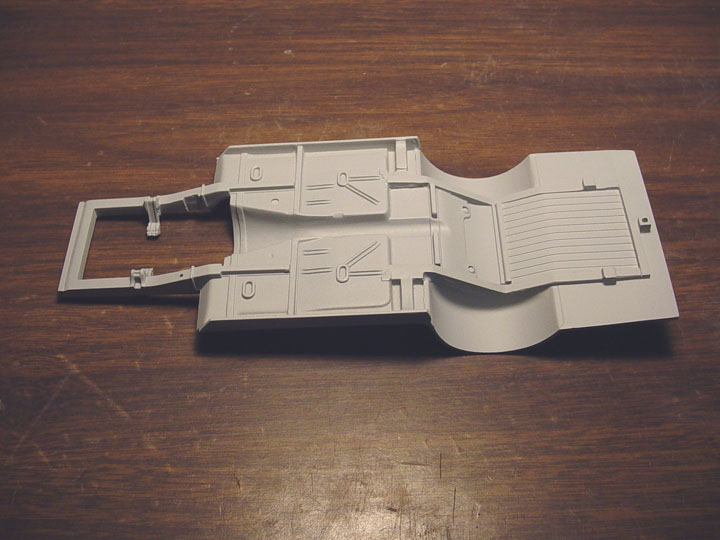
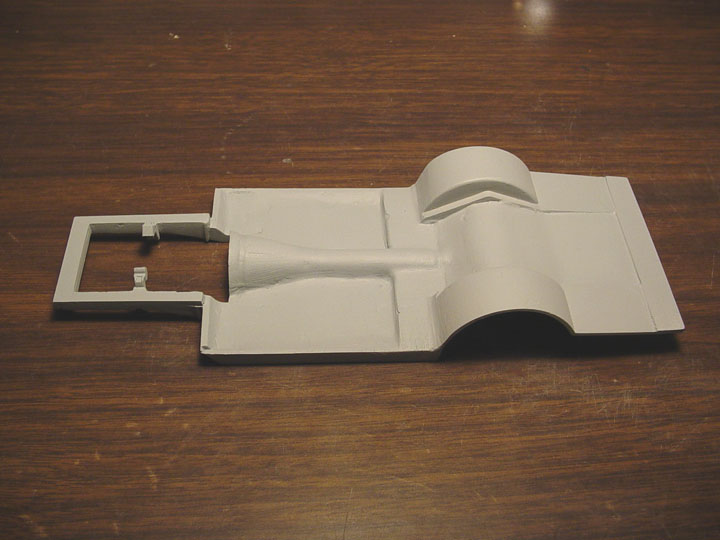
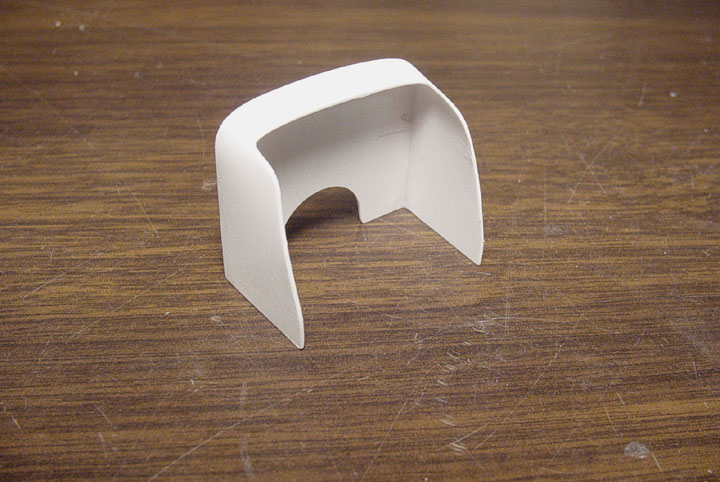 The firewall/ doghouse was made from all sheet plastic !
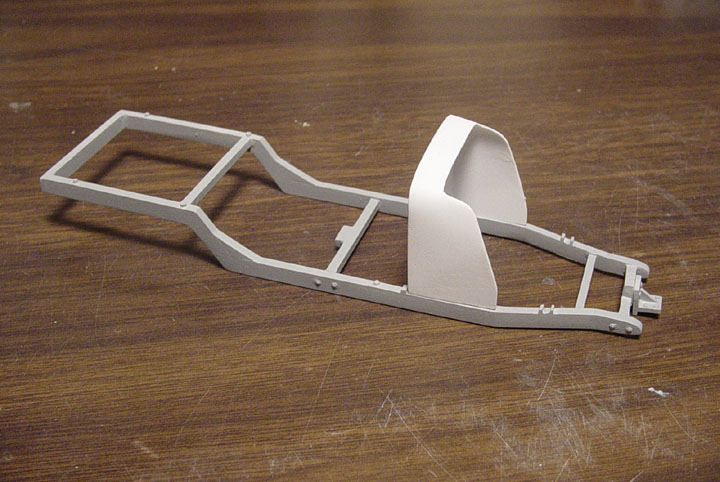 The motor mounts and tranny locations are finished.
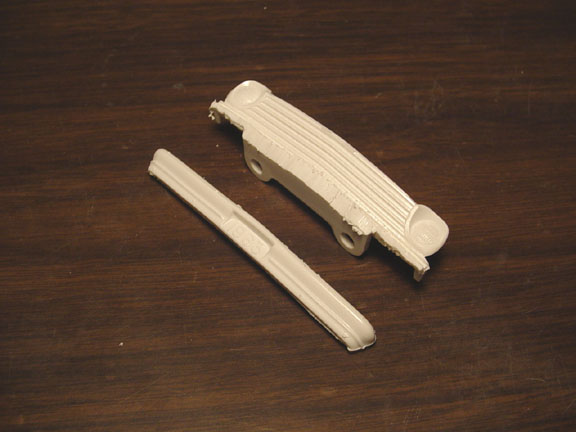
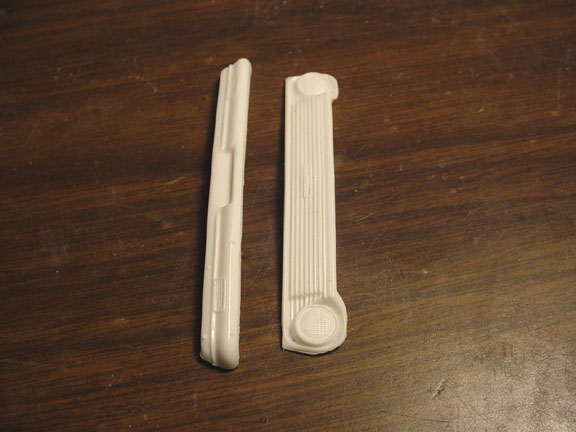
 This is how the Seat &
Drive Shaft Tunnel should look when assembling.
This is how the Seat &
Drive Shaft Tunnel should look when assembling.
Glue the back of the seat to a roll bar.
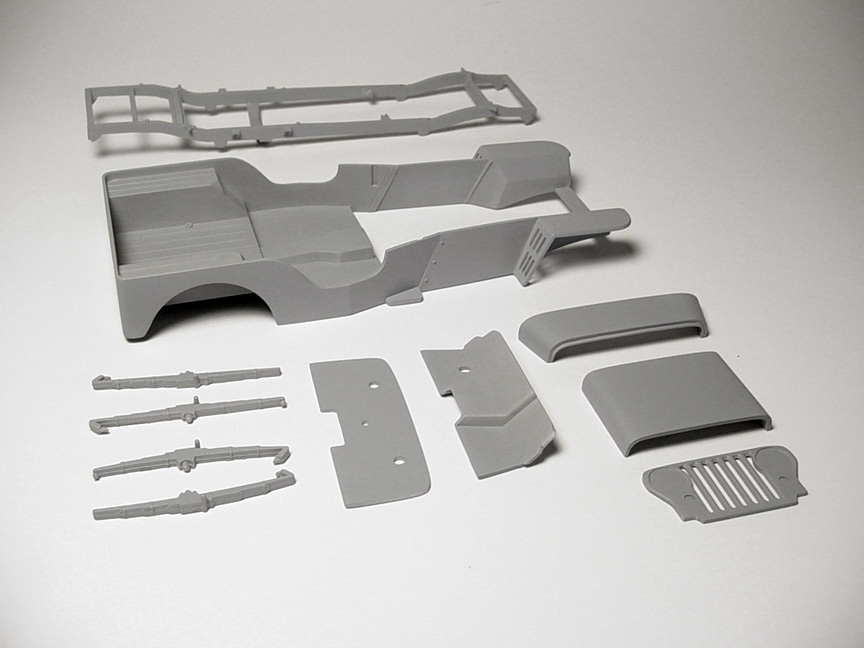
Master Model is finished !
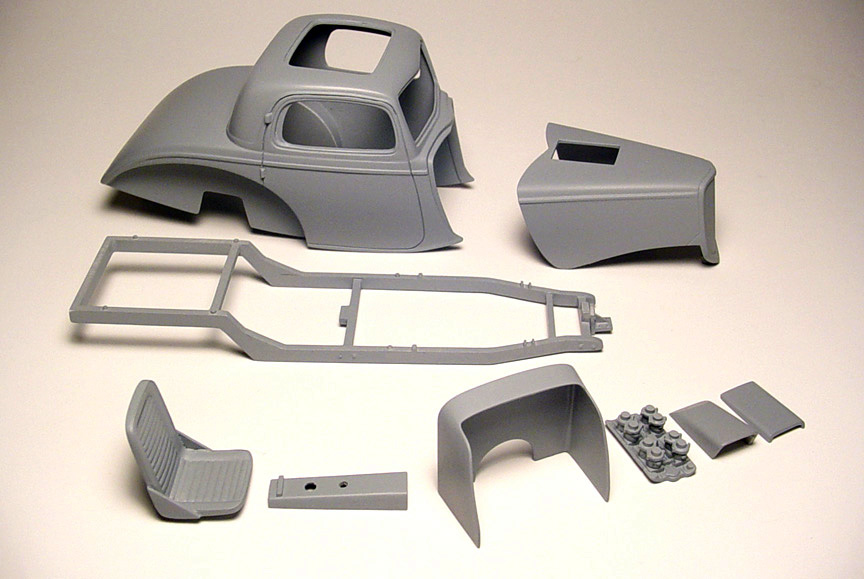
Shown are all the parts that will come with this resin starter kit.
Resin
kit will include: Correct Body, Hood, Frame (with Shackle, roll bar & motor mount locator
pins),
Seat, Drive Shaft Tunnel, Firewall/Doghouse, Hilborn Small Block Chevy Injection
Manifold and 2-piece Hood Scoop.
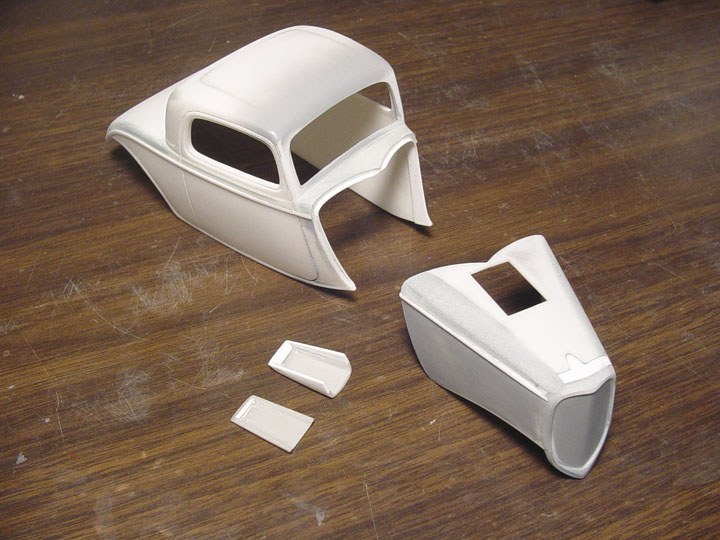
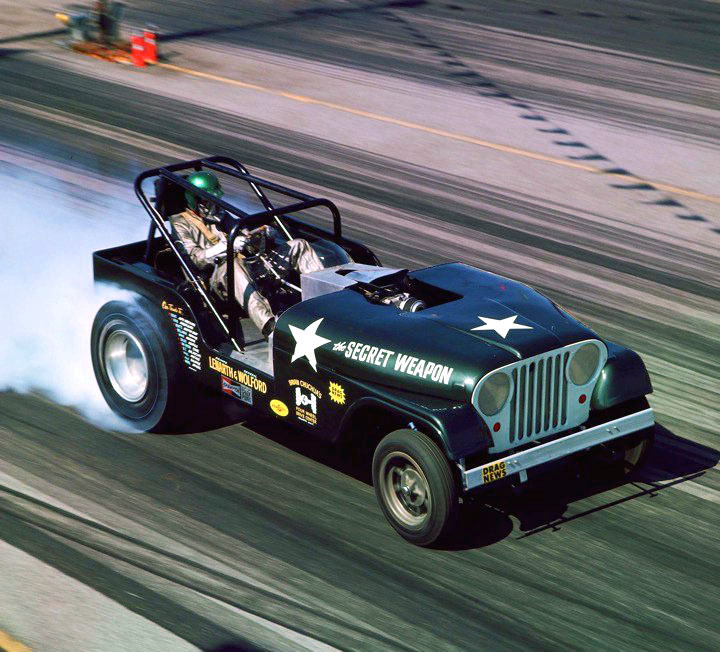
Ed Lenarth & Roger
Wolford's
"SECRET
WEAPON" ARMY JEEP

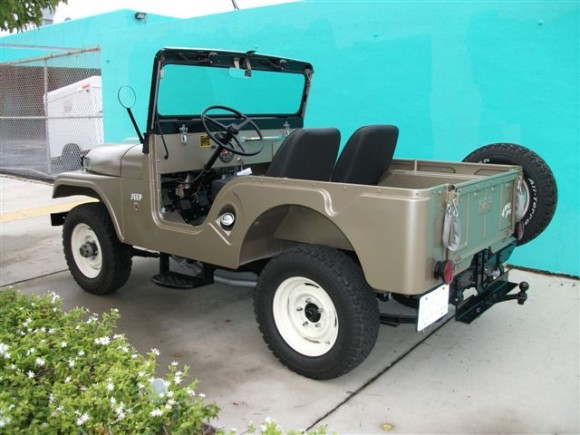
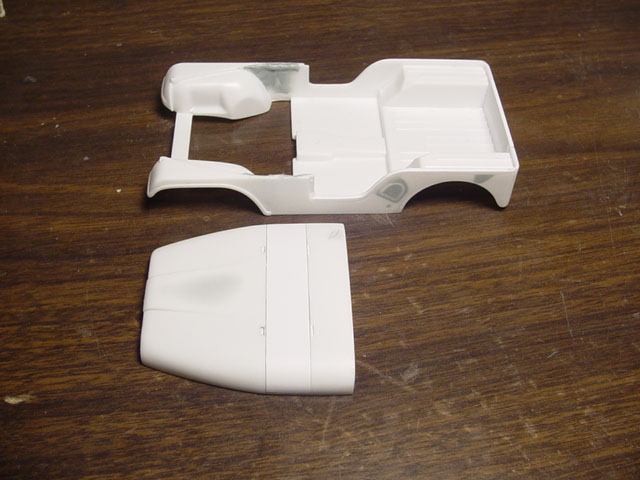
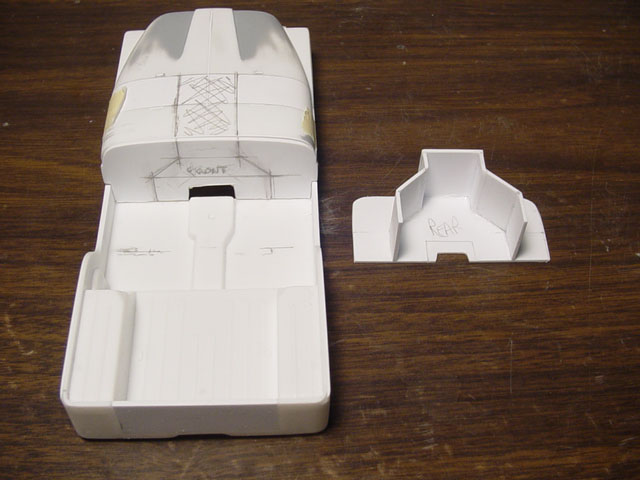
 Starting
this project with an amt/ertl Daisy Dukes CI Jeep.
Starting
this project with an amt/ertl Daisy Dukes CI Jeep.
Comparing it to the Secret Weapon Funny Car and some 1965 Stock Jeeps,
I
noticed the rear was too long and there wasn't enough room for decal lettering
on the side of the door area for the Secret Weapon Jeep,
So plastic strip
was ran up the front of the wheel well and the rear of the stock wheel well
was cut back to shape.
This set the wheels back another inch and a 1/2.
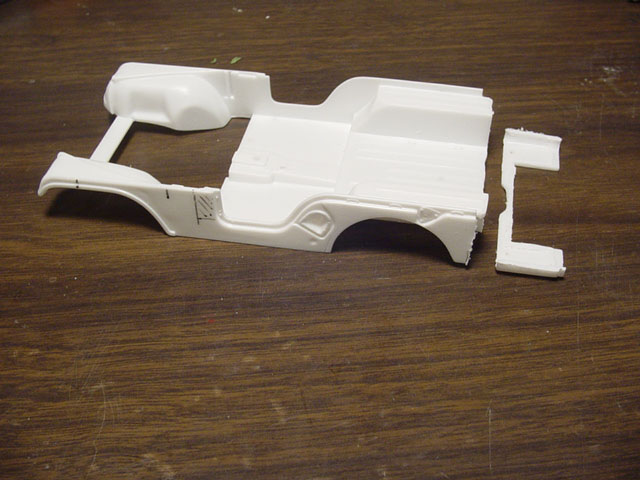
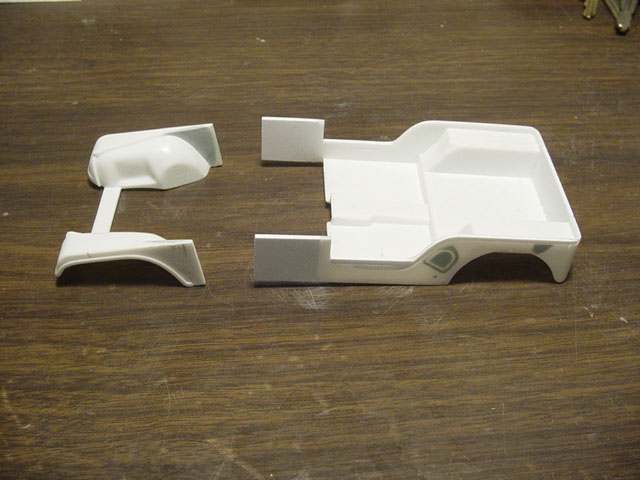
Also:
The trunk of the jeep was way too long, so 6 scale inches were cut and removed
from the rear.
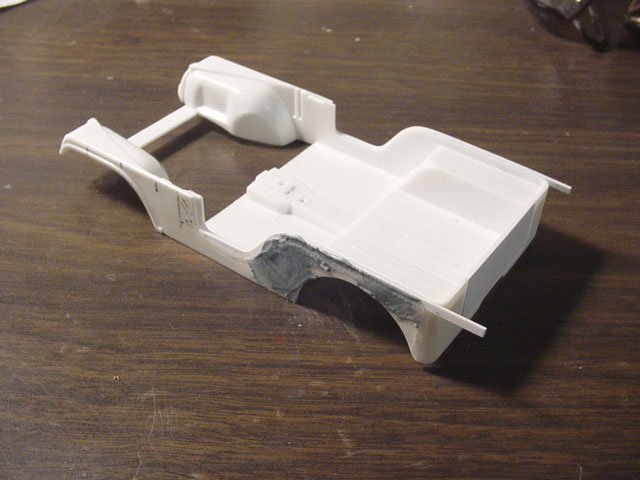 The recess' on the sides all needed to be filled in, along with adding sheet
plastic to the top edge of the body.
The recess' on the sides all needed to be filled in, along with adding sheet
plastic to the top edge of the body.
The tail gate was filled in using .080
plastic sheet.
 After reading an article
from Popular HOT RODDING Nov.1966,
After reading an article
from Popular HOT RODDING Nov.1966,
it makes mention of the original Wheelbase
measuring 102"........ I used these measurements for all the Wheel
Base alterations.
The original cowl being 12 scale inches, another 12" plastic sheet
was then added to the mid-section of the hood and the cowl,
to give it
the stretch it needed....... and putting it in the middle added strength,
so the hood
will retain its shape.
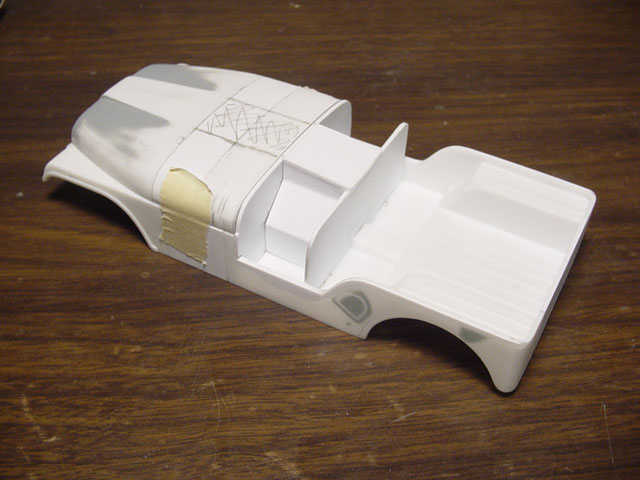
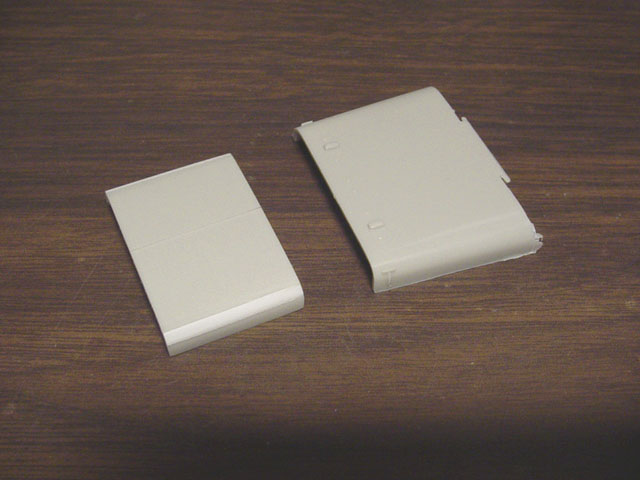
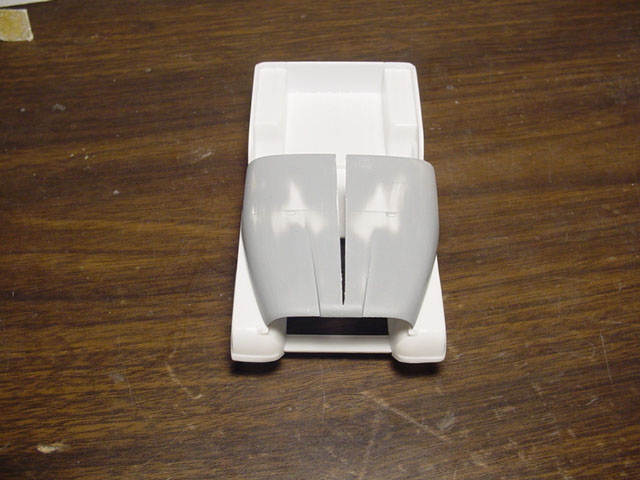 The original hood and cowl were too wide for the body at the rear,
so a pie shaped 4" cut was removed and the 2-pieces were re-glued
(although a filler strip was added to the center of the cuts).
All other holes were filled in and a plastic strip was added the the rear
of the hood.
 The hood is made up of 13 separate pieces, all reshaped and sanded smooth.
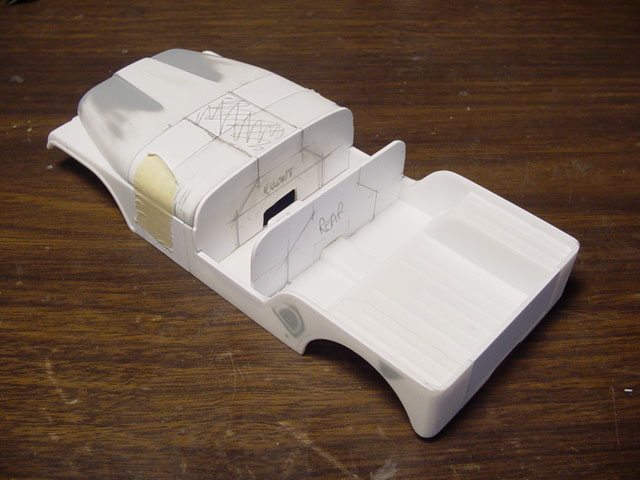
 The front of the door entry was cut up to the bottom of the floorboards,
this made sense, since the firewall would end at the front of the door.
The front of the door entry was cut up to the bottom of the floorboards,
this made sense, since the firewall would end at the front of the door.
After reviewing the wheelbase, it being 102", the body needed to
be stretched another 18"..... this was re-checked using tires and
mag wheels for accuracy.
The front of the fenders needed to be thicker, (as you could see a gap
between the hood and the fenders) so Evercoat putty was used.
The bottom of the doors were too short also (keeping in mind the Champion
sticker & Driver/Owner names needed to fit),
another scale 2"
were added using. 060 X .080 plastic strip.
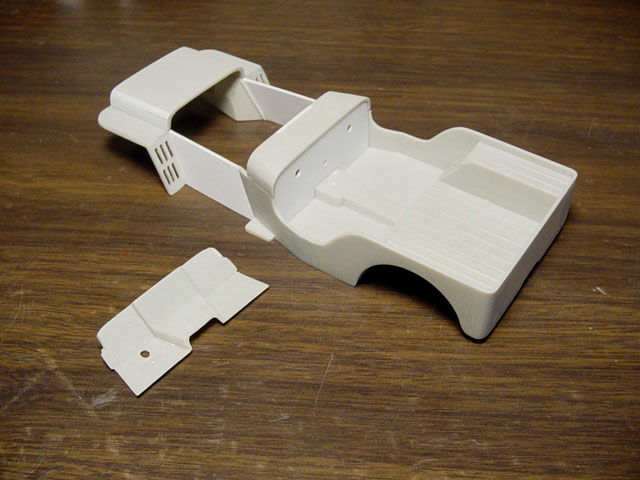
 A firewall was made from .060 plastruct sheet, a secondary firewall was
made for the basis of the rear section of the Dog House.
A firewall was made from .060 plastruct sheet, a secondary firewall was
made for the basis of the rear section of the Dog House.
 The sides of the Dog
House were made with .040 plastruct sheet.
The sides of the Dog
House were made with .040 plastruct sheet.
 The Dog House is now starting to take shape.
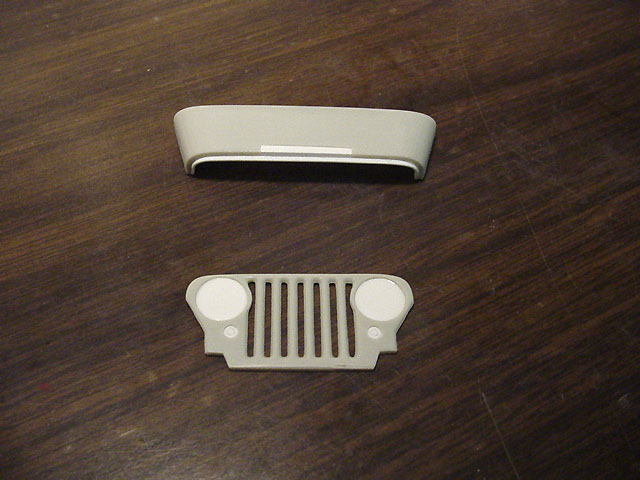
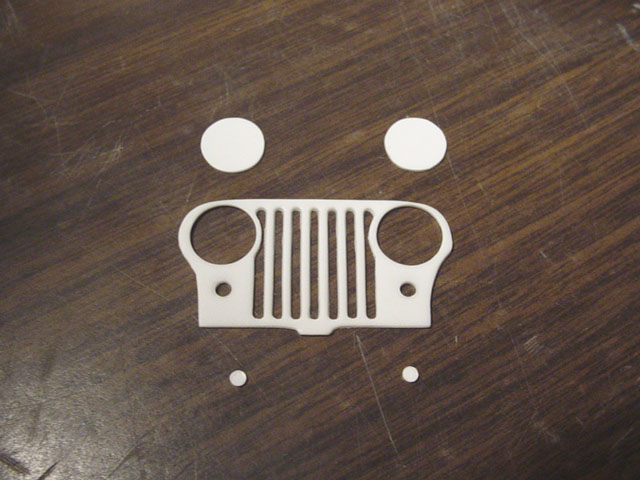 The head light buckets were drilled out and the original holes of the
signal lights were filled in with super glue as a quick filler.
The head light buckets were drilled out and the original holes of the
signal lights were filled in with super glue as a quick filler.
Now, for some reason, the original grill was flat in the front and rounded
in the back (a factory flaw).
The grill was reversed, so the the rounded edges now facing front.
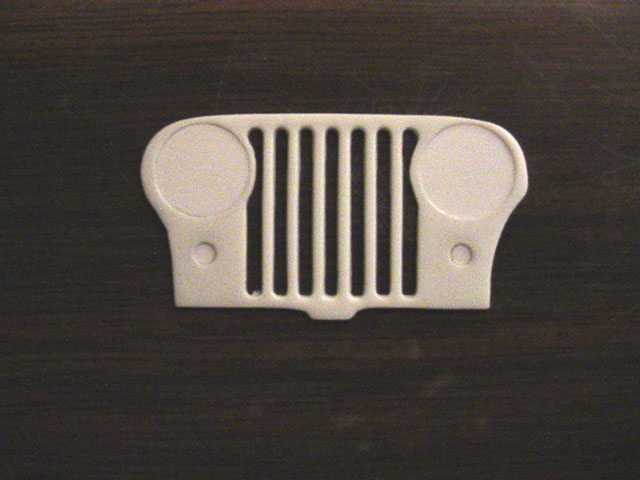 An all new grill with blocked-out head lights and marker lights.
CHASSIS
 The original
chassis was cut in two, so we can add the 18" stretch to match the
body.
The original
chassis was cut in two, so we can add the 18" stretch to match the
body.
This will be done using 2- pieces of .060 plastruct
strip,
super gluing them together to get the thickness of the original
frame rails and then adding 18 scale inches to both sides.
 Here's the chassis and body after all the clean
up.
Here's the chassis and body after all the clean
up.
 I wanted to add motor mounts and tranny mounts on the new frame to fit the
Miss Deal 392 Hemi,
I wanted to add motor mounts and tranny mounts on the new frame to fit the
Miss Deal 392 Hemi,
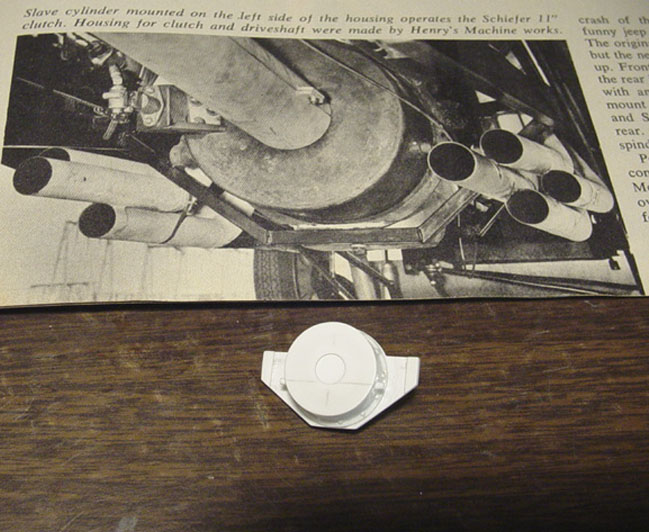
but after searching for a good "DIRECT DRIVE HOUSING"..........
I couldn't come up with a correct one, in any model kit.
So it was decided to build a new correct one based
on a "HENRY'S DIRECT DRIVE BELL HOUSING".
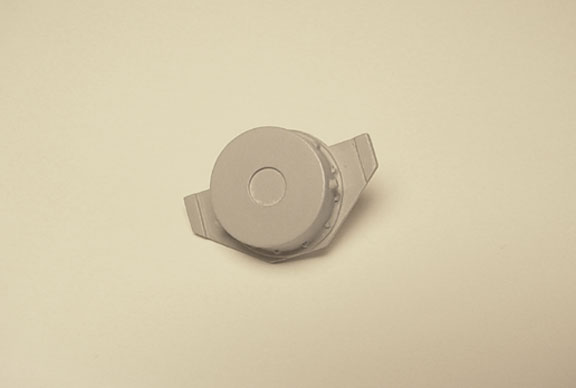
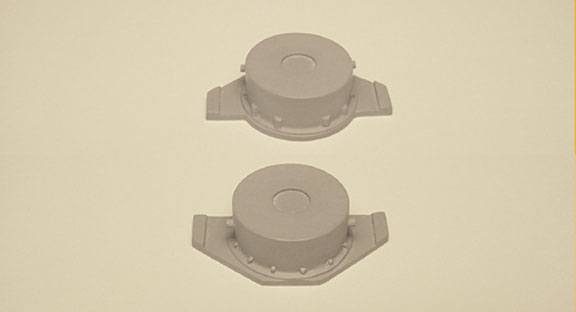 This
is another part that is missing from our hobby!
This
is another part that is missing from our hobby!
We will be adding it to the production line as a single part very soon.
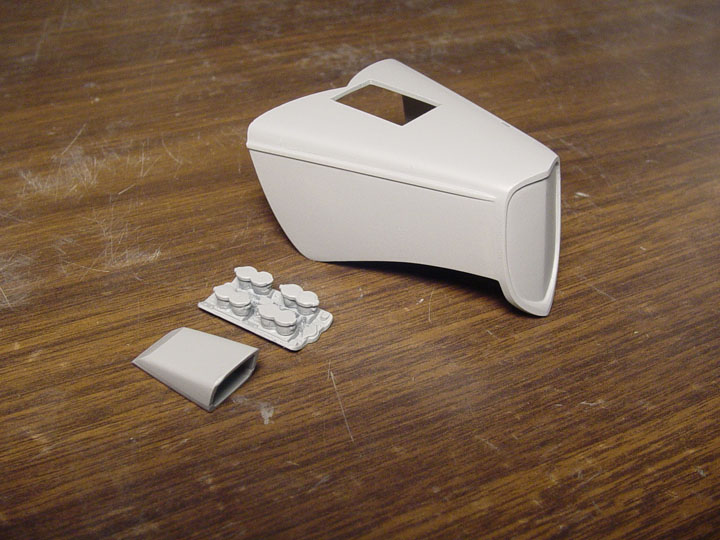
SCOTT "Super Scoop" INJECTION
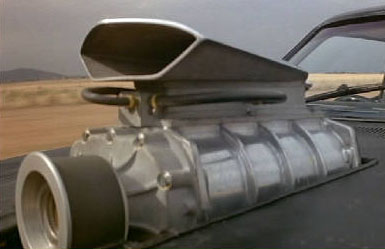
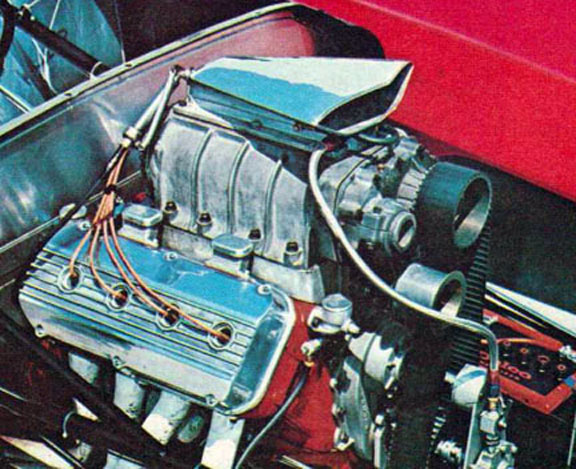
The Secret
Weapon Jeep uses a "SCOTT INJECTOR"
This new piece will be made and sold separately.

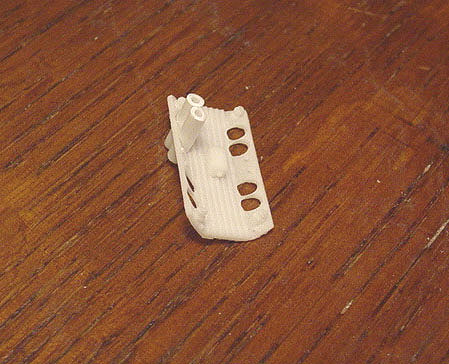
 Starting with a Scoop
from the Revell Tony Nancy 22 jr. kit, it was completely re-shaped.
Starting with a Scoop
from the Revell Tony Nancy 22 jr. kit, it was completely re-shaped.
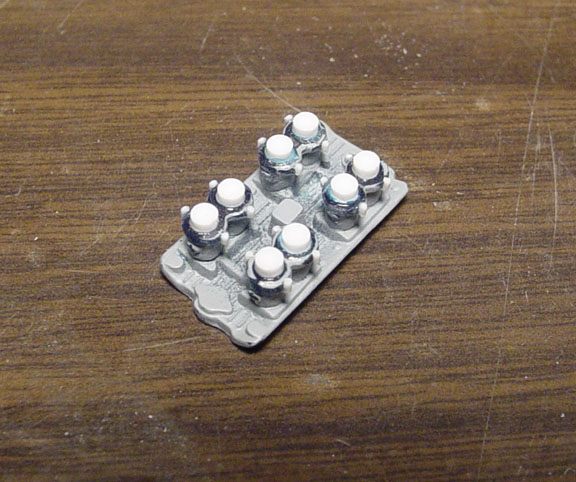
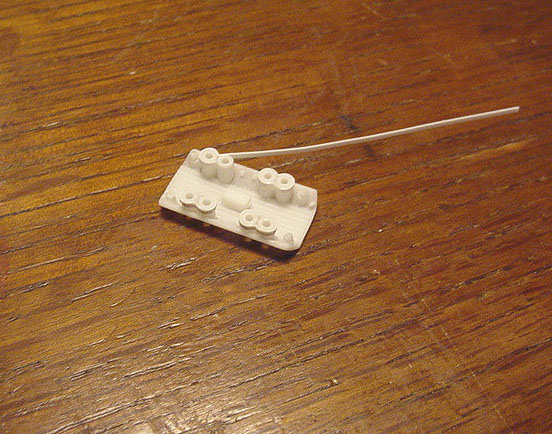
The Injector unit was
created with plastic square tube and toped off with actual nuts & bolts
for realism !
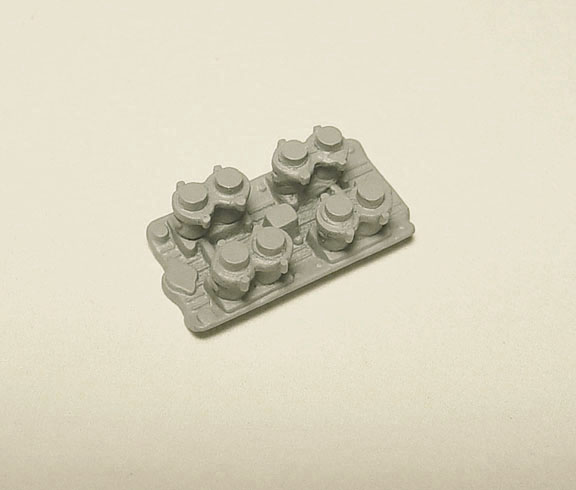
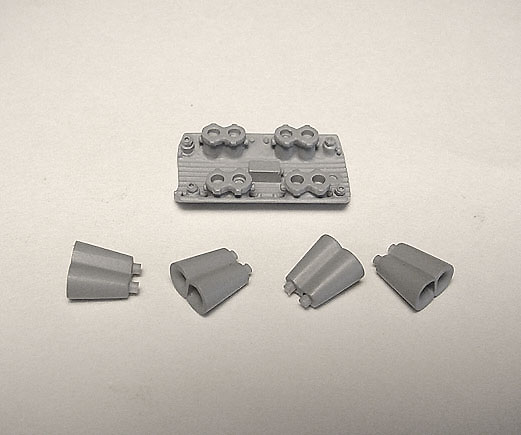
 Here's
all the parts for the "SCOTT INJECTOR" and will come with this
model.
Here's
all the parts for the "SCOTT INJECTOR" and will come with this
model.
It will
also be sold as a separate piece on the web site !
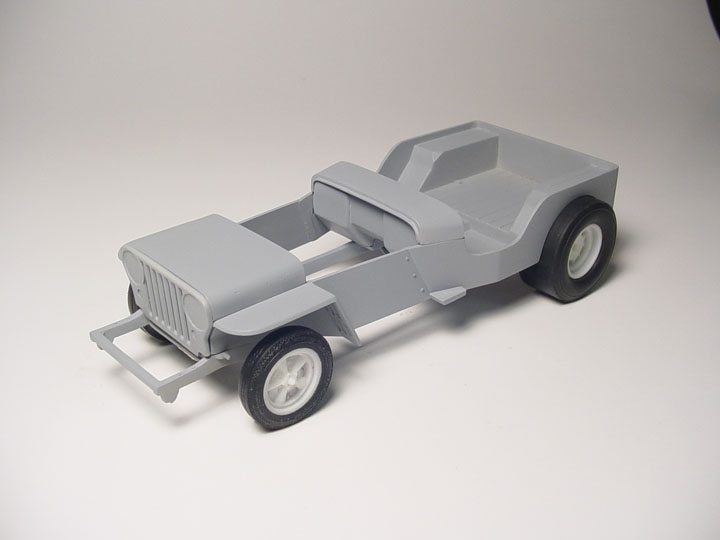
The Master Model is finished!

Model
is now Available !
#SC-
61
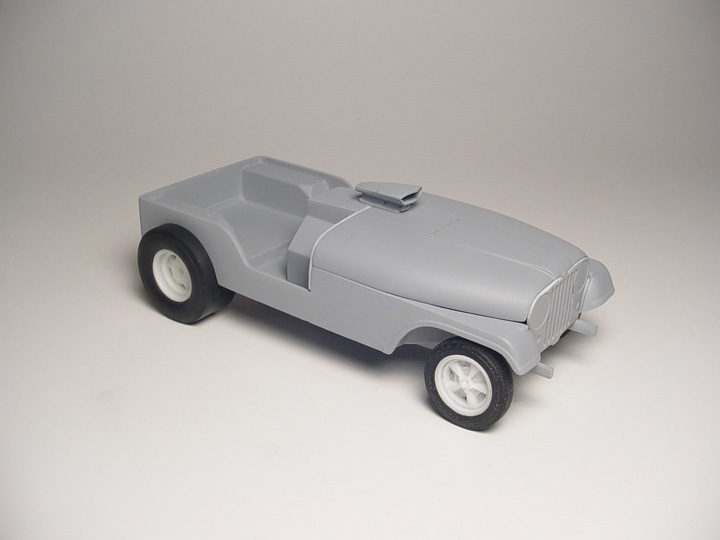
Gene Conway's
C&O "DESTROYER" NAVY JEEP F/C
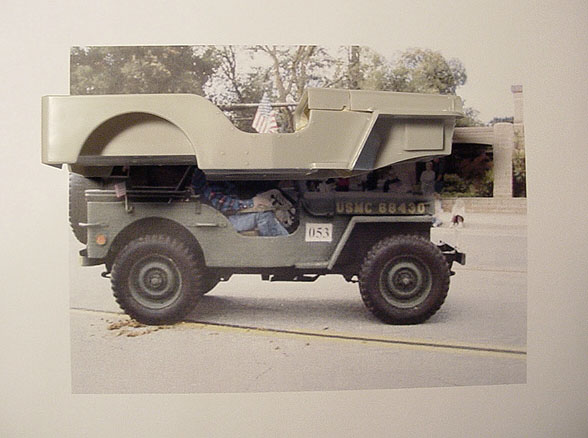 We're starting out with
an amt/ertl Hogan's Heroes World War II Jeep.
We're starting out with
an amt/ertl Hogan's Heroes World War II Jeep.
After doing research for Jeeps on the internet, it was determined that this
Hogan's Heroes Jeep was based on a Willys M38
*The M stands for Military*
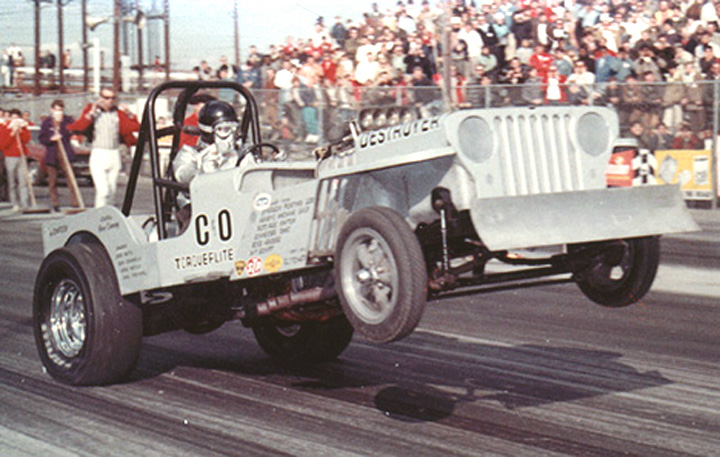
It's obvious that the rear of the bed and 1/4 panels were too long even
for the stock Jeep...... (see photo).
 4 scale inches were removed
from the rear.
4 scale inches were removed
from the rear.
 Now the stock Jeep body looks correct compared to the original body and
the full size Jeep !
Now the stock Jeep body looks correct compared to the original body and
the full size Jeep !
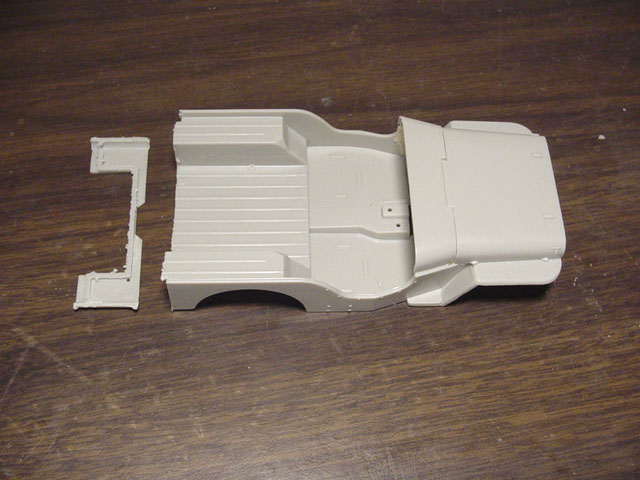
 The front clip was removed from the body, the "Speed Holes" on
the fenders were carefully measured and rounded out with a round jewelers
file.
The front clip was removed from the body, the "Speed Holes" on
the fenders were carefully measured and rounded out with a round jewelers
file.
All seat mounts and injector marks were removed from interior floor,
as well as filling in the gun mounts on the side.
 The cowl was filled in with plastic and then a drip rail was added to the
front of the cowl.
The cowl was filled in with plastic and then a drip rail was added to the
front of the cowl.
The headlight holes were filled in with .010 plastic sheet.
the marker lights were ground down, holes were drilled and the plastic sheet
was counter sunk to match the headlights.
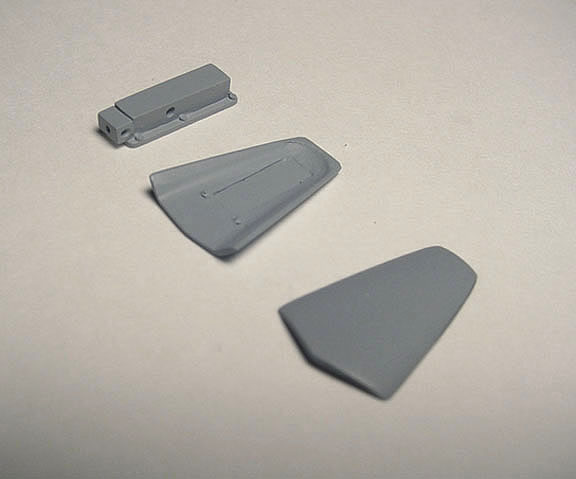
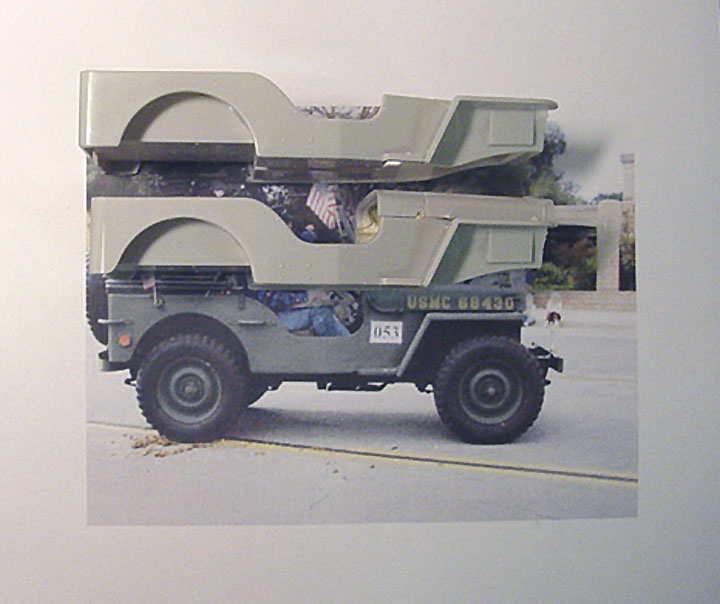
 To make the Destroyer hood, it needed to be shorter, narrower and also had
to be straitened, as the stock Jeep hood has a raked shape.
To make the Destroyer hood, it needed to be shorter, narrower and also had
to be straitened, as the stock Jeep hood has a raked shape.
The Destroyer
Jeep Funny Car hood is completely square.
So, the hood was cut in half and 3 1/2 scale inches were removed from the
front and 8" were taken from the rear of the hood.
Plastic strip was added to the sides of the hood, to match the contour shape
of the grill.
The hood is supposed to go over the grill, but because of the thickness,
it looks way out of scale.
You can use this hood as a template if you want to add real aluminum sheet,
it could then hang over the grill.
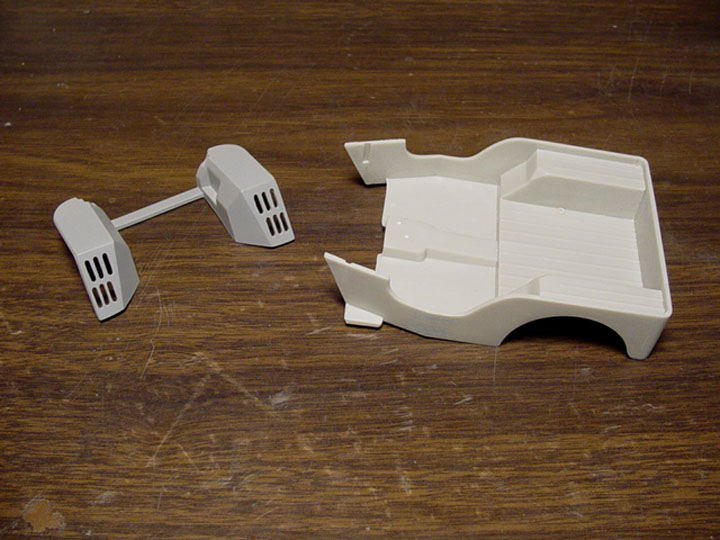
 All pedals and wires were removed from both sides of the Firewall and a
secondary Firewall was made from
All pedals and wires were removed from both sides of the Firewall and a
secondary Firewall was made from
0.40 plastic sheet, with all roll bar holes
& steering wheel hole in the correct displacement.
The article states the
car was stretched 30", so 30" body panels were added using .040
plastic sheet.
Which would give the body a 104" wheelbase.
The article also states that the wheelbase is 110", so there is a discrepancy about the measurements here.
If the wheelbase is 110", the body would need to be stretched by 36".

After reveiwing this photo,
it doesn't look like they altered the fenders and compared to the master 1/25 scale body I'm working with,
I'm going with the 30" stretch as it looks to be more accurate.
 The grill didn't fit properly, so 7 new pieces of plastic strip were added
to The front of the grill around the fenders.
The grill didn't fit properly, so 7 new pieces of plastic strip were added
to The front of the grill around the fenders.
The battery recess was also filled in with plastic sheet.
CHASSIS
 The original Jeep frame was stretched 30" to match the body.
The back bumper supports were removed, along with the original motor mounts.
Using a Revell 392 Miss Deal Hemi, it was determined where the motor mounts
and transmission bracket needed to be relocated.
The back of the frame rails needed to be raised, by using plastic strips
to fill the gaps, and the spring brackets
were cut off and re-set back to
the raised frame rails. The ends of the frame rails were all boxed in using
plastic strip.
 You can see here how nice the new frame fits.
We will also be adding the springs from the Hogan's Heroes Jeep, so no donor
kit will be needed !
Just add your own rear end and front dropped axle.
 After all the major body work, we went back to put in bolt heads on the
fabricated panels.... a nice extra detail !
After all the major body work, we went back to put in bolt heads on the
fabricated panels.... a nice extra detail !
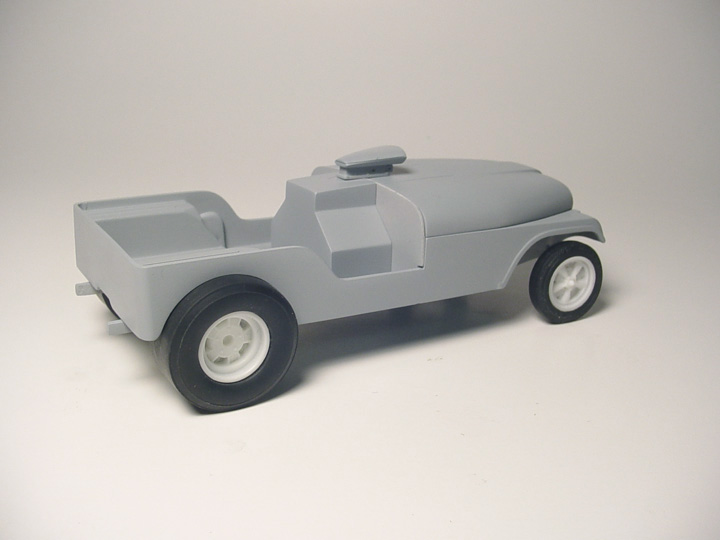
THE MASTER IS FINISHED

Model
is now Available !
#SC-
60
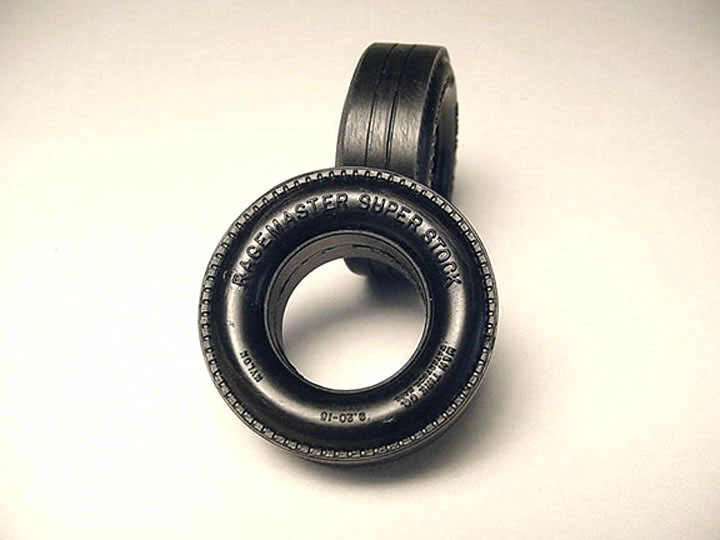
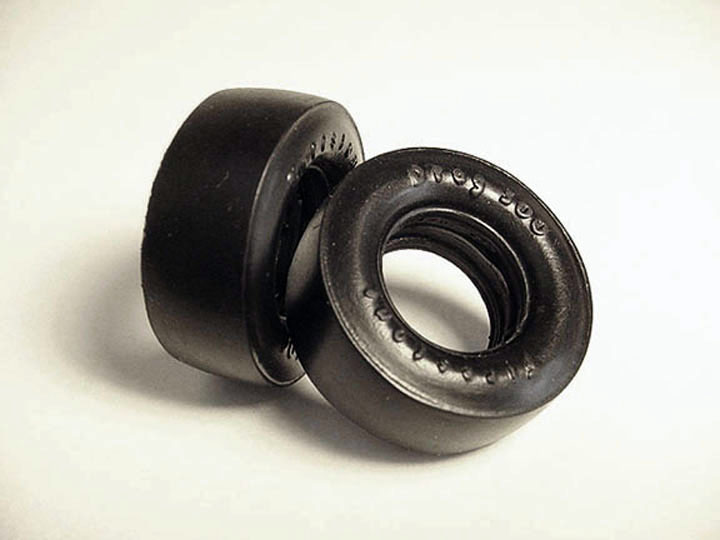
7"
CHEATER SLICKS
(
M&H Racemaster Super Stock )
&
9"
CHEATER SLICKS
( M&H
Racemaster Super Stock )
No aftermarket or model company has ever made a correct 7" or 9" Cheater Slick....... until now !
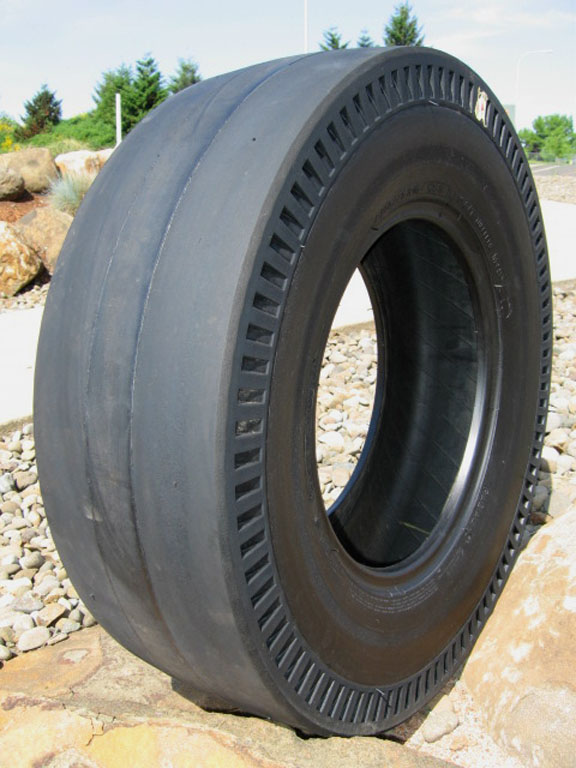
Starting
with an old Racemaster Super Stock 9" plastic drag slicks from an unknown
kit ?
The reason was clear, it not only has the correct 9" width, but is
very rare and would make a great contender for a
new cheater slick, and its not quite a Pie Crust type slick, but it does
have nice side wall line detail !
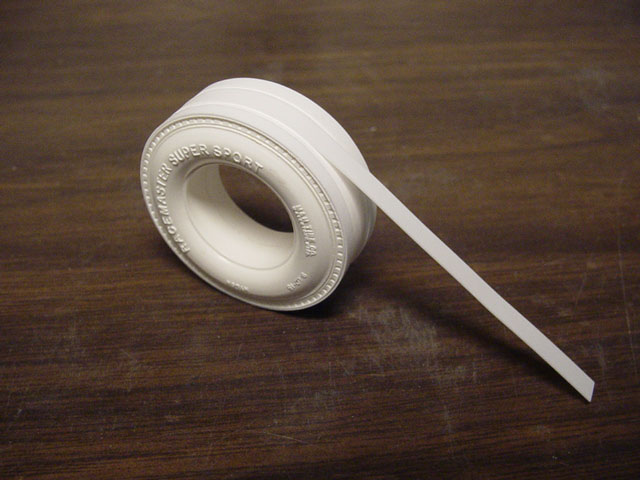
The surface was sanded down smooth & Straight, and to retain a 30"
diameter after we add 0.10 thick plastic strip.
Two .010 X .125 Evergreen plastic strips were added to each side, carefully
glued on with plastic cement.
A center strip of 0.80 Evergreen strip was added to the center, creating
2 small empty lines...... the new Cheater lines.
 To create the 7" Cheater Slick, we used the other pair of slicks and
cut it down the middle, removing 2 scale inches from the center,
To create the 7" Cheater Slick, we used the other pair of slicks and
cut it down the middle, removing 2 scale inches from the center,
after carefully
measuring around all the surface, the 2 - pieces were glued together.
.010 X .080 was used for each side, then a piece of .010 X .100 was used
in the center, creating new empty Cheater lines.
Each
Cheater line was re-scribed to perfection.
A
special thanks to Dennis Havlicek for his extensive research on NHRA approved
Cheater Slicks !
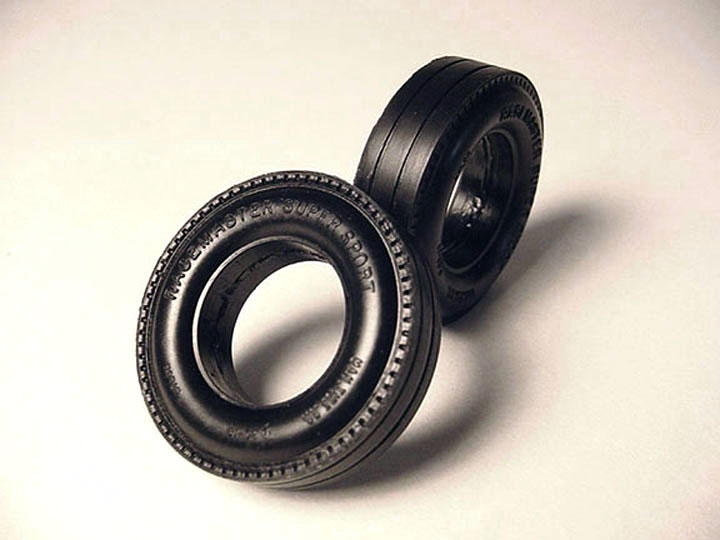 7" Cheaters
 9" Cheaters
M/T BIG BLOCK CHEVY VALVE COVERS
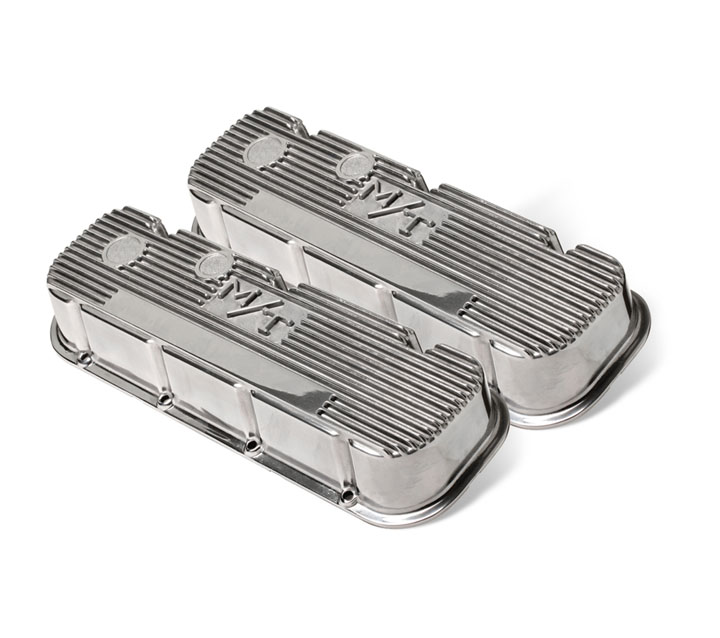
"Dirty Don" from reliable resin has copied these M/T BBC Valve Covers that I created here,
and is now selling them on his Facebook page.
"Don't Support Resin Piracy"
Be an educated buyer.... Please read !
Click logo
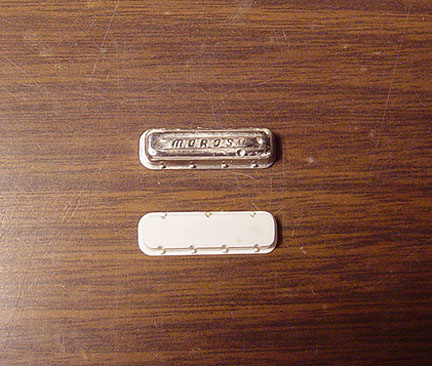 Starting with
an old MOROSO CHEVY big block valve cover ( from an unknown kit ? )
Starting with
an old MOROSO CHEVY big block valve cover ( from an unknown kit ? )
it had the correct size and bolt pattern. The top of this valve cover was
sanded flat with a slight angle.
 This valve cover (on top) was considered a BBC, (some resin company's are
selling this valve cover as a Big Block,
This valve cover (on top) was considered a BBC, (some resin company's are
selling this valve cover as a Big Block,
but its way too narrow, too short,
too thin and lacks major details !
The M/T scripts
were cut out from it, and are going to be added to our new BBC VALVE COVER
MASTER.
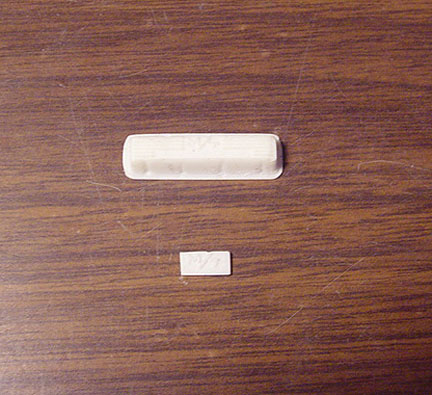
 Now comes the hard part
!
Now comes the hard part
!
After sanding down the M/T logo to fit flush, I wanted to use 0.10 X 0.10
plastic strip for the cooling fins,
but neither Plastruct or Evergreen made a strip that small, so I had to use .010 X .040, the. 010 side was glued to the Valve Cover to create
the fins.
These fins will be sanded down to be .010 tall.
A piece of .010X. 040 was applied on its side to be used for the center
flat spot.

The
master is finished !
The oil cap plug and 427 script plug was added by
hollowing out tubing and adding another smaller tube slightly lower.....
although I didn't add the 427 letters (you wouldn't be able to read
it anyway).
This is the only accurate M/T BBC valve cover ever made..... I Guarantee it !
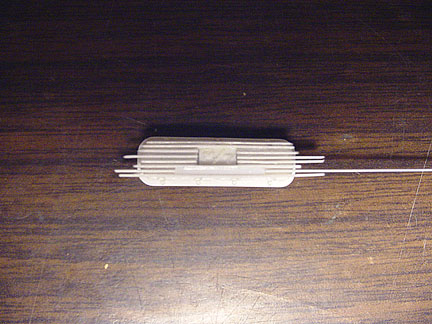
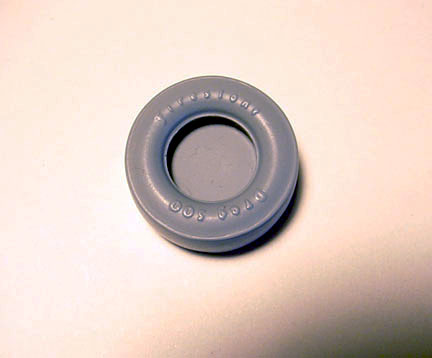
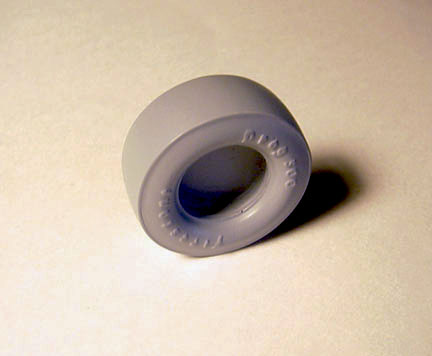
FIRESTONE DRAG 500 SLICKS
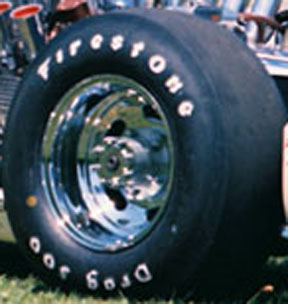
These
Slicks are being designed by Ron Ramsey & Scott Kapellusch
Ron Ramsey had some original Johan Firestone Drag 500 Slicks, the problem
is.....
is that they are lettered FIRESTONE one one side, and GOODYEAR on the other.
Another problem is that they are too small in diameter and have no side
wall detail.
We
wanted to create an all new correct FIRESTONE DRAG 500 SLICK
lettered on both sides with correct diameter and side wall detail !
These Slicks will fit a stock wheel well on any Barracuda, Charger, Dart, Road Runner, Etc.
 Ron cast the FIRESTONE
500 side from the Johan Slicks.... (as they had GOODYEAR on the other side).
Ron cast the FIRESTONE
500 side from the Johan Slicks.... (as they had GOODYEAR on the other side).
The slicks were too small in diameter, so I added .020 plastic strip around
the surface of the tread area.
This not only did this makes it a bigger diameter, but will also serve as
the detail edge of the slick.
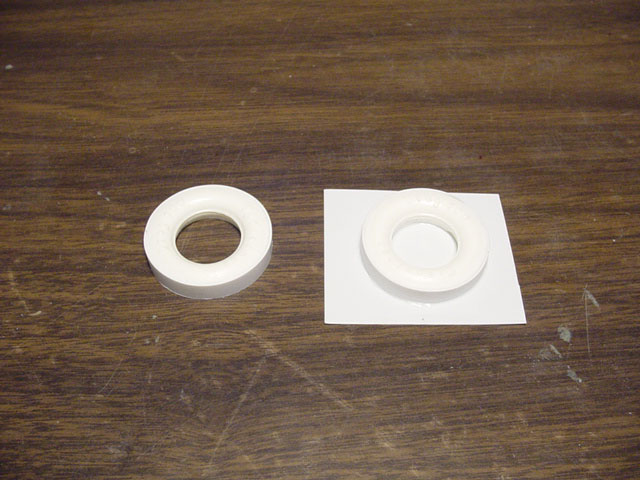 .010 plastic sheet was added to one side of the slick ( this is to aid in
the molding process).
.010 plastic sheet was added to one side of the slick ( this is to aid in
the molding process).
 The two sides of the FIRESTONE slicks were glued together, making sure it
was 10.50 all around.
The two sides of the FIRESTONE slicks were glued together, making sure it
was 10.50 all around.
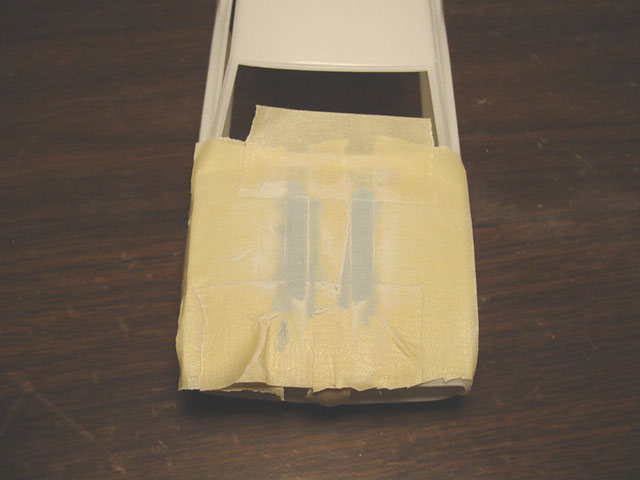
Ron and I agreed, that the slick would be cool to have a curved crown effect
on the tread surface !
At first I tried
to use masking tape with different sizes to create a bulge effect, but it
didn't work out well, so the slick was taped off
on both sides of the side wall and a home made tool was made from plastic
sheet to be used as a putty spreader.
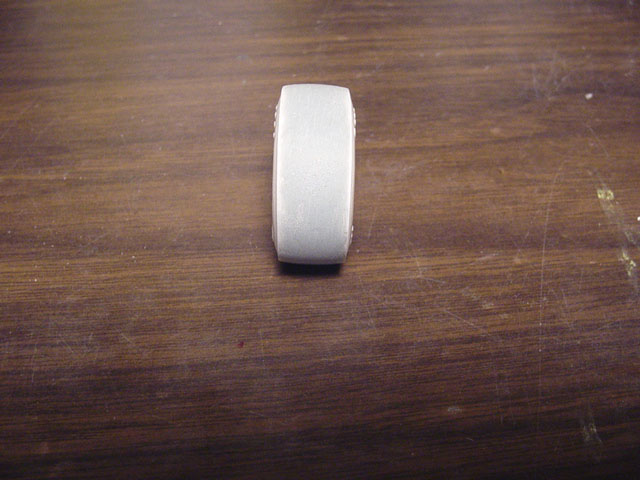 After some carefully sanding, here is the new crowned surface.
The Slick was primed, checked for imperfections and re-worked, all work
was done under a magnifying glass !
 The hard copy is ready to be molded in rubber.
THE MASTER IS FINISHED !
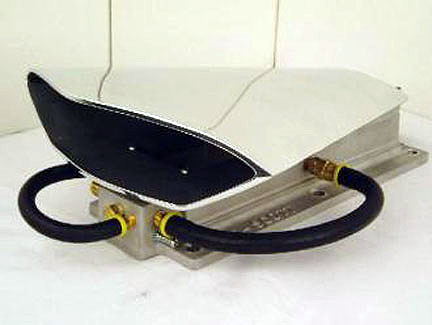
ENDERLE
FUEL INJECTION CHEVY MANIFOLD
(with Ram Tubes)

Enderle Chevy Manifold & Ram Tubes were never offered in model form.......... until now !!!
 Starting with our Chevy Hilborn
Manifold, the injectors were removed and new holes were drilled for plastic
tubes (to be used as straight tube injectors).
Starting with our Chevy Hilborn
Manifold, the injectors were removed and new holes were drilled for plastic
tubes (to be used as straight tube injectors).
 The tubes were cut to size and
tension rings were added with .010 plastic strip.
The tubes were cut to size and
tension rings were added with .010 plastic strip.
 All nut & screw heads were added, along with Throttle end caps.
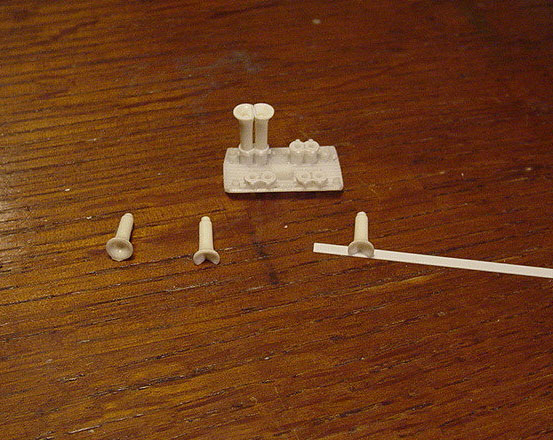 Starting with some old plastic
stacks, one side of each tube had the flare cut off and .010 plastic strip
was added.
Starting with some old plastic
stacks, one side of each tube had the flare cut off and .010 plastic strip
was added.
This is so the tubes can be fit flush together.
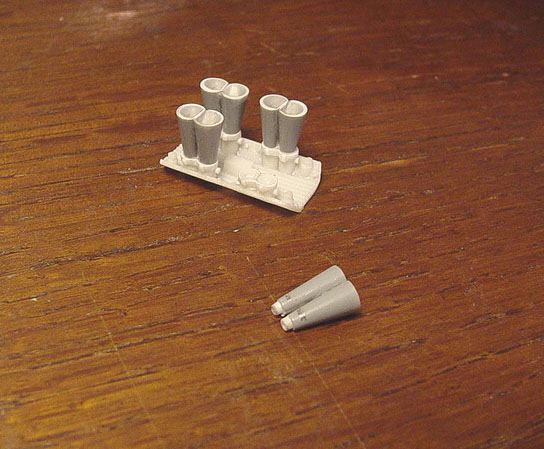
 So here's were it gets tricky......
the stacks we show here are straight tubes with a flare at the end, our
new "Ram Tubes" need to be cone shaped.
So here's were it gets tricky......
the stacks we show here are straight tubes with a flare at the end, our
new "Ram Tubes" need to be cone shaped.
So the stacks were mounted to paper clips and puttied along the sides of
the tube (this is so it can be handled while puttying & sanding).
this was not easy and one mistake would have been disastrous !
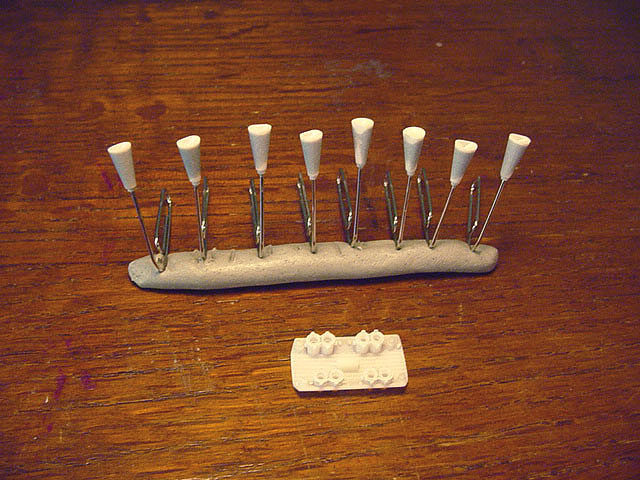 Here are the new "cone shaped"
tubes after they were sanded smooth.
Here are the new "cone shaped"
tubes after they were sanded smooth.
 The tubes were glued together,
but were too long, so they were measured and cut.
The tubes were glued together,
but were too long, so they were measured and cut.
Not shown, but the tubes also had to be re-puttied between the tubes, for
a better look.
 Here are the new "RAM TUBES" and finished Enderle Manifold.
 99 separate parts were used to
create this Enderle Manifold & Ram Tubes.
99 separate parts were used to
create this Enderle Manifold & Ram Tubes.
12 pieces had to be filled with putty, that's 111 steps to make this master.
THE
MASTER IS FINISHED !
( Ram Tubes will be 4 separate pieces )
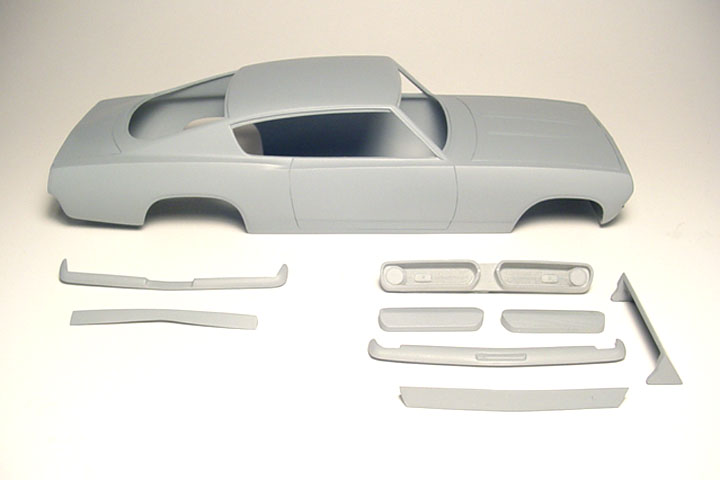
'67-'68
BARRACUDA FUNNY CAR
THIS
WILL BE THE FIRST '68 BARRACUDA FUNNY CAR EVER MADE !
Our
goal is to give you an accurate body to represent a true '67-'68 Barracuda F/C
Body
as the Polar Lights Barracuda F/C body is not correct, not even for what they show on
their box art !
The Polar Lights Body is a Stretched, Flattened, '69 Cuda body. It also has
inaccurate proportions.... Sad but true !
BODY WORK
 I took these photos of the Polar Lights Cuda Body and our '68 Barracuda
stock body,
I took these photos of the Polar Lights Cuda Body and our '68 Barracuda
stock body,
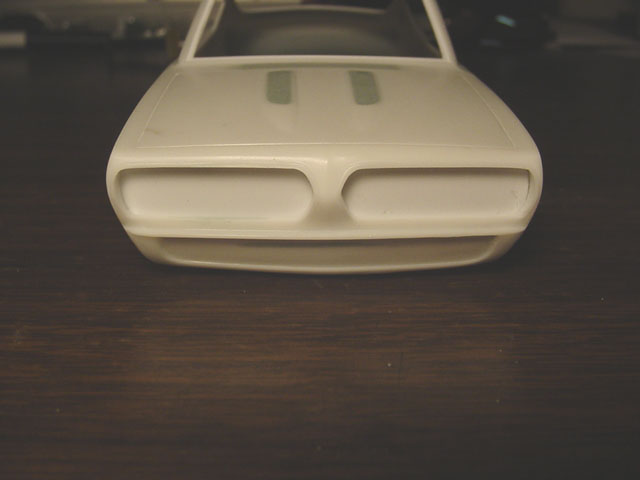
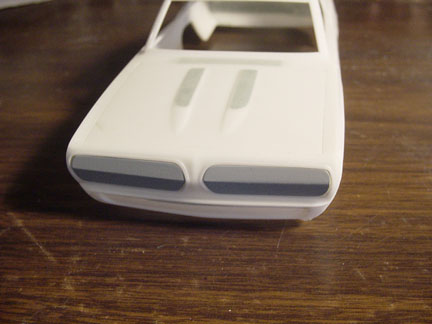
you can see the changes in body shapes. Notice the front 1/4
panels are sloped on the stock '68 body,
notice the roundness on the stock
'68 body, notice the POWER BULGES on the stock '68 hood, notice the Polar
Lights body is a '69 Barracuda !
 After removing all the Emblems,
Marker Lights, Wiper Blades, Door Handles & all Body Trim.
After removing all the Emblems,
Marker Lights, Wiper Blades, Door Handles & all Body Trim.
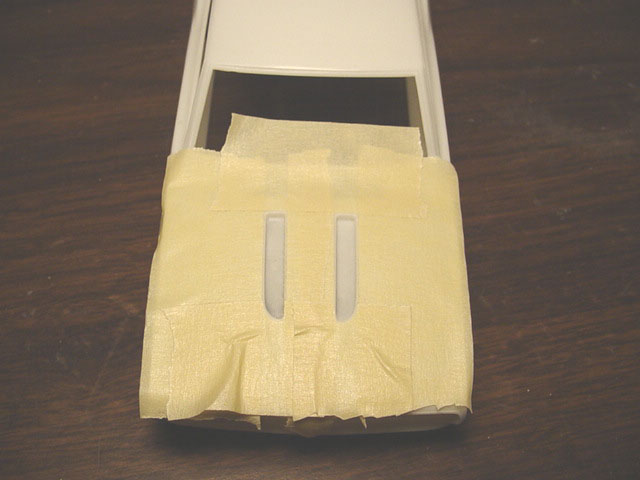
The
Louver Holes were taped off.
this is so there will be no mistakes when we fill it with putty.
 The putty was sanded down to the tape, again, so NO
mistakes are made.
The putty was sanded down to the tape, again, so NO
mistakes are made.
 The Vent holes were done the same way !
I had to re-tape & re-putty the power bulges, to give them more of a
rounded arch, as I wasn't happy with the first result's.
 The front wheel alteration was started by putting
the bumper on to get an idea of how far to bring the wheel well up.
The front wheel alteration was started by putting
the bumper on to get an idea of how far to bring the wheel well up.
The
cut line looks slanted, but it is straight as all alterations are measured
with the body flat on a table and measured along the panel,
it was measured
1' 9" along the top of the panel.
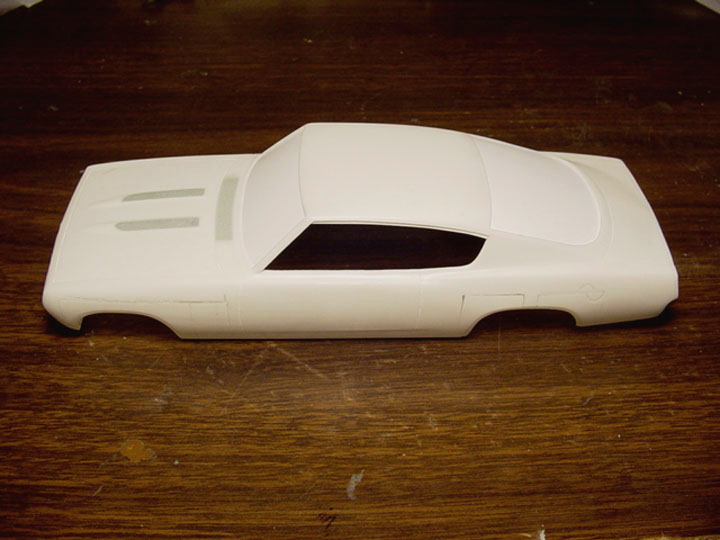
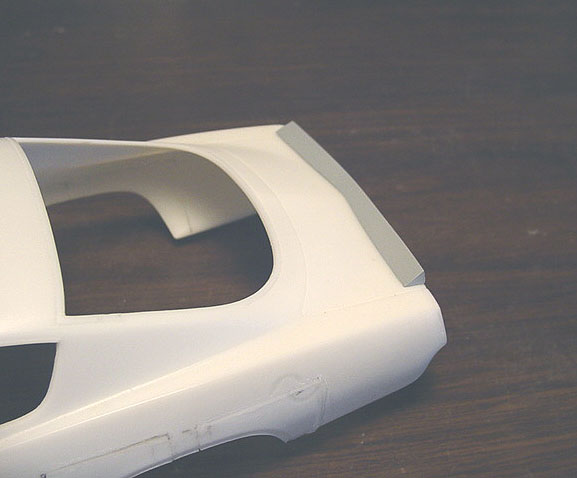
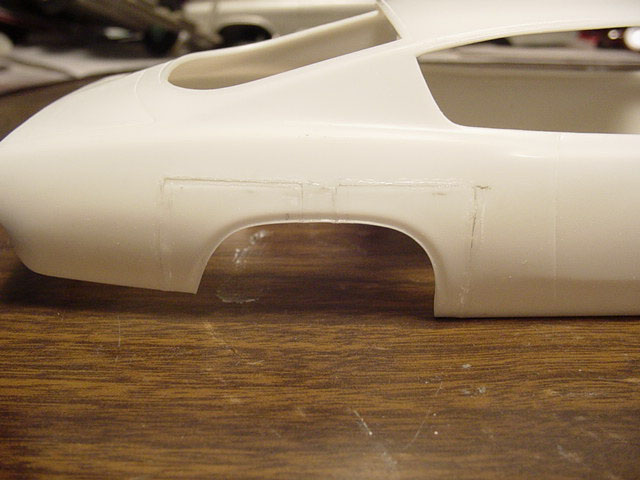 The rear wheel well was much harder to do, as it had to be widened !
After
measuring a Polar Lights Slick compared to the original wheel well, we determined
that the Barracuda wheel well will need to be widened 4 scale inches.
4" was left on the middle of the master body, and the front of the
wheel well was cut out.
Then from a spare body, the new section of the wheel well was cut in the
middle of the wheel well,
when installed it will give me 2" on each
side, after the rear section was put on....... we now have a 4" wider
wheel well !
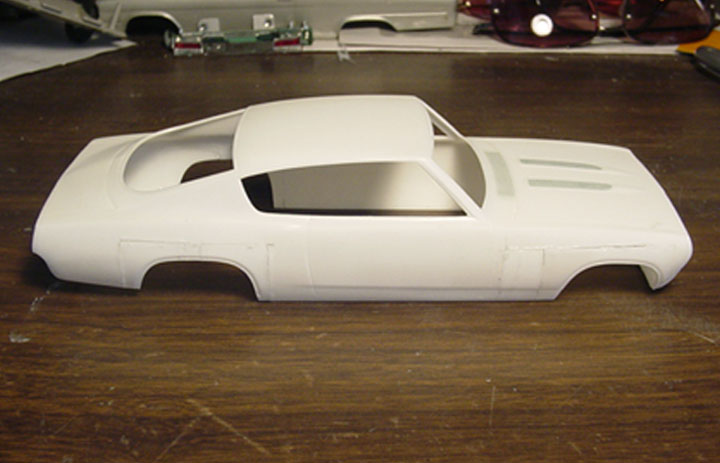 Here's the new wheel well alterations !
notice the body is still stock length, we will keep it that way, as the
only one that was stretched was the "Virginian".
The Chrome rings around the wheel wells were also removed,
as none of the funny cars had chrome trim around wheel wells !
( For some reason the Polar Lights body has them ) ?.......Dam that thing
is awful !!!!
Some cars have wheel wells that are "Hogged out"
or have a different shape, or have a flare around it,
with this wheel well,
you'll be able to create any look or shape you desire for any particular
car you want to build !
 The Valance was filled in with .040 sheet plastic, the Grill recess' were
filled in with .010 sheet plastic.
The Valance was filled in with .040 sheet plastic, the Grill recess' were
filled in with .010 sheet plastic.
( You will need to cut the Grill recess' out if using the stock grill ).
The grill moldings and nose were re-cut to be more prominent as the kit's was very poor and barfly noticeable.
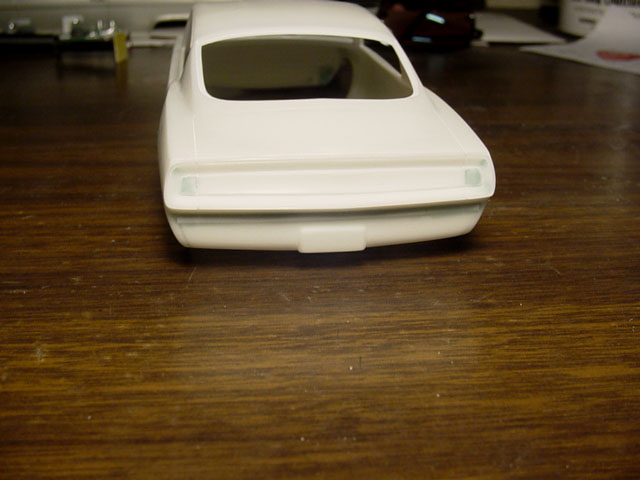 The rear Valance was also filled with .040 sheet plastic.
The taillights were carefully filled in with putty and all emblems were
sanded from the trunk panel.
 All window chrome trim was carefully cut out, then. 010 plastic sheet was
added to the under side.
All window chrome trim was carefully cut out, then. 010 plastic sheet was
added to the under side.
This will act as the new recessed window trim found
on fiberglass Funny Cars ( to mount the clear Plexiglas to ).
 New window recess' are
finished.
New window recess' are
finished.
Also, .020 x .020 Plastic strip was added to the top of the side windows.
 Here you can see the window trim on the inside of the body and the smoothed
out puttied areas.
Here you can see the window trim on the inside of the body and the smoothed
out puttied areas.
I had hoped to use the rear window of the PL model, but they did some weird
re-shaping of their rear window,
and I needed to do ours correct. So, you
will need to use .010 or .020 clear plastic for all the windows.
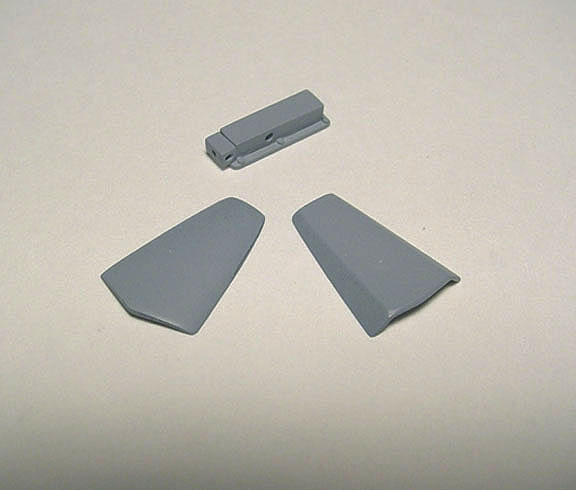
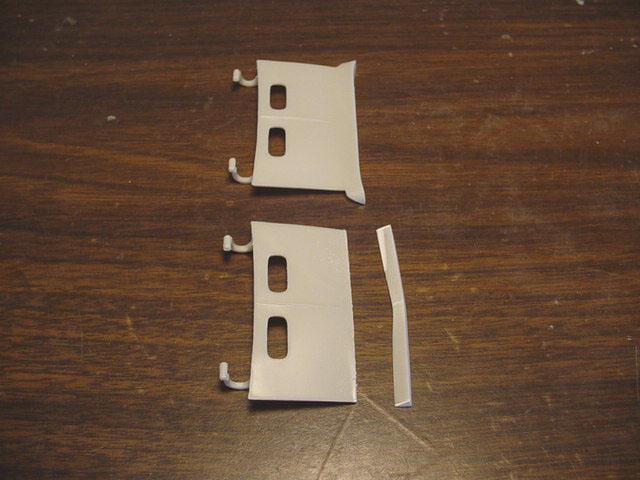
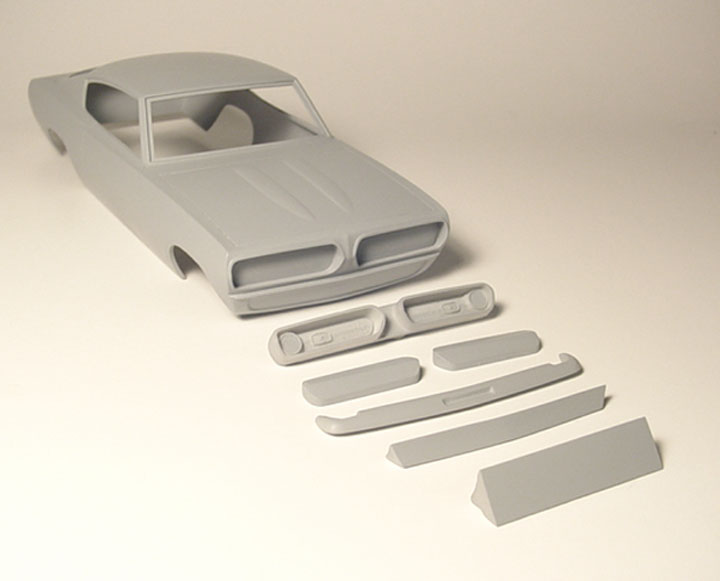
BODY PARTS
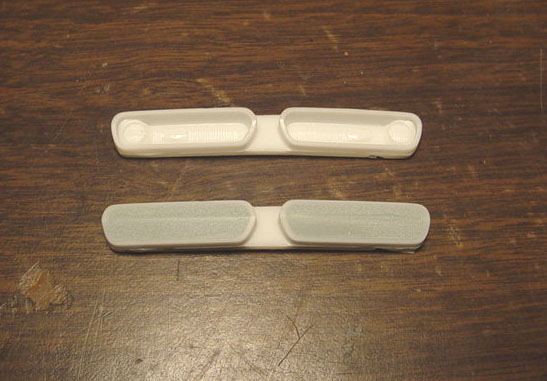 We want to give you the option of a Blocked out grill
area, so we started with a stock '68 Grill and filled
it with Ever coat putty.
We want to give you the option of a Blocked out grill
area, so we started with a stock '68 Grill and filled
it with Ever coat putty.
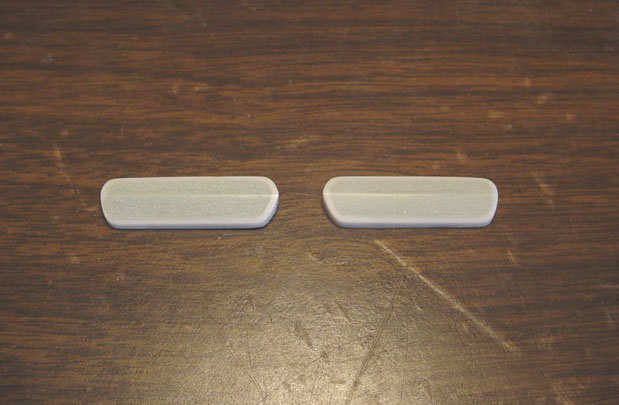 The grills were separated and sanded to match the angles of the original
grill shell.
The grills were separated and sanded to match the angles of the original
grill shell.
 This will make it easy for a grill filler.
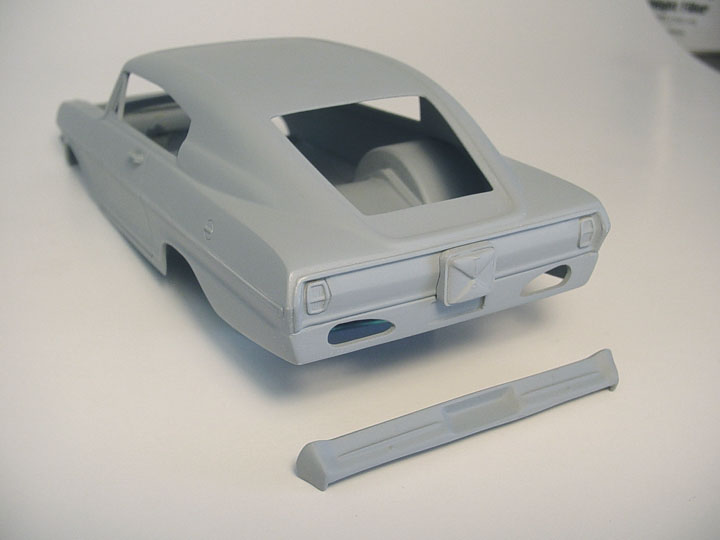
 We wanted to give you a separate rear spoiler (as
not all cars ran a spoiler),
We wanted to give you a separate rear spoiler (as
not all cars ran a spoiler),
and after looking at the Polar Lights Cuda,
we decided to make a better one from scratch. So after digging around,
we
started with a '66 Corvair rear trunk (with spoiler), cut it off the trunk
lid, and re-shaped it to fit our new Barracuda trunk.
 How's this for a perfect fit !
This new spoiler has a better angle and looks more correct to what the real
cars were running.
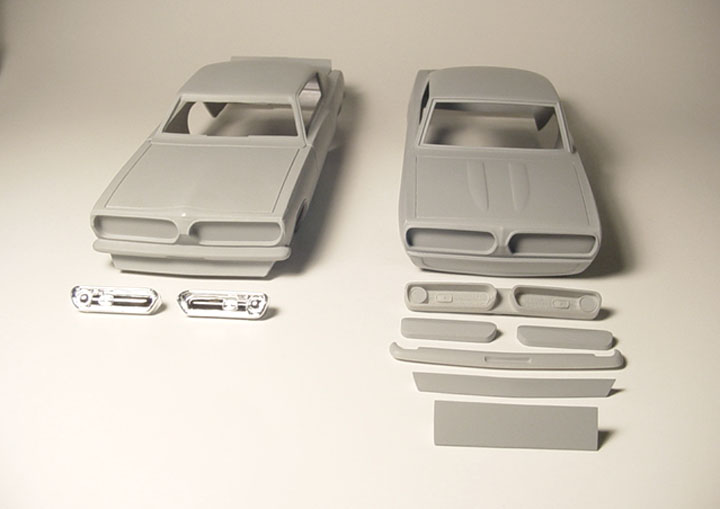
Master Model is finished
Compare
our Speed City Body (on the right) to the Polar Lights body
They look like two completely different bodies,
ours being "correct" of course !


This is the first '67-'68 Barracuda Funny Car in model
history !
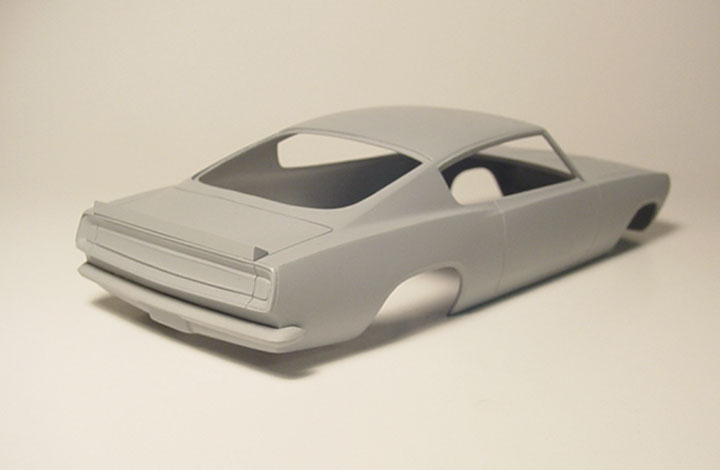
Finally, we can all build a correct '67-'68 Barracuda F/C.
And with all the extra Front & Rear body parts, there is more than 30
ways to build this Funny Car body !
Resin
kit will include:
* Correct 1968 Barracuda Funny Car Body
* Two separate style Front Spoiler's...... ( not all
cars ran a spoiler )
* Separate Rear Air Foil..... ( not all cars ran a rear air foil )
* Stock '68 Grills..... ( with block out headlights )
* Angled Grill Blockouts...... ( some cars had blocked out grill areas )
* Separate Bumpers...... ( as some cars didn't run with bumpers )
A Polar Lights Barracuda or Charger F/C will be needed for a donor kit !
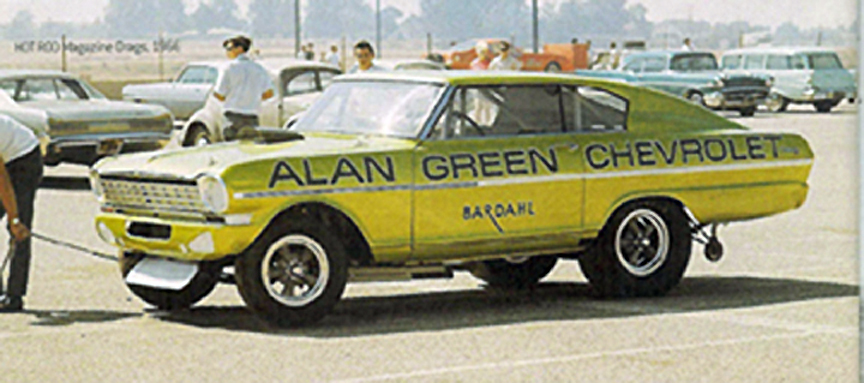
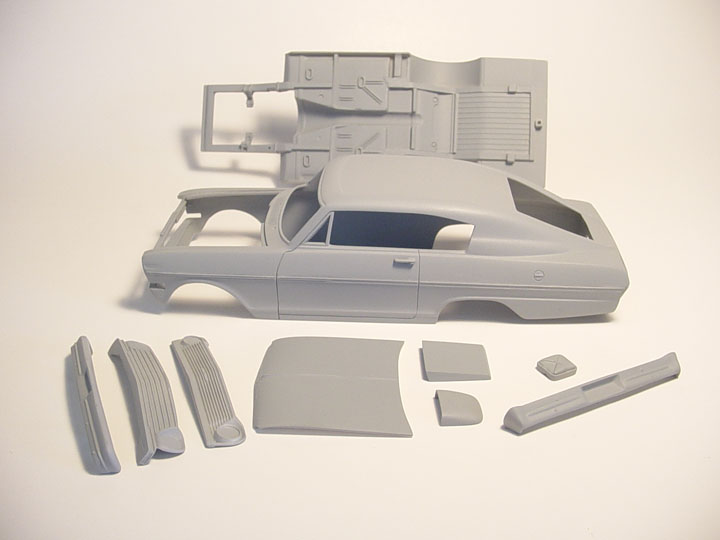
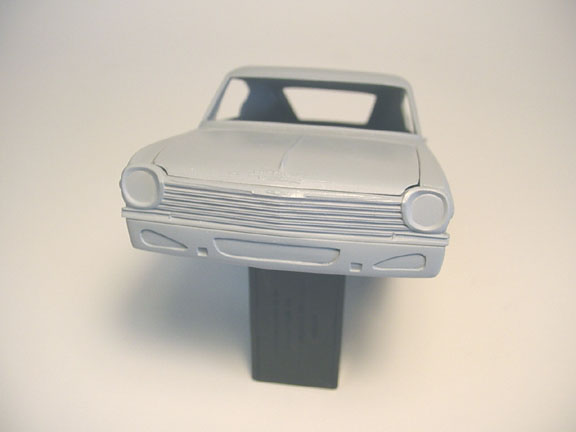
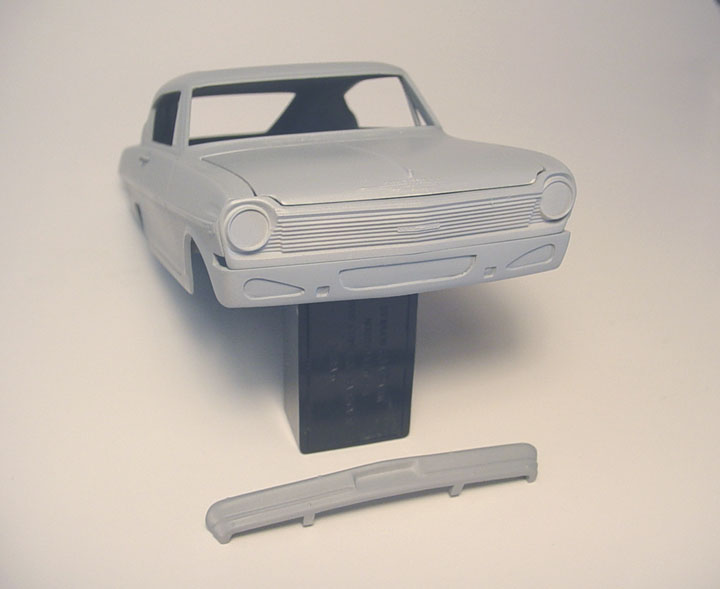
1963/'65 CHEVY NOVA FASTBACK

Were
going back to the original Master Model and re-designing it to be more accurate
and to include an A/FX Chassis !
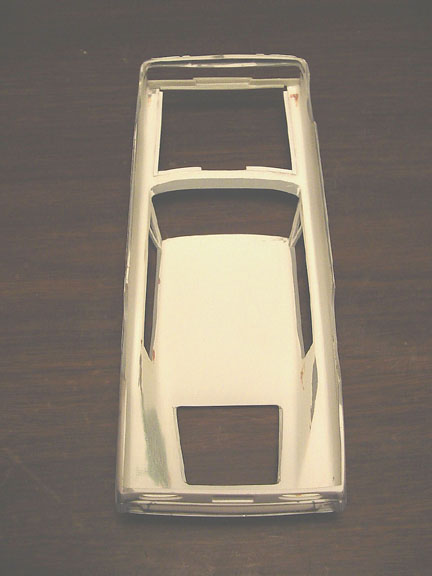 The inside of the original
body was too thick,
The inside of the original
body was too thick,
so it was "SUPER THINNED" and now its as thin
as a Plastic kit model !
 The body was completely sanded smooth to remove any imperfections !

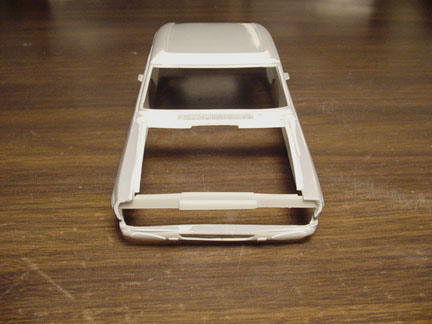 The original hood supports fit very poorly because we didn't have the hood from
the original model ( that's another long story ),
The original hood supports fit very poorly because we didn't have the hood from
the original model ( that's another long story ),
so we added all new correct
hood supports.
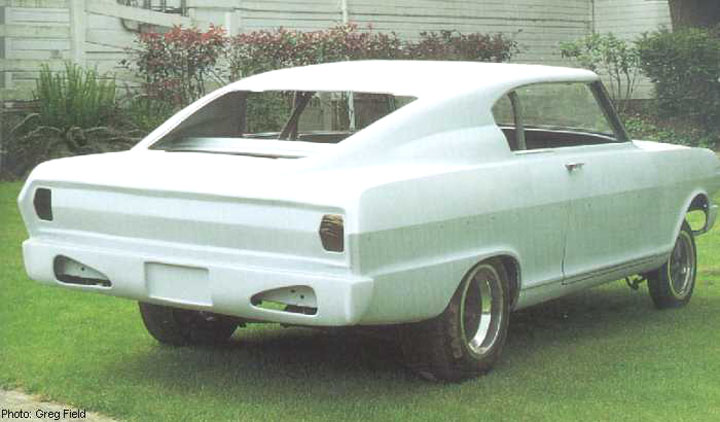
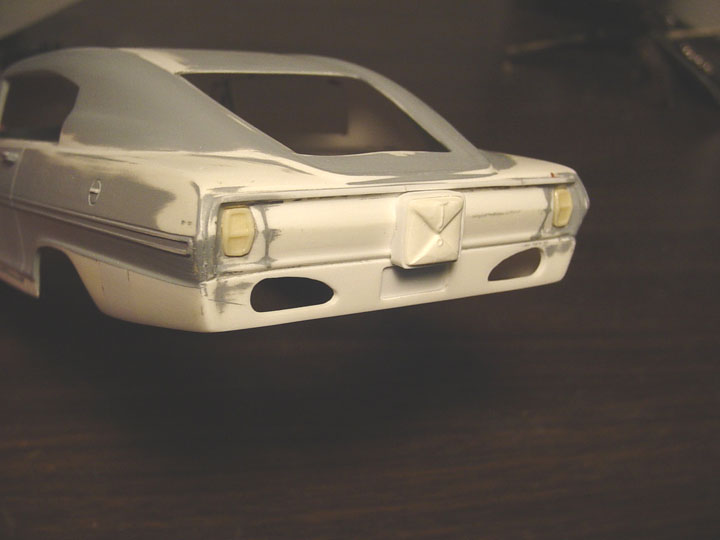
The Block-outs from the bumper holes in the front splash pan were added, to
more accurately resemble the "Alan Green Chevrolet" car.
Also, a radiator
/ fender support was added for strength & appearance.
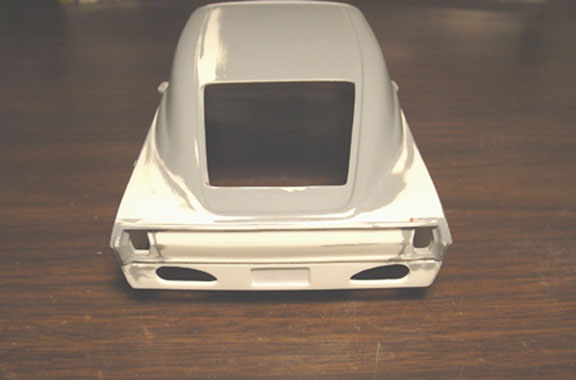 The rear window was opened up correctly and bumper mount holes were added to the
rear valance,
The rear window was opened up correctly and bumper mount holes were added to the
rear valance,
and a licence plate recessed area was put in (as photo of real
car shows)
The Alan Green car has a parachute surround on the trunk deck ,
so we will add that as a separate item !
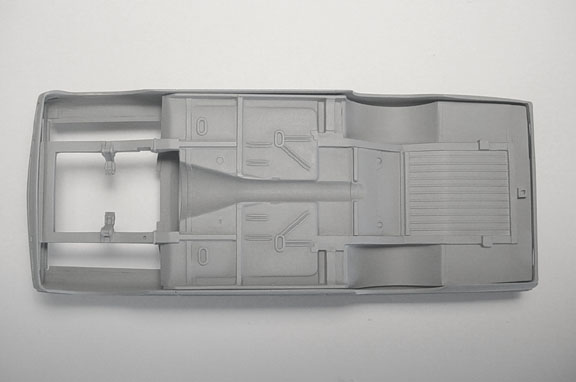
CHASSIS
 We'll be adding an Altered Wheelbase Chassis to this kit. Starting with an amt.
'66 Chevy Nova SS,
We'll be adding an Altered Wheelbase Chassis to this kit. Starting with an amt.
'66 Chevy Nova SS,
( you'll need that kit to use as a donor for Interior, Motor
& Chassis parts. Photo shown is a stock '66 Nova Chassis (not altered yet).
 15 scale inches were removed from the mid-section of the floor pan.
The wheel
wells were borrowed from our Square Tube Chassis, and installed at the same
place as the original wheel wells.
Extra frame rails were added to the Chassis
using plastic strips.
The gas tank and trunk floor was removed and a new trunk floor pan was installed
using some Plastruct ribbed sheet.
The original suspension mounts on the frame
was removed and plastic strips were added to the front frame rails.
All holes
were filled with plastic round tube. As a bonus were adding the wheelie bar
mount !
 Here is the finished Chevy Nova Fastback A/FX Chassis.
Were not adding the Firewall, Interior floor or the door panels, as they will
be in the donor kit anyway along with other parts.
(
you will need to use an amt. '66 Chevy Nova SS, as a donor ).
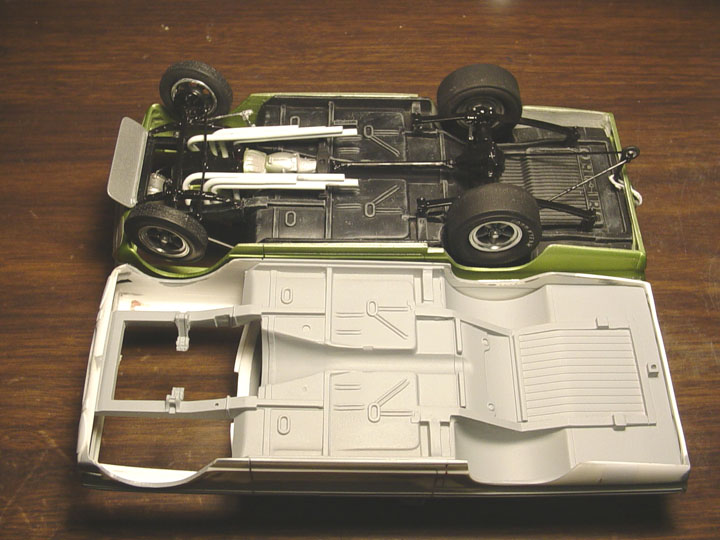 As you can see, it's a perfect fit !
This new chassis is what I should have done to my original build, and as you
can see,
I cheated I my model and sanded down the frame rails & inner wheel wells,
so I could get the slicks to fit.
This new Chassis is much more accurate as
has room for even bigger slicks, if you choose to use them ?
'63
& '65 NOVA GRILLS
To set the record straight:
There was never a '64 or '65 Chevy II Nova Fastback.
ALSO: Chevrolet never built a "Fastback"
version and it was never a production model.
The original '63 Chevy II Nova Fastback's were built
by Bill Thomas.
Bill built a few of these cars to be used for the NASCAR and the Drag Racing
Circuit.
Later, some of these cars ran with '65 Nova Front fenders & Grill, but kept
the '63 Body.
This is the reason behind us creating a separate '63 & '65 Grill !
 After finding an original amt '63 Nova grill, the grill & bumper were separated.
 Using a '65 Nova grill/bumper from the Chevy II Funny car, the grill & bumper
were also separated.
Using a '65 Nova grill/bumper from the Chevy II Funny car, the grill & bumper
were also separated.
 Here's the new '63 & '65 Grills, in the progress of adding block out headlight
covers.
Here's the new '63 & '65 Grills, in the progress of adding block out headlight
covers.
Also: the '65 Nova bumper has been modified with longer sides and bumper mounts.
The side marker light holes in the body, will have to
be filled if using the '65 Grill !
 We went back to the front valance, to make it fit the new grills by adding plastic
strips, and cutting
We went back to the front valance, to make it fit the new grills by adding plastic
strips, and cutting
correct holes to recreate the original valance.
.010 sheet plastic will be added to the back of the valance later.
PARACHUTE
WITH SURROUND
After being asked
several times about how to build the Parachute & Surround for the Alan Green
Car,
it was decided we had to make one !
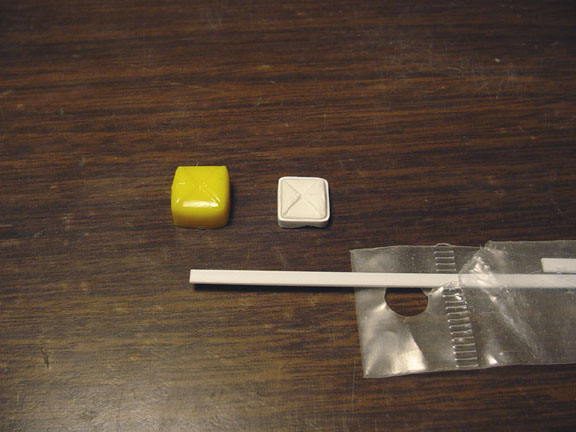 Starting with an old
mpc parachute, I made a mold and cast a few up, then the sides were sanded down to
Starting with an old
mpc parachute, I made a mold and cast a few up, then the sides were sanded down to
make it smaller. We added .030 x .100 plastic strip all around the parachute
for a surround.
 Here's the new Parachute with Surround
( this will be a separate item, NOT molded to the body ) .
Here's the new Parachute with Surround
( this will be a separate item, NOT molded to the body ) .
We also felt it unnecessary to cast the taillights separately because they were
so small, and it would be easier to just foil them while on the body.
MASTER MODEL IS FINISHED !
............................................................................................................................
'63 Grill .............. '65 Grill& Bumper
Model
is now Available !
Page 4
![]()
All rights reserved. Do not copy any Speed City Resin bodies or parts without permission and consent.