
"MODEL NEWS "

Lets face it, were all getting older and our vision is not what it used to be!
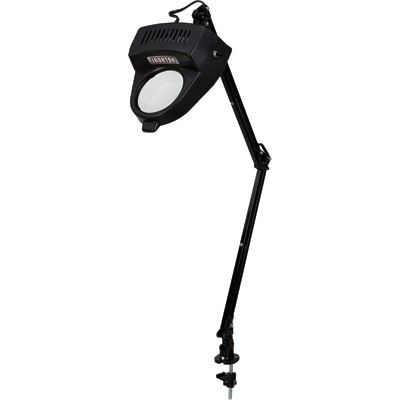
This Magnifier-Lamp is a "must have" for any modeler.
I have used these since 2009 and I can't do the fine detail work without it.
As a matter of fact..... I have 3 of them on all my work benches.
Click logo
TIPS ON BUILDING A RESIN MODEL
By Scott Kapellusch
* To properly store your resin model:
Remove all packing peanuts and discard.
Clean all flash that prevents Interior Tub & Chassis from fitting into body.
Place Interior Tub & Chassis back into body so all parts fit together nicely and lay flat on the bottom of the box.
Do not store in areas that gets hot as resin will warp.
* Soak all resin parts
in CASTROL SUPER CLEAN or WESTLEY'S BLEACH WHITE for 24 hours.
* Scrub parts with an old tooth brush and rinse with soap & water.
* Use a good automotive primer before painting.
* Spray your primer at night or when its cool to avoid getting a rough texture.
*
Use Locktite "Precision
Max" or "Professional Super Glue" to glue all resin parts together....... even when gluing plastic to resin.
FOR A POLISHED ALUMINUM LOOK
* Always' clean resin parts to remove mold release *
Paint parts with MODEL MASTER Aluminum Plate Buffing Metalizer (now in rattle can) #1451
*Buff painted part with a Q-Tip*
( OR )
Use "RUST-OLEUM BRIGHT COAT METALLIC FINISH #7718 CHROME" spray paint.
Use this for all simulated aluminum on your model instead of aluminum paint for better results.
FOR A CHROME LOOK
We were the first to bring news of Molotow Chrome a few years back.
Since then, there are now several different Chrome ink manufactures on the market.
Apply chrome ink directly over clean bare plastic or resin..... No need to have a black undercoating.
No need to thin, just pour into air brush cup and spray a heavy coat !
(Clean air brush with rubbing alcohol)
HOW TO MAKE HEADERS FROM SOLDER
By Scott Kapellusch
I know a lot of people are fearful on attempting to make headers from solder.
Solder bends very easily and isn't as hard as you might think.
Although a little time consuming, I hope this info will help them give it a try.
Because solder tubes are heavier than plastic,
you'll need to make mounting pins for a better bond to your engine.
Here's how.....
1. You will need standard size paper clips, a wire cutter and 4 OZ. (113g) rosin core solder for standard headers,
or use 3oz Lead Free Acid Core Solder .062" / 1.6mm. for Buick, Olds, Pontiac engines as they are smaller in diameter.
2. Place the flange on engine head and drill holes through flange holes and into the
engine head to fit the paper clip pieces to be used as "mounting pins".
(Chevy & Pontiac will need the center tubes re-drilled more towards the center)
3. Heat the paper clip end and push hot end into the center of the rosin core solder.
4. Cut off paper clip end, so only a 1/4" is showing from the solder tube.
5. Bend each tube to your desire to meet up with the collector.
6. You can pre-drill the 4 collector holes to seat the header tube ends for a solid fit.
7. Once you finished with aligning all the headers, super glue all the header tubes into the flange.
These headers were made for the Sox & Martin '66 Barracuda AFX.
They were started by gluing pre-cut solder pieces into the resin collectors first,
bending and cutting them to the desired shape & length,
heating the paper clip rods into the solder ends and then gluing them into the resin Flanges.
Making sure they fit while resting on the motor mounts and fitting them to the bottom of the body.


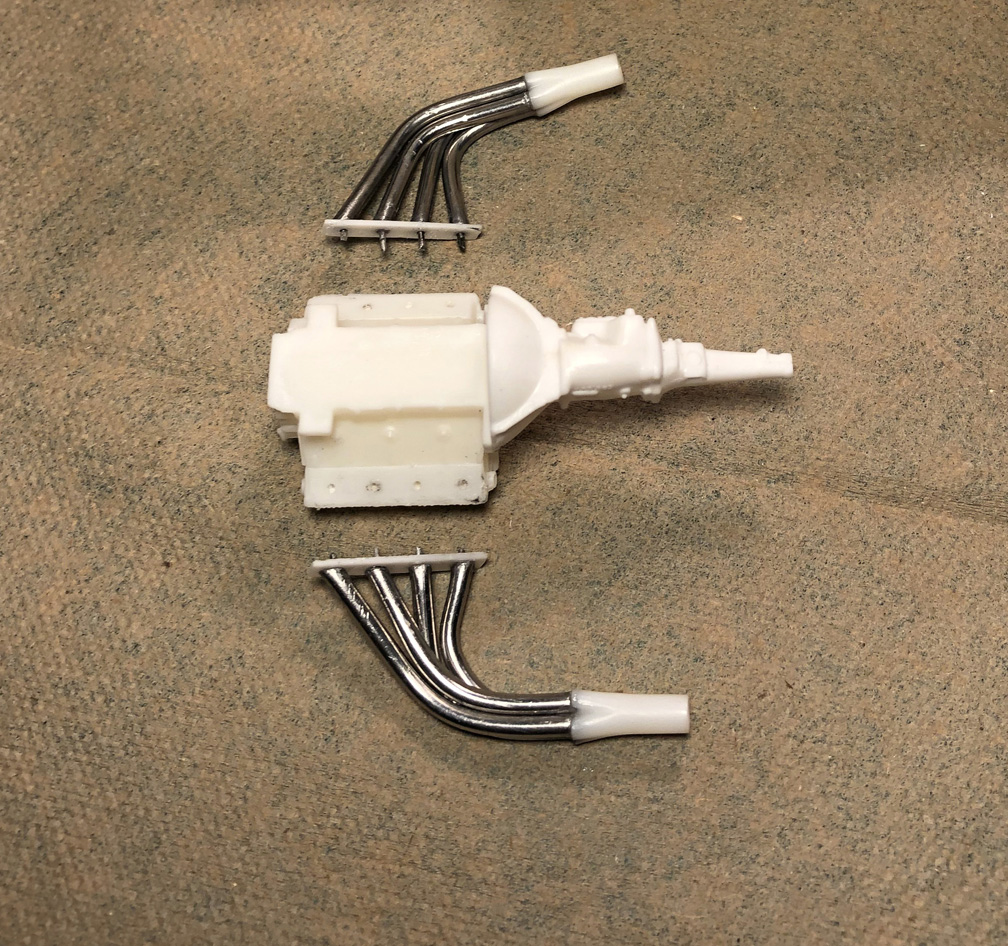
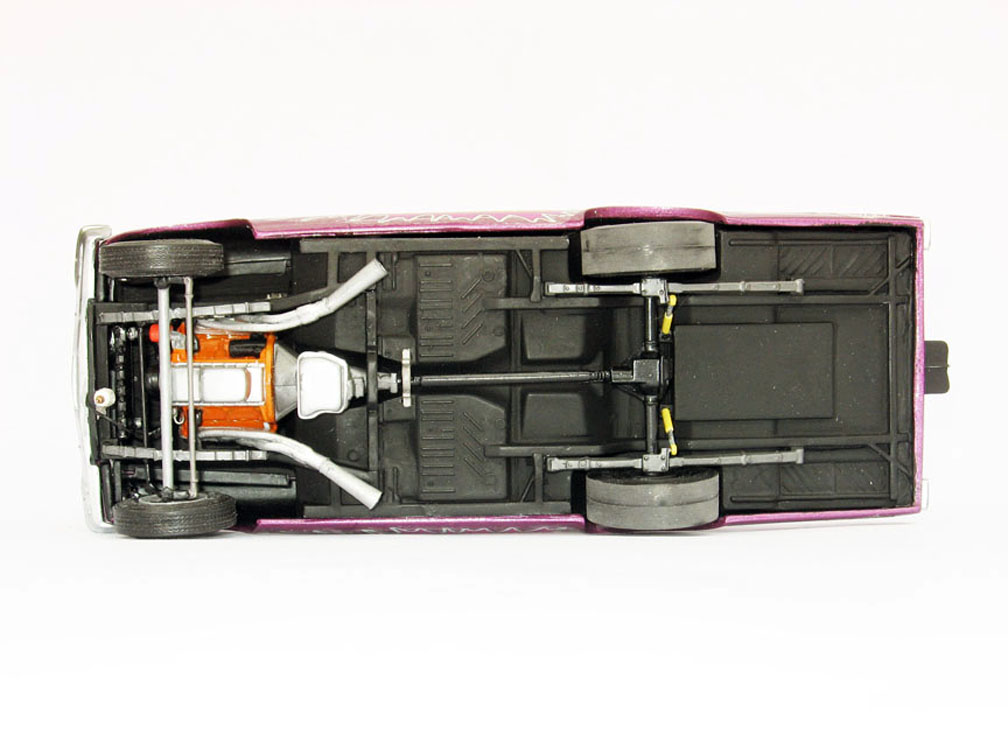
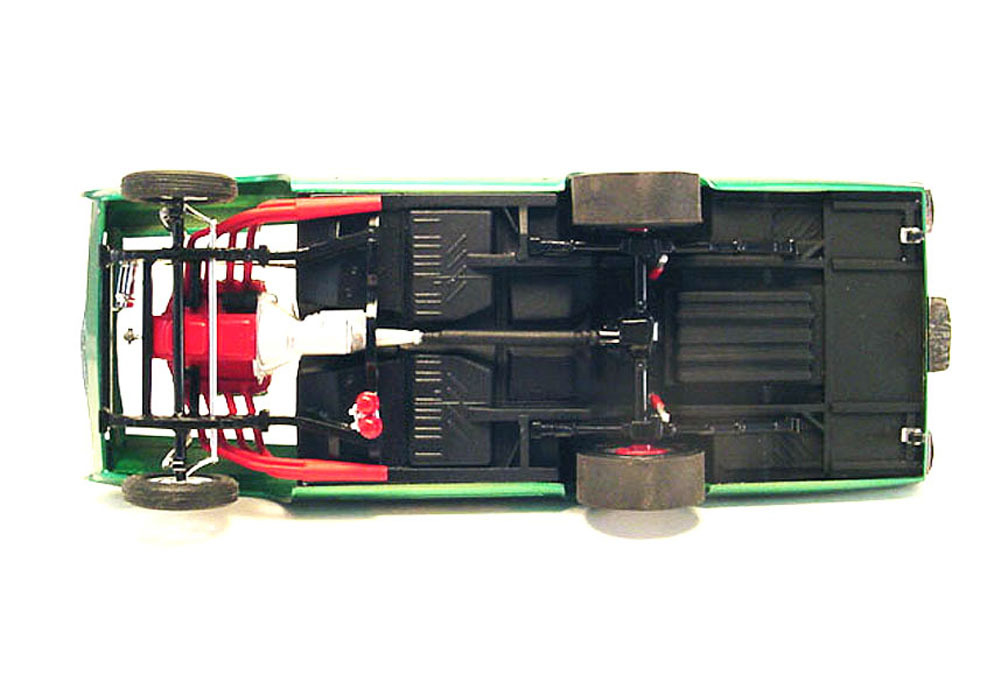
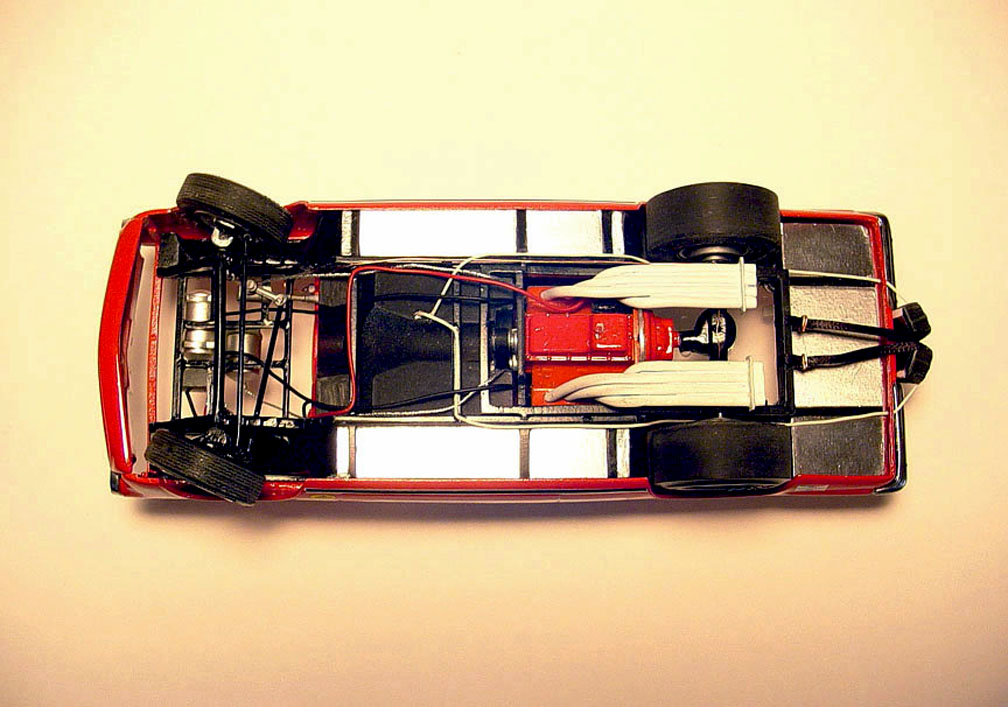
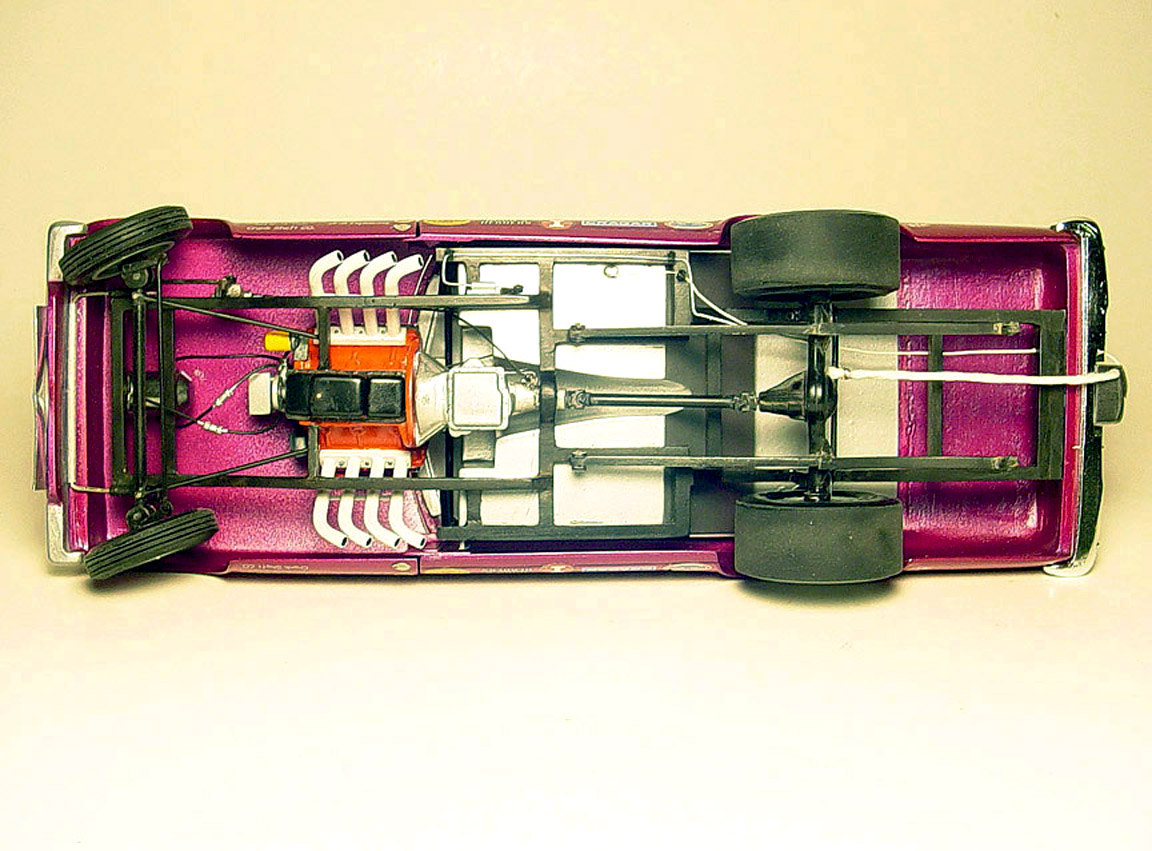
These headers were made for the Dick Harrell Camaro Funny Car.
They were started by making one header tube to the desired shape & length first,
then making 3 more copies for one side and then reversing the bends for the other side,
making sure it fit while the engine was resting on the motor mounts and fitting them to the bottom of the body (see photo 2).
Then heating all the paper clip rods and pushing them into the rosin core solder ends and then gluing them all into the resin flanges (see photo 1).
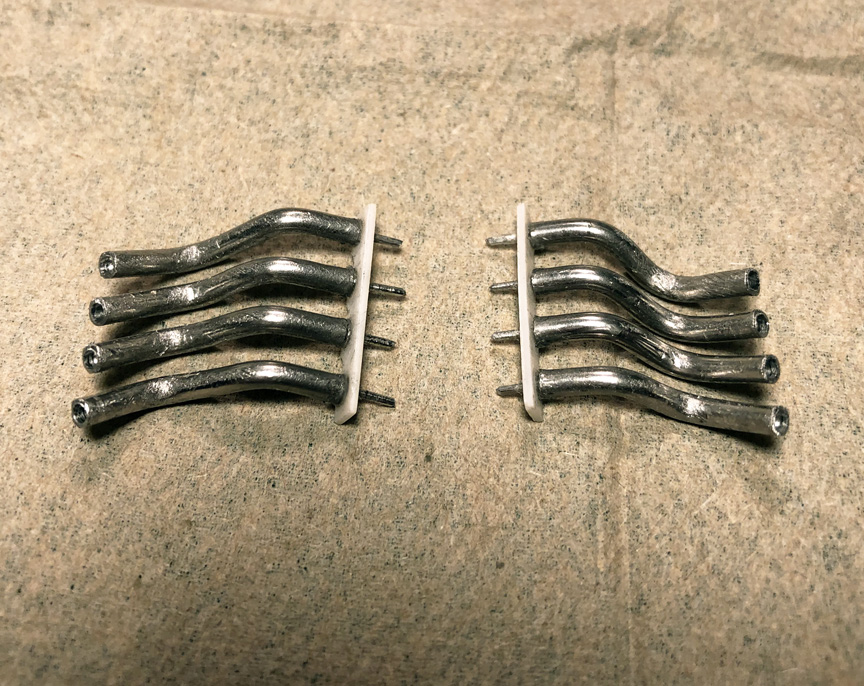
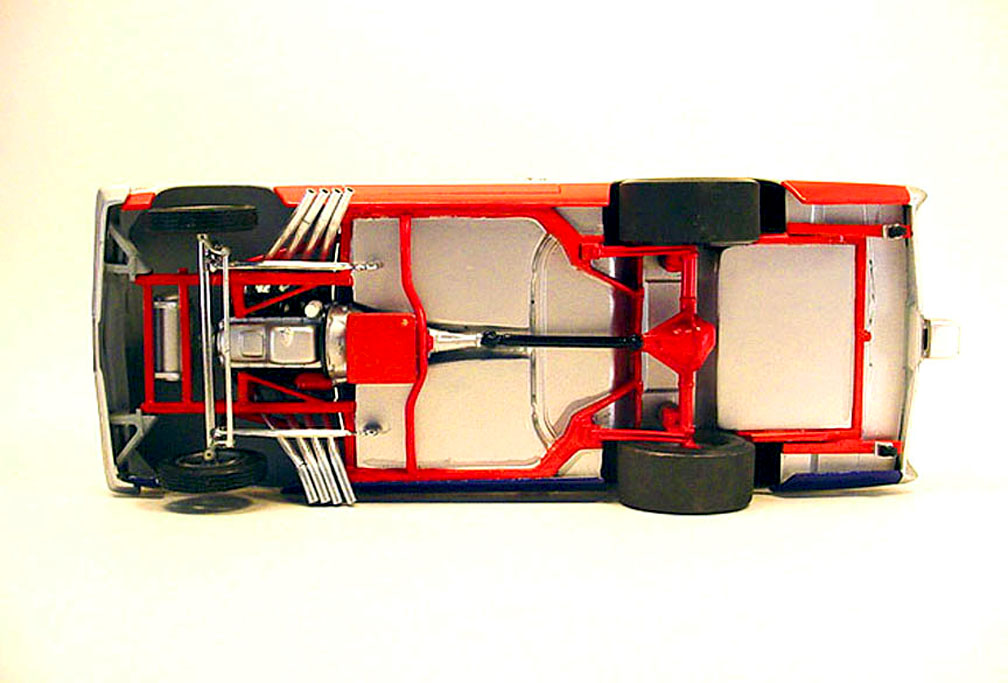
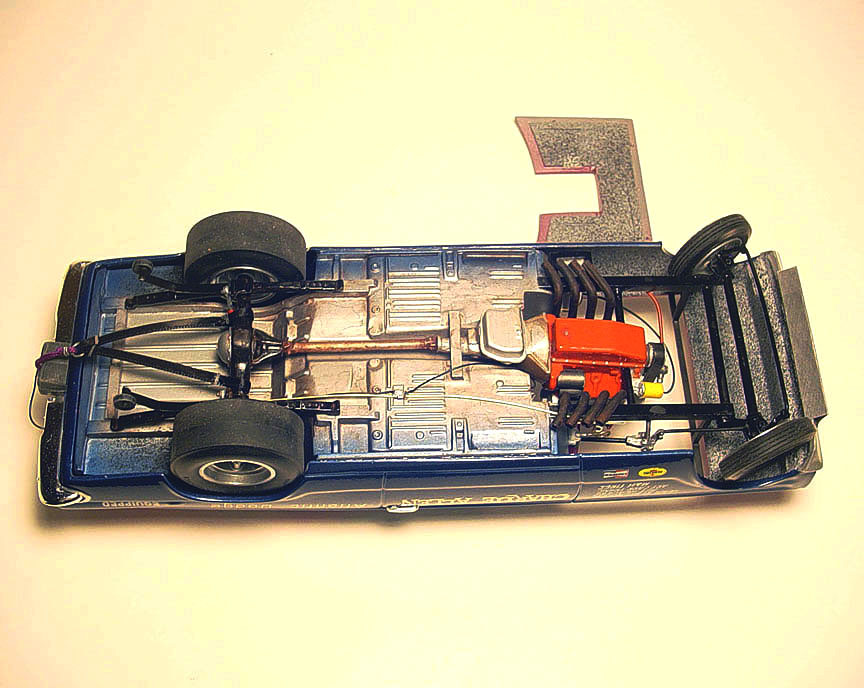
The holes were drilled out and glued to tooth picks. Then primed & painted (see photo 3).
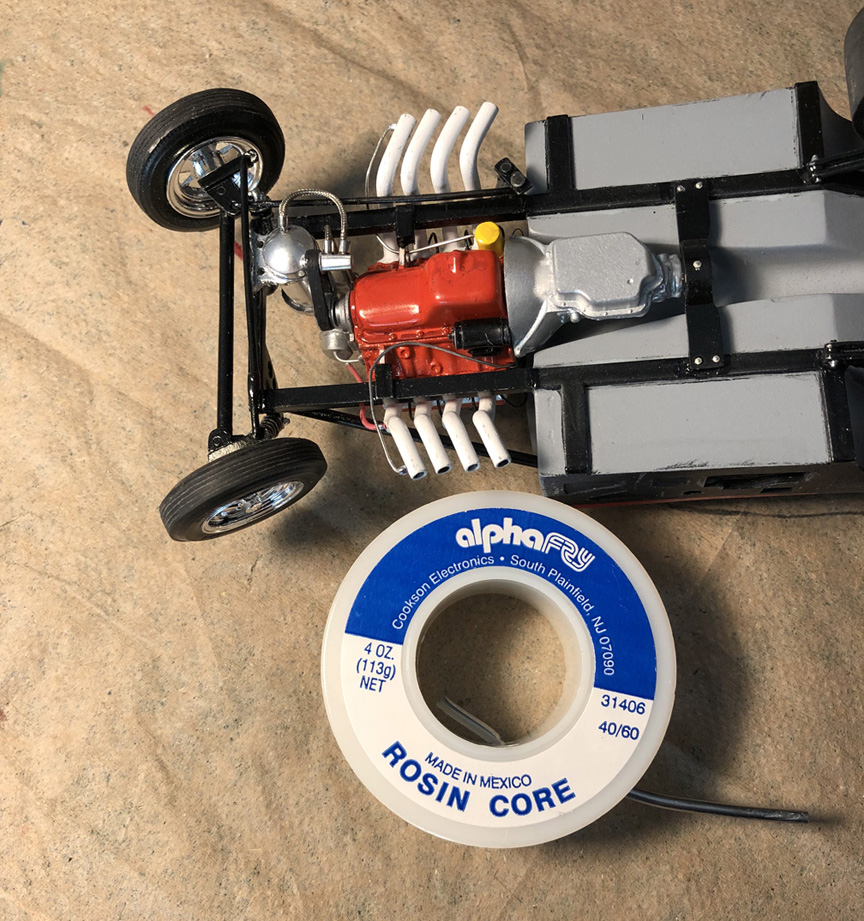
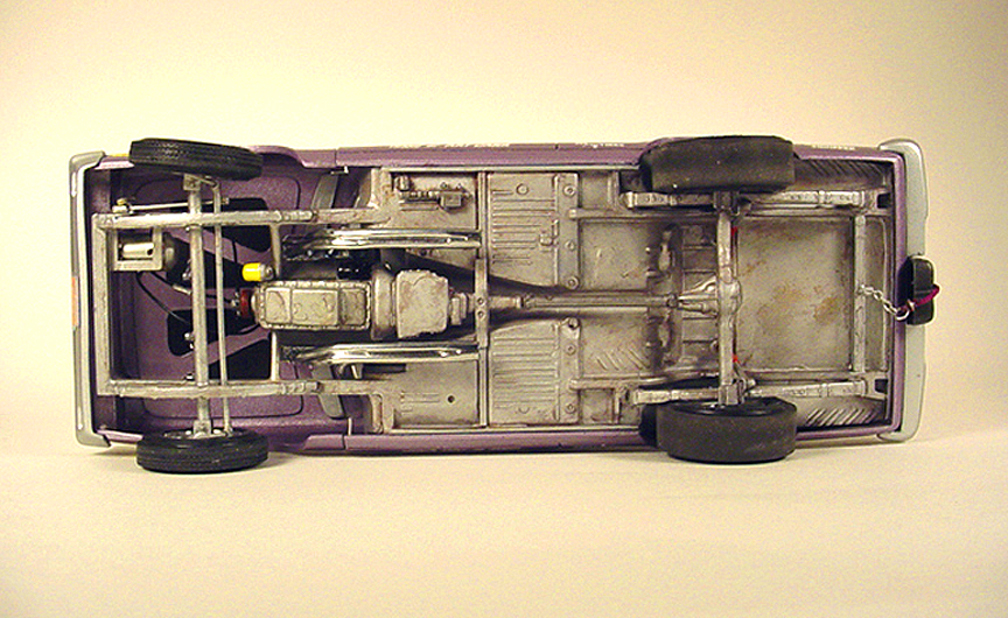
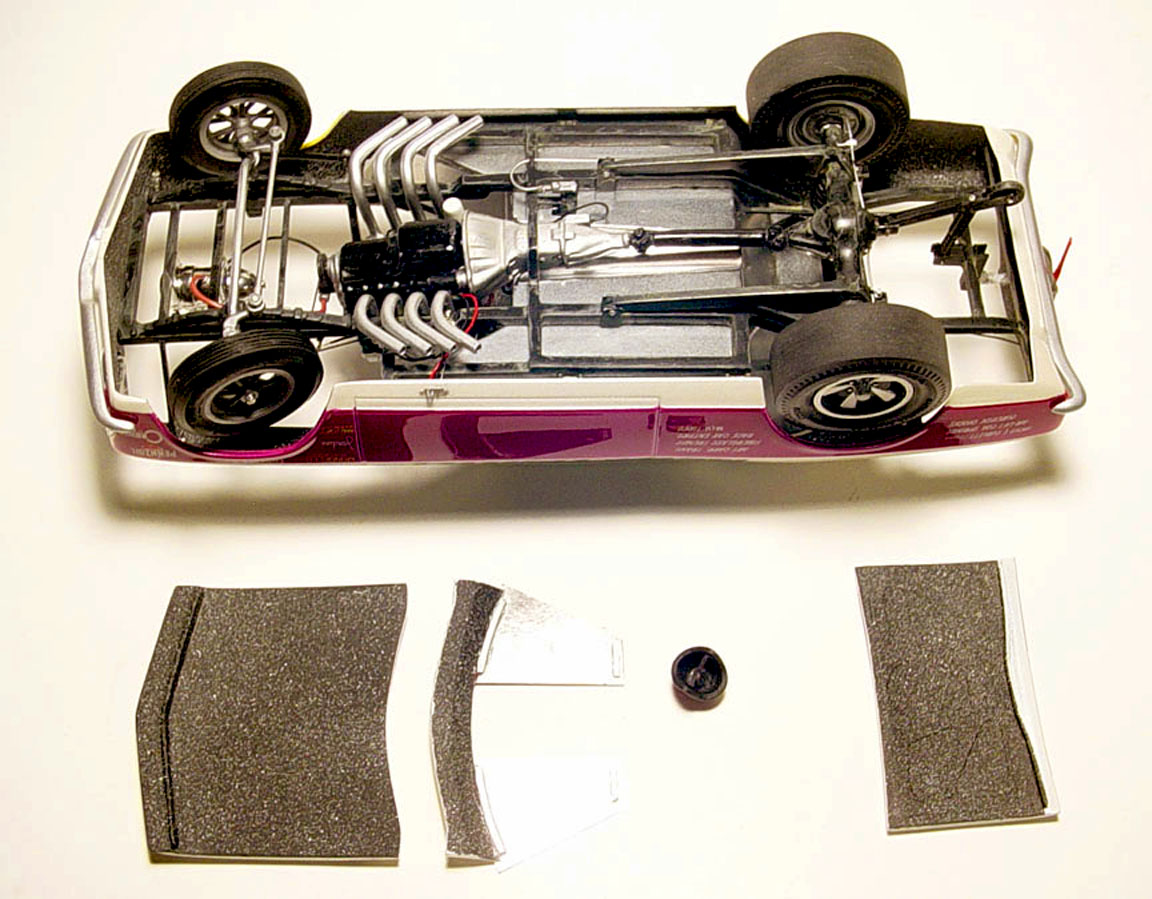
I use alphaFRY "rosin core" solder 4 oz. (113g) #31406 40/60. (see photo 4).
This solder is made up of 40% tin & 60% lead, so surgical gloves and washing hands are highly recommended !
These headers were made for my 1966 Hurst Hairy Olds in 1/25 scale.
This is the fastest and easiest way to make solder headers.
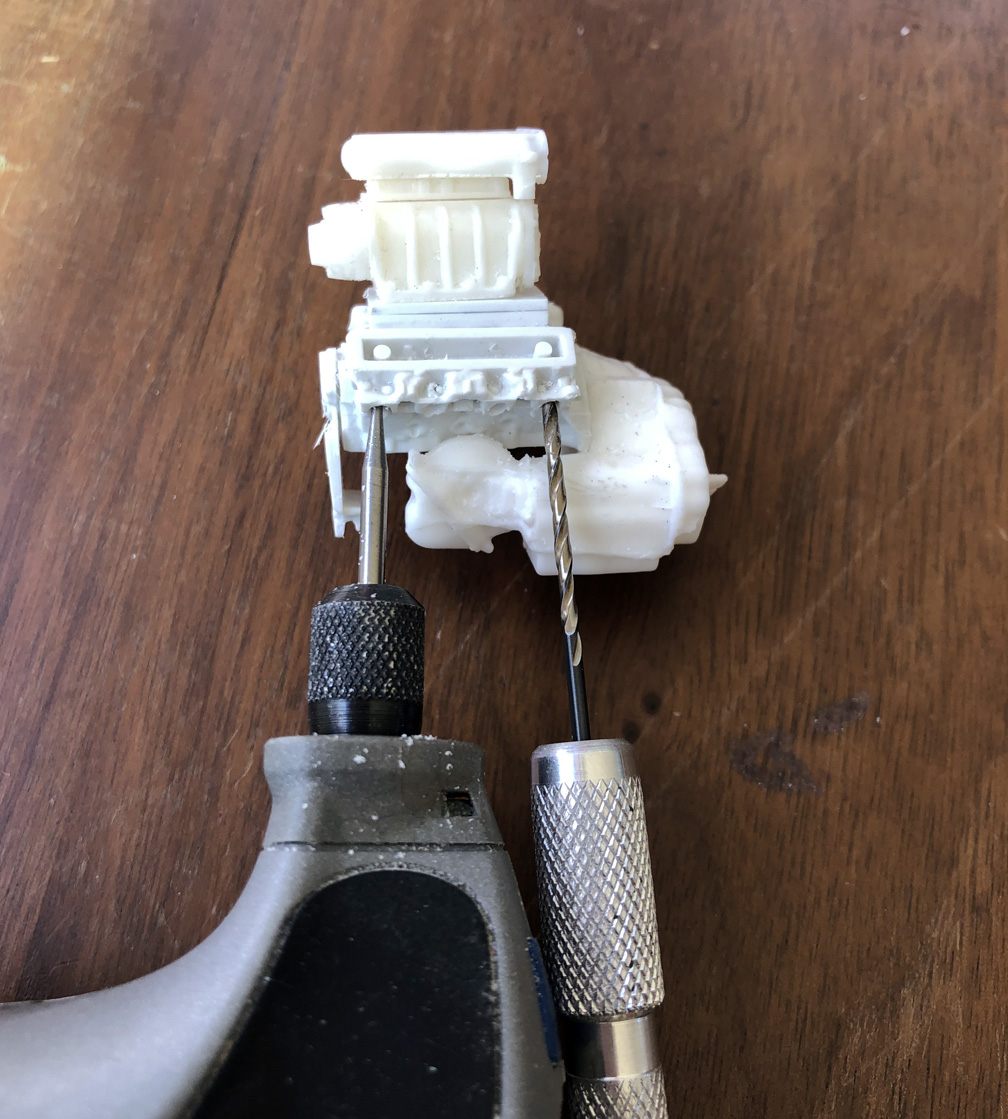
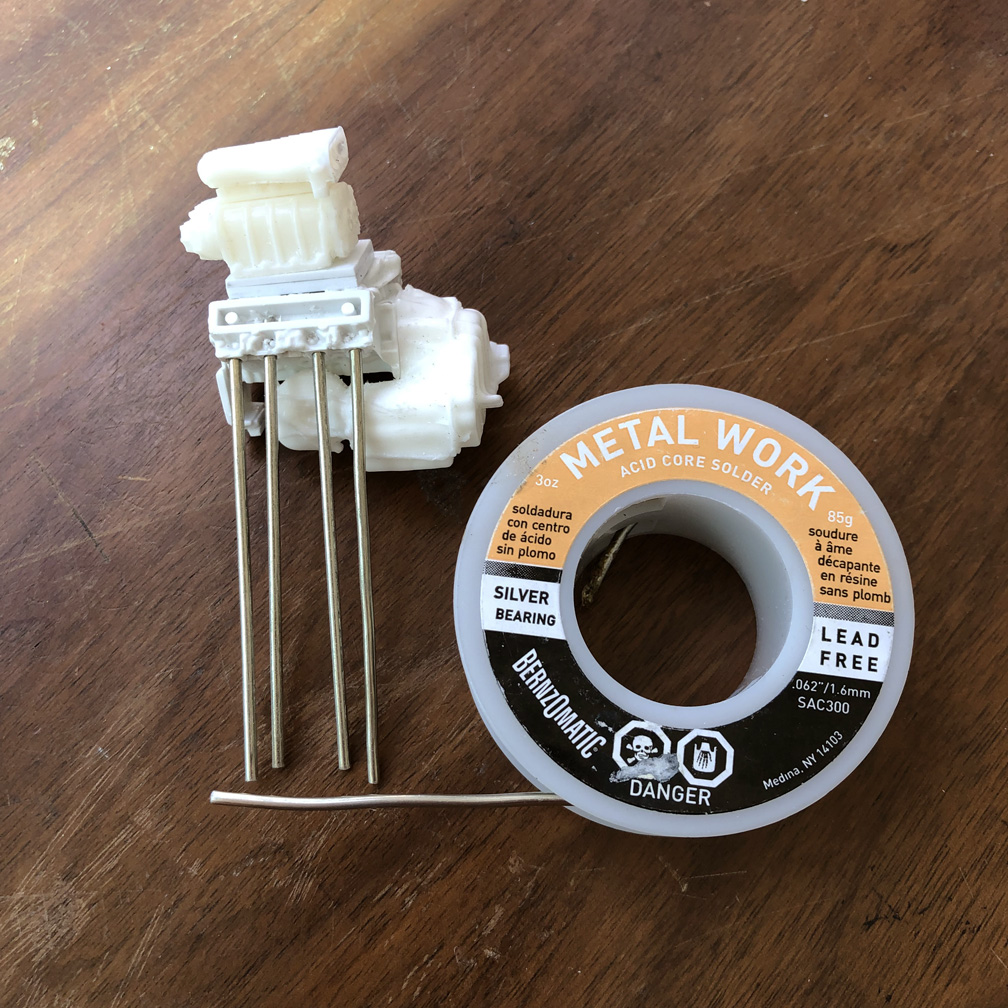


Photo 1. Using a Dremel with a small bit, I pre-drilled all the pilot holes first. This was quick and saved a lot of time.
I then re-drilled the holes using a pin vise with a 1/16" bit that fits the solder tubes perfectly.
Photo 2.The Olds engine has smaller exhaust tubes, So I'm using the 3oz Lead Free Acid Core Solder .062" / 1.6mm.
Cut 4 pieces of solder about 3" long and insert them into the holes. Solder bends like butter, so this is extremely easy to do !
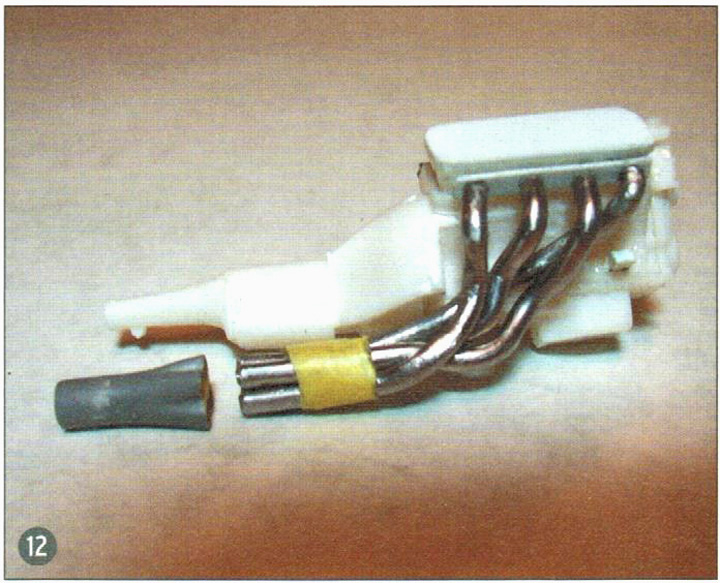
Photo 3. After bending all the tubes, I inserted the engine into the chassis and re-adjusted the tube ends to be straight.
Then Super Glued all the ends of the solder tubes. After the glue dried, I re-adjusted the tubes and then,
put a bead of Super Glued between all the header tubes.
Photo 4. After finding where the header tubes need to stop, they were all cut with a hobby knife.
The hole ends were then drilled out using 3 different size drill bits.
Here's a
"HOW TO" article from Ron Ramsay in Scale Auto April 2017
HOW TO MAKE WINDOW GLASS FOR MODEL CARS
By Scott Kapellusch
 Use masking tape to cover inside of window area, then trace border of window with a pencil.
 Place tape (with pencil lines) on .010 or .020 Clear Plastic Sheet, cut out tracing with scissors.
Remove tape and place the clear window inside the body.
Use small drops of Super Glue (use a tooth pick) to set the window in several points.
* Use Accelerator
on another tooth pick for faster dry time *
Then add a bead of Super Glue to all the edges........ its that easy !
FOR FLUSH MOUNTED FUNNY CAR WINDOWS
By Scott Kapellusch
1. If it is a soft curved window.... Using "clear parts cement", quickly brush clear in the window recess and when the glue is dry (24 hours),
Thin a small amount of cement with water and apply with a small bristle brush and let capillary action
pull all the thinned clear into all the empty spaces.
2. If it is a dramatic curved window.... Make a light razor cut along the edge of the glass where it will be glued.
Cut tiny scratches along the edge using your razor knife. This will give the glass some "bite" so the glass with stick better.
If the corners lift, tap tiny dabs of super glue in the corners to hold the glass down.
"clear parts cement" use the method from #1.
3. To create rivets..... Use "Testors Chrome Paint" and apply with a sharpened tooth pick. Re-sharpen tooth pick often.
Start on each corner, then place a drop in the center and apply rivets evenly between the corners and center rivets.
This should be the very last thing you do to your model build.
You may never go back to kit glass again !
If
your hobby store doesn't carry .010" Clear Plastic Sheet, go here to get it on line!

HOW TO CUT OUT A HOOD OR TRUNK
By Scott Kapellusch
Many resin & plastic models don't come with separate hoods or trunk.
Here I'll show you the cleanest way to cut out and make a recessed gutter.
This model doesn't have hinges, only deck pins.

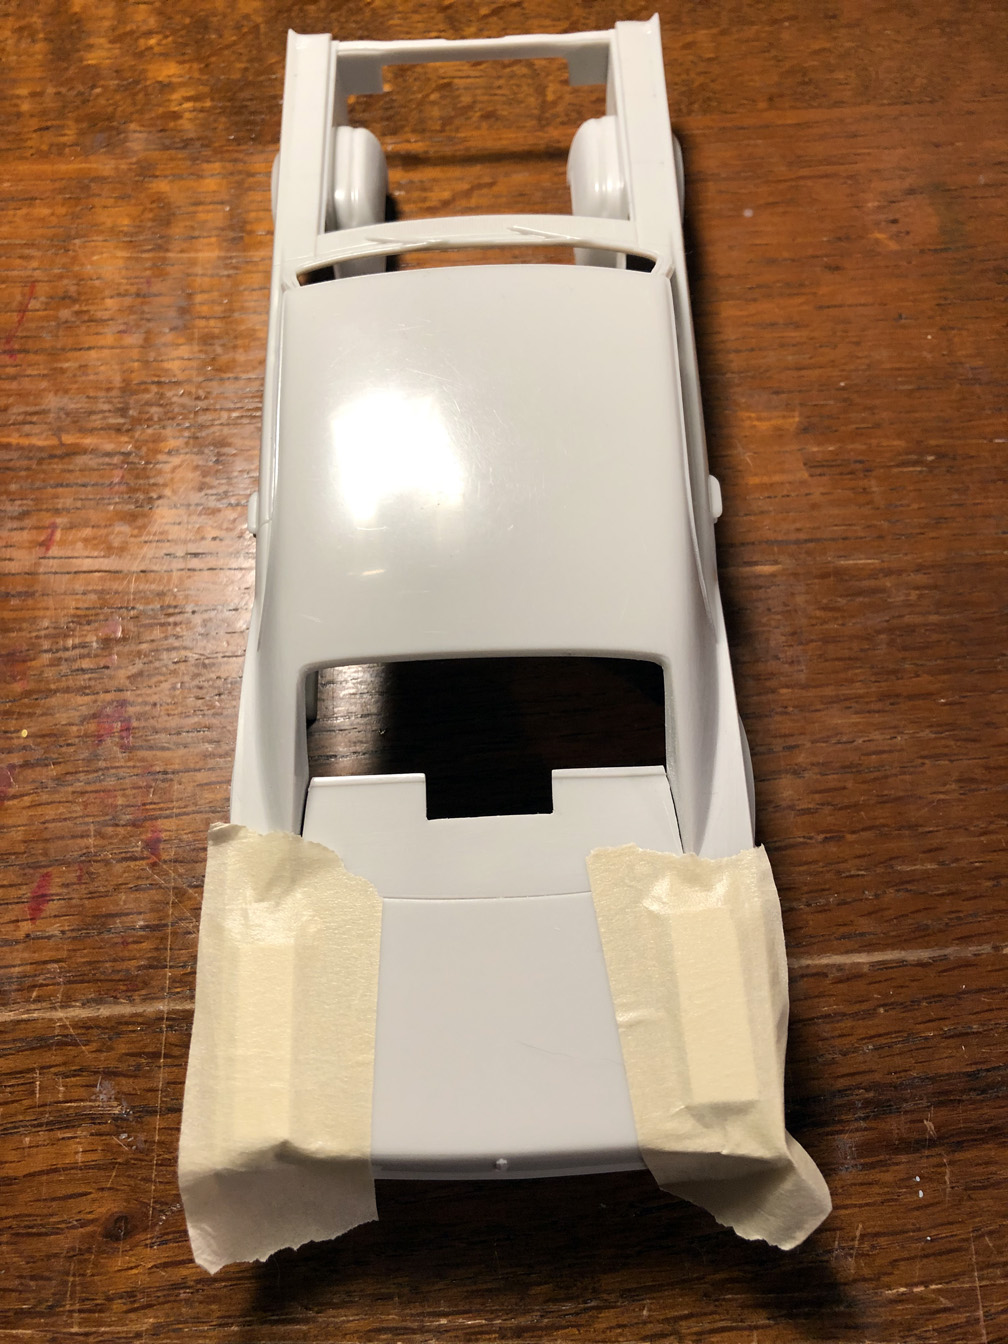
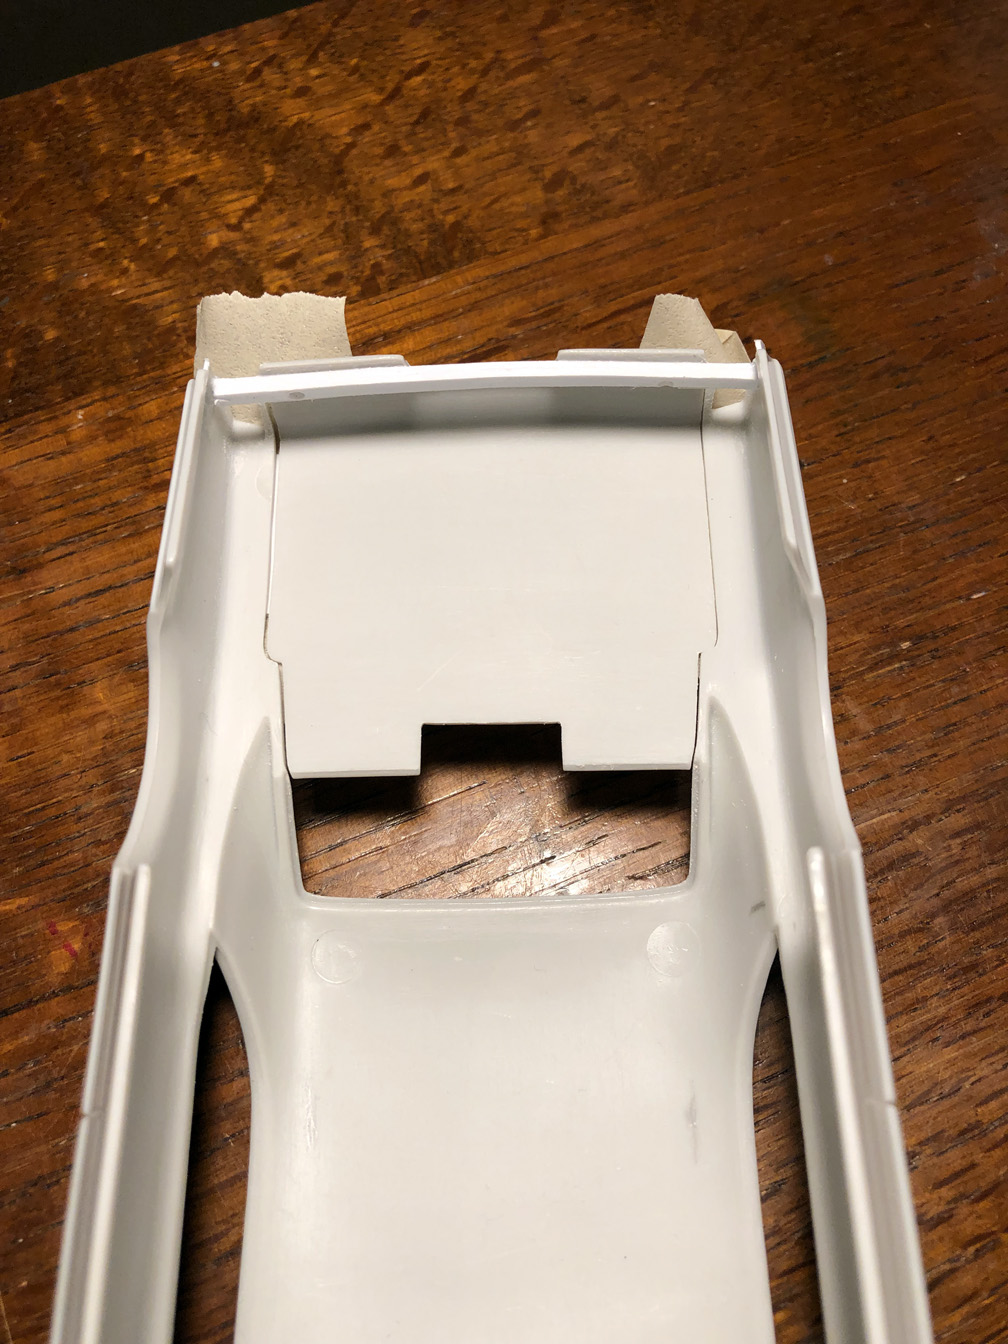
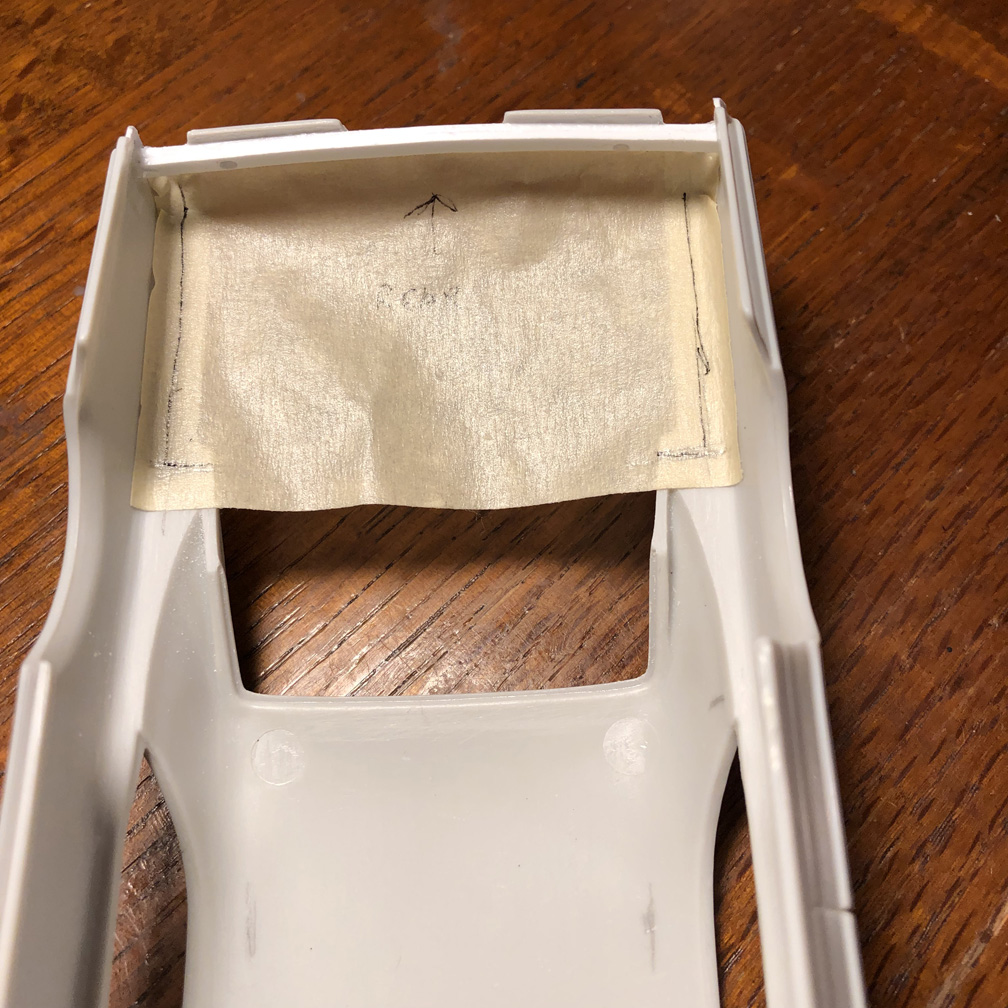
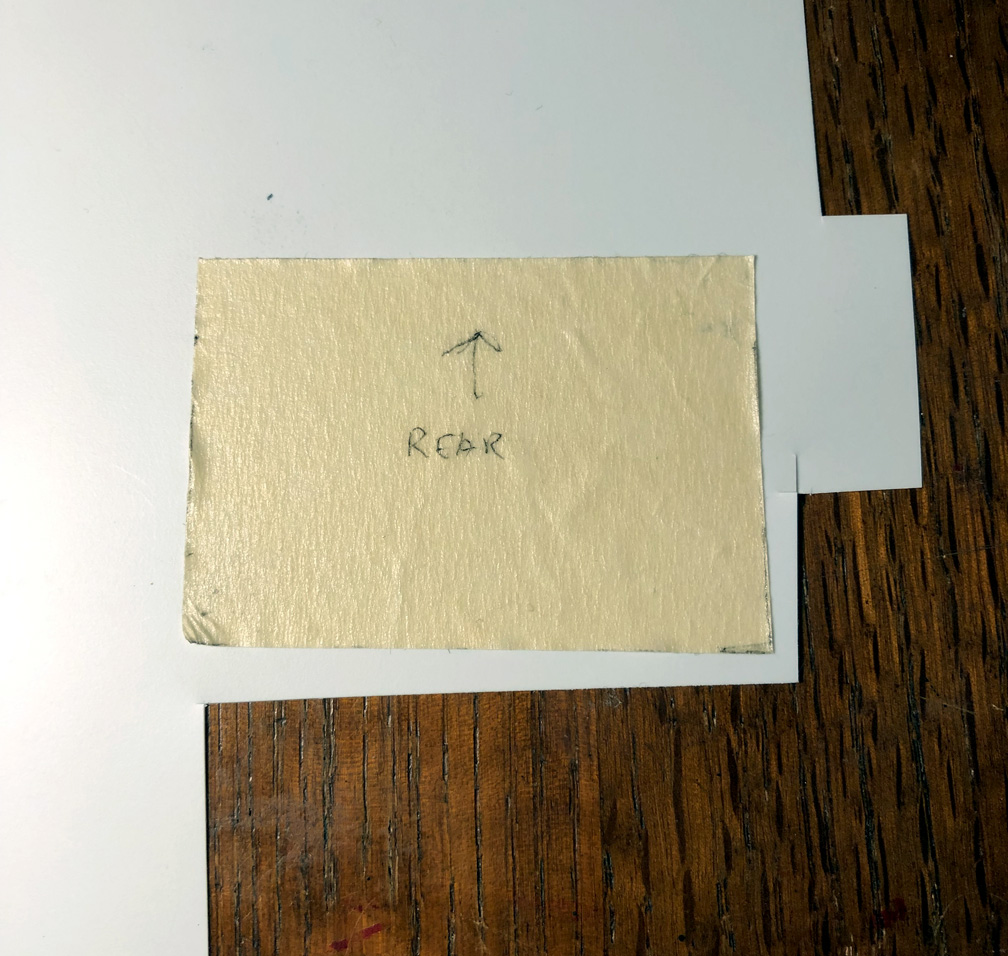
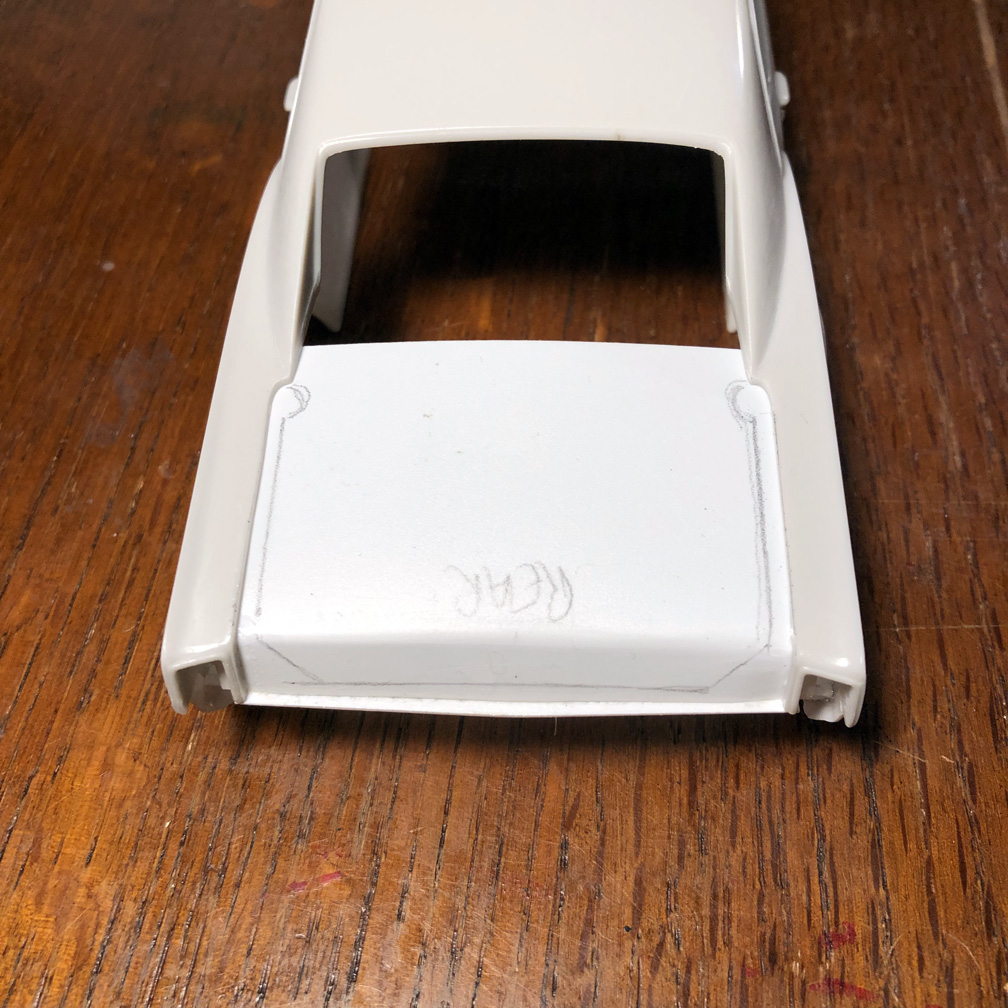
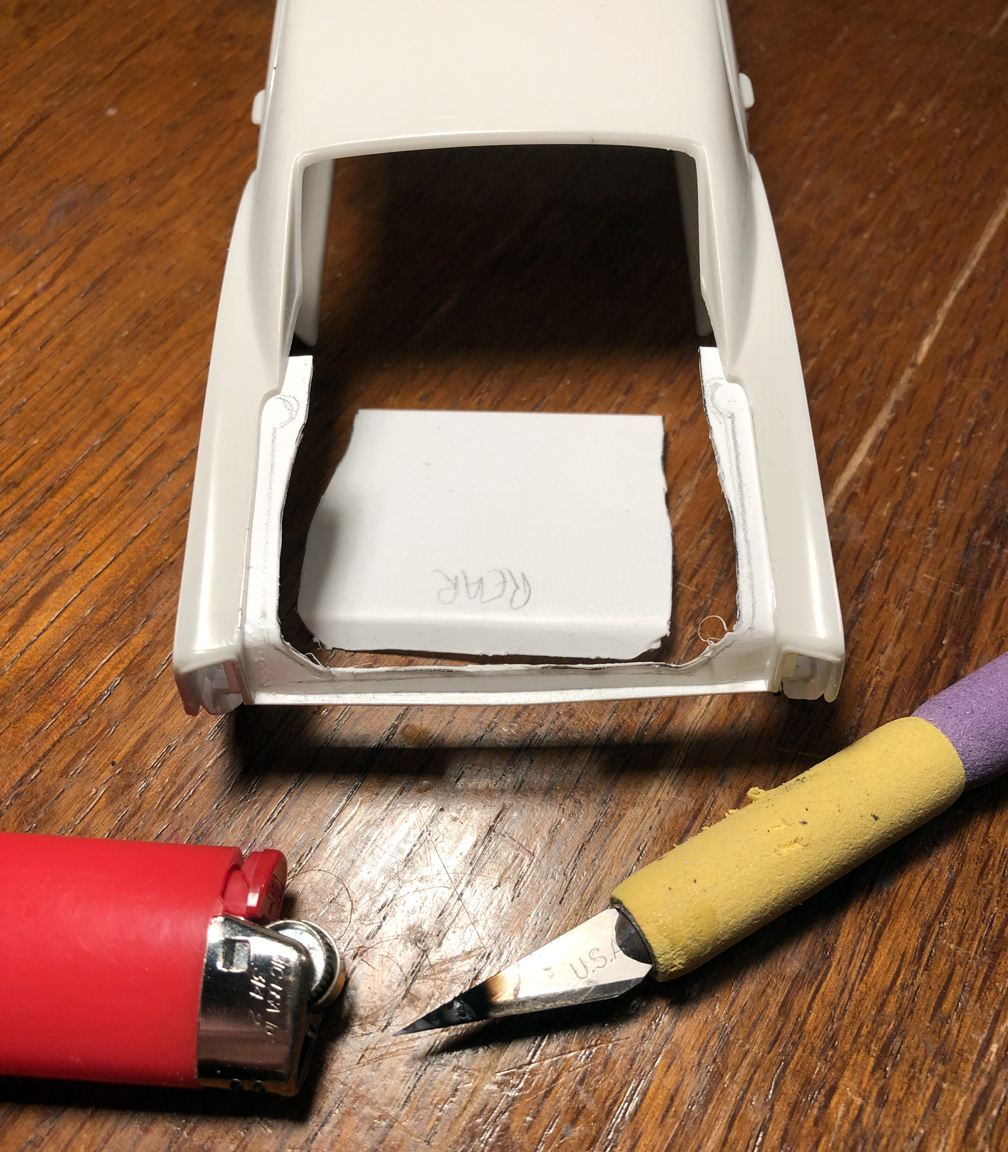
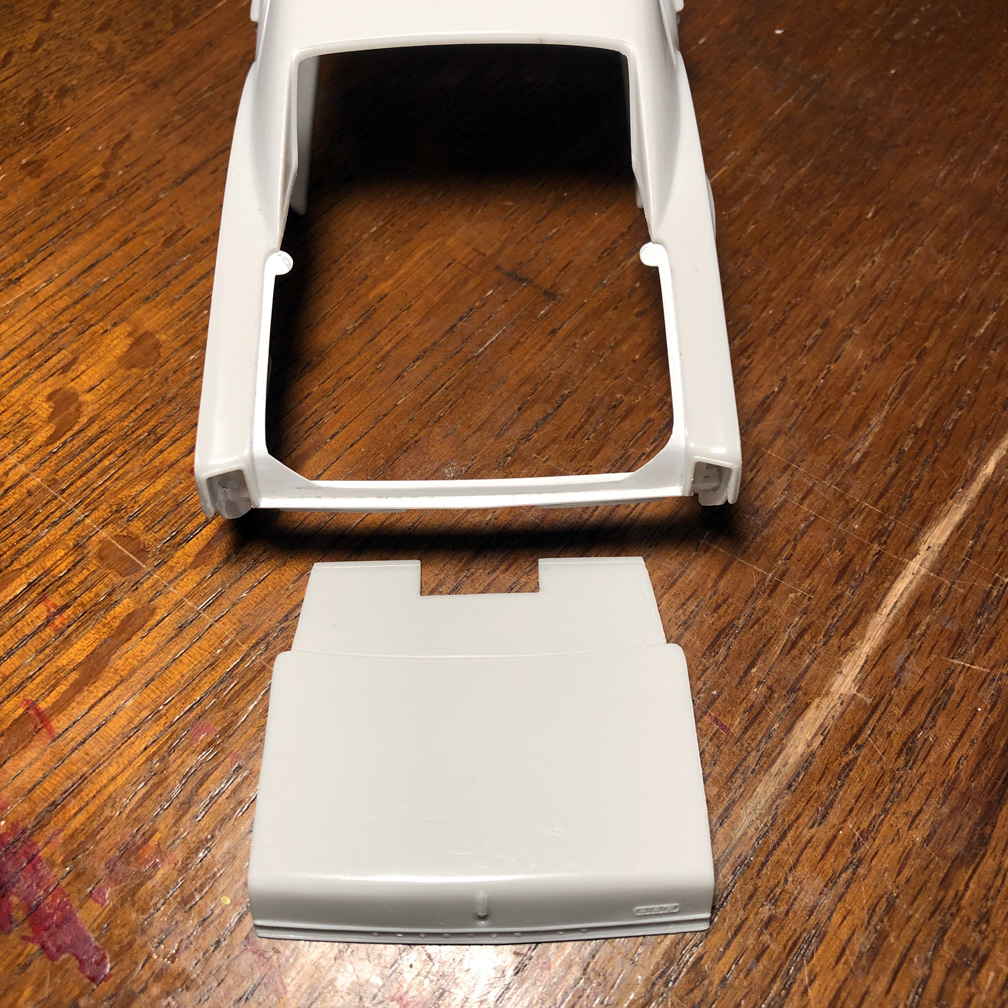
Photo 1. Before removing the trunk lid, start by sanding down the inside of the trunk lid and fenders to get it thinner.
I used the back side of the hobby knife to scribe out the trunk lid. This is a slow process, but I can make sure that I get a perfect cut.
Photo 2. Two pieces of plastic strip is put over the seem between the trunk lid and the fenders.
Now I can sand the back side of the fenders even with the thinned trunk lid.
Photo 3. The inner fenders were sand down even to the thickness of the trunk lid with sand paper and sanding sticks.
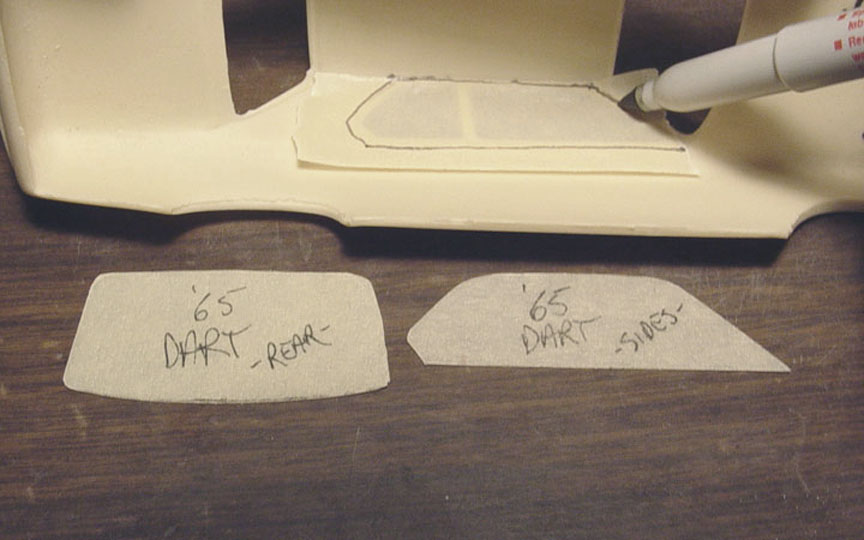
Photo 4. After sanding the trunk lid and fenders evenly, I use masking tape and draw were the I need to add plastic.
Photo 5. Remove the tape from the trunk and transfer it to some plastic sheet.
In this case it curves down so I want the sheet to be thin. I'm using .010" sheet.
Photo 6. Use liquid cement to install the plastic sheet to the inside of the trunk. Let dry overnight.
Photo 7. Use a lighter or small candle to heat up an old #11. X-acto blade. Slowly cut/melt along side the pencil line.
Photo 8. Now use a fresh new #11. X-acto blade to cut close to your line and clean up edges with a small sanding stick.
This took 3 days of build time, working 3-5 hours per day.
More photos and info. coming soon !
I'll be adding deck pins later on !
HOW TO BUILD A FLIP NOSE FRONT END
By Scott Kapellusch

Click on photo for larger printable Instructions.
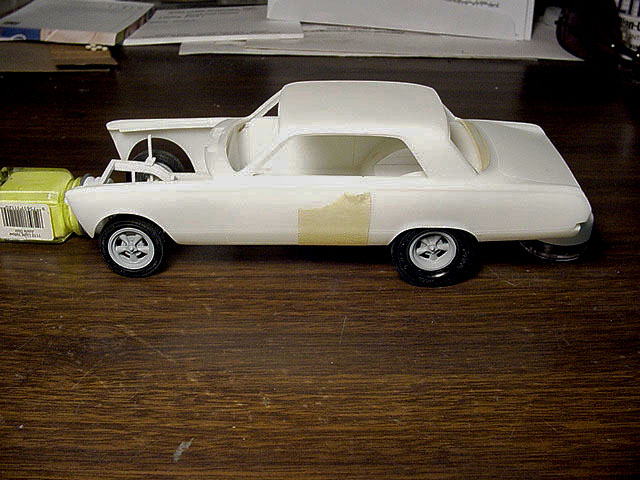
Here's the "Flip Front End" method, used on some of our models.
HOW TO BUILD A STRAIGHT TUBE AXLE WITH POSEABLE WHEELS
By Scott Kapellusch
I've
built a lot of altered wheel base cars, and
though some of them used a dropped tube axle found
in some kits, the most impossible to find, is a straight tube axle !
A lot of customers have emailed me and asked if I would cast one in resin
?
Well, here is the reasons why we don't, or cant cast them.
1. All cars have a different width, so a single tube
axle would not fit all car bodies.
2.
Depending on which mag wheel
you use, it would also alter the distance from the width (fender to fender).
3. The tie rods and spindles are too small & too thin.... and would break
too easily.
In this
article we will show you how to scratch build your own Straight Tube Axle.
As you read this article, it may sound difficult, but it's relatively
easy you understand the process.
 Real 1/1 tube axle's are 3" tube, a 3/32" Plastruct Hollow
Tubing is used to replicate that scale.
Real 1/1 tube axle's are 3" tube, a 3/32" Plastruct Hollow
Tubing is used to replicate that scale.
(we will show you why hollow tube works best later in
this article).
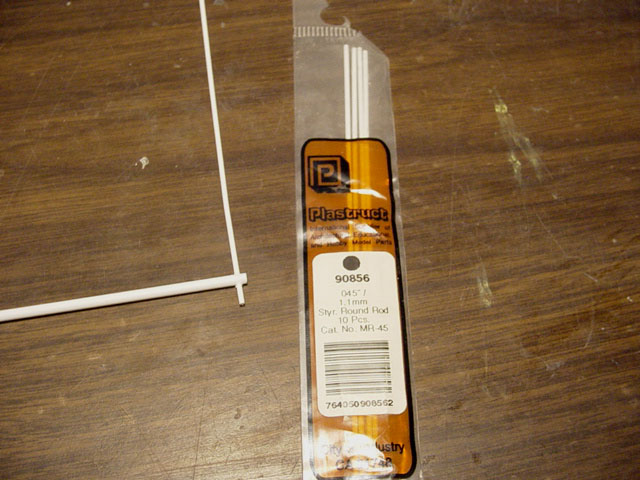 0.45" Plastruct Round Rod is used for the spindle axles, drill holes
through the main axle.
0.45" Plastruct Round Rod is used for the spindle axles, drill holes
through the main axle.
( This will be for the spindles to pivot on ).
 This is how it should look when finished (notice the
spindle axles are not even) it doesn't matter, because later the axle will be cut in half.
This is how it should look when finished (notice the
spindle axles are not even) it doesn't matter, because later the axle will be cut in half.
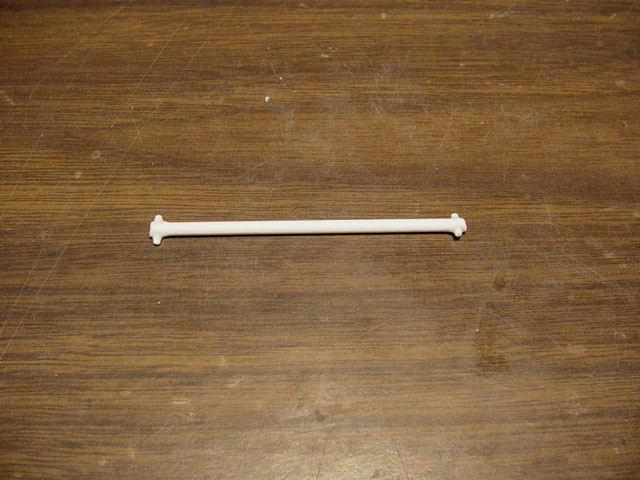
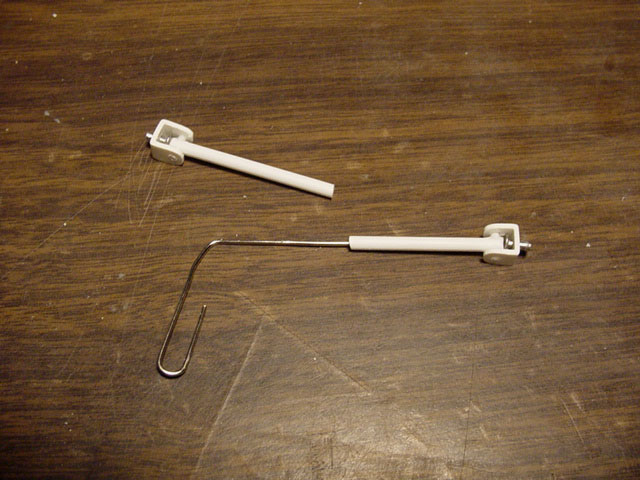
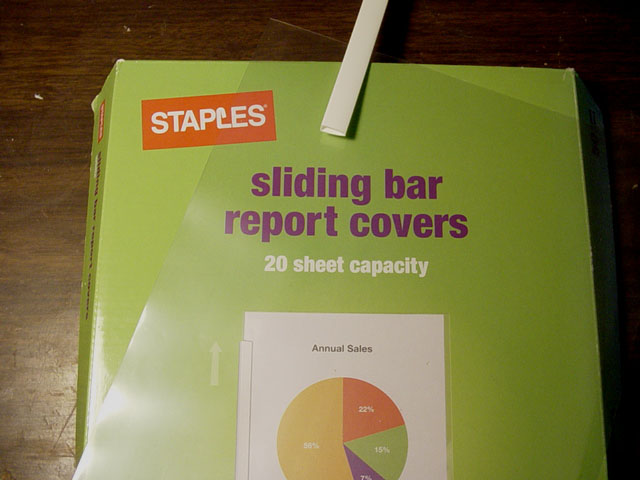 The "SLIDE BARS"
that come in these "Sliding bar report covers" found at Staples will
be used for the Spindles.
The "SLIDE BARS"
that come in these "Sliding bar report covers" found at Staples will
be used for the Spindles.
My wife bought these a long time ago, and asked me if I could use them.........
could I ever !
(You may be able to purchase these individually or see if Stapes has any to give away) ?
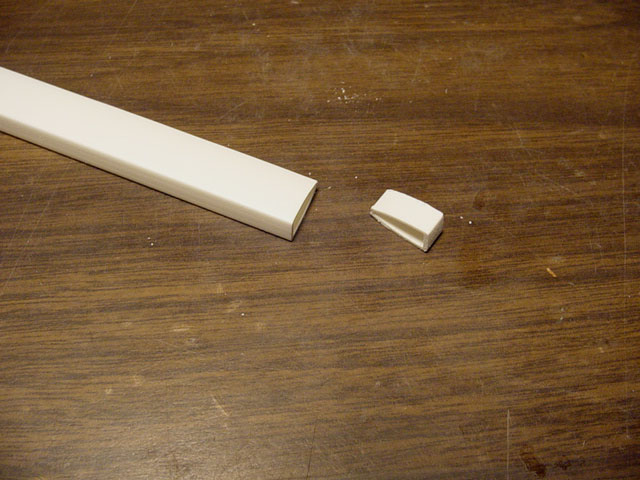 Cut a piece off the "SLIDE
BAR" about a 1/4" wide.
Cut a piece off the "SLIDE
BAR" about a 1/4" wide.
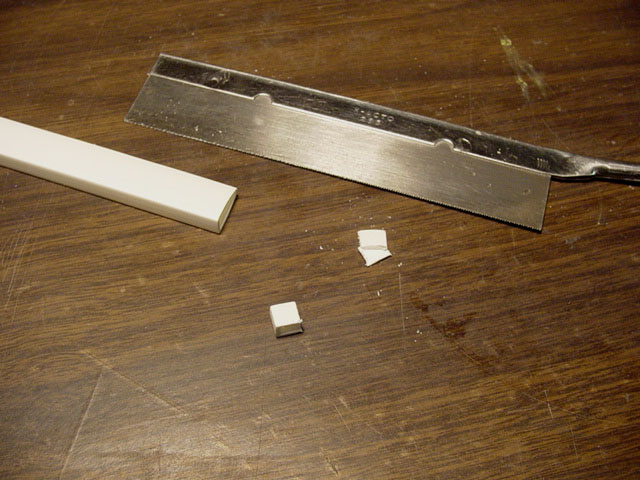 Now cut off the ends of the
"SLIDER BAR", this will be used for the Spindles.
Now cut off the ends of the
"SLIDER BAR", this will be used for the Spindles.
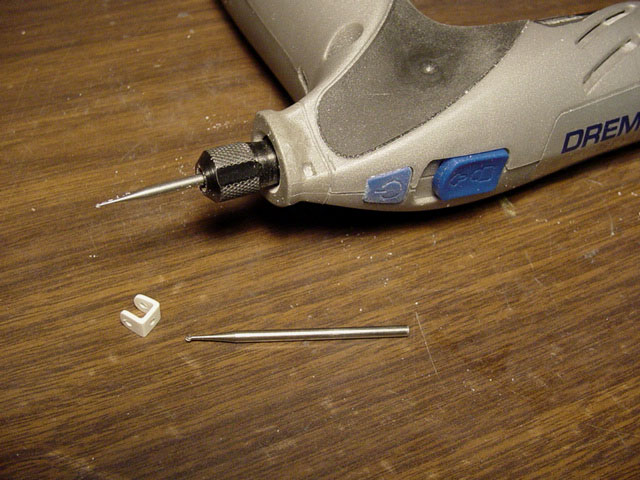 Drill pilot holes holes in the top & bottom and the center of the Spindle,
then open it up with a 0.45" drill bit.
Drill pilot holes holes in the top & bottom and the center of the Spindle,
then open it up with a 0.45" drill bit.
 Round off the ends of the
spindle, this will help with its
rotation.
Round off the ends of the
spindle, this will help with its
rotation.
Small flat head (assortment pack). These nails can be found in any hardware store.
The nail will be used for the spindle axle.
 Depending on what mag wheel your using, measure how long the Nail should be cut.
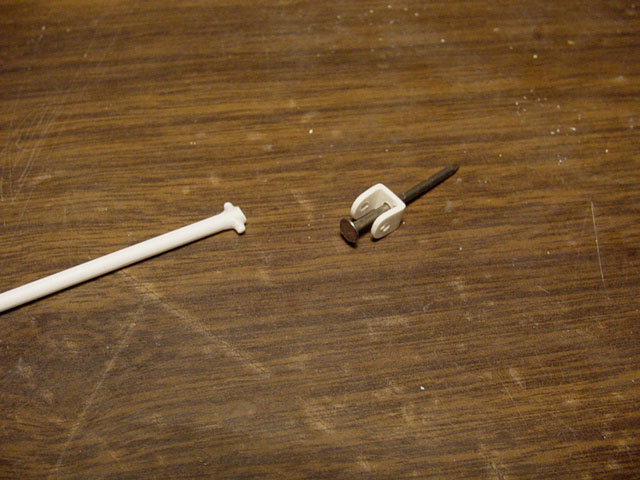
Slip the "SLIDER BAR" (THE
NEW SPINDLE) onto the straight tube axle.
Because the "Slider bar" has an angle to it, it will not come off
when put on........ an added bonus!
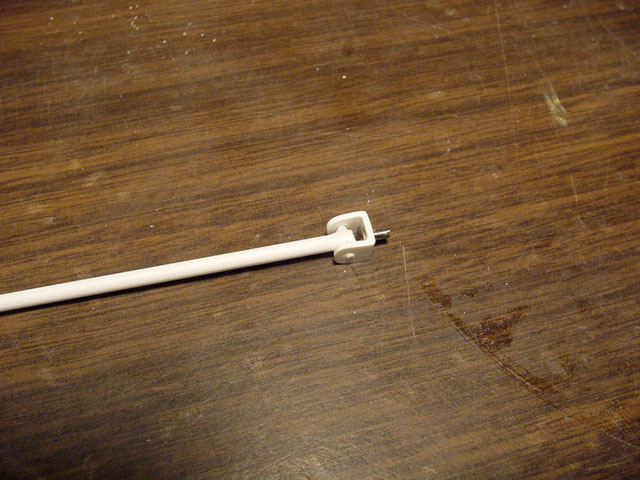
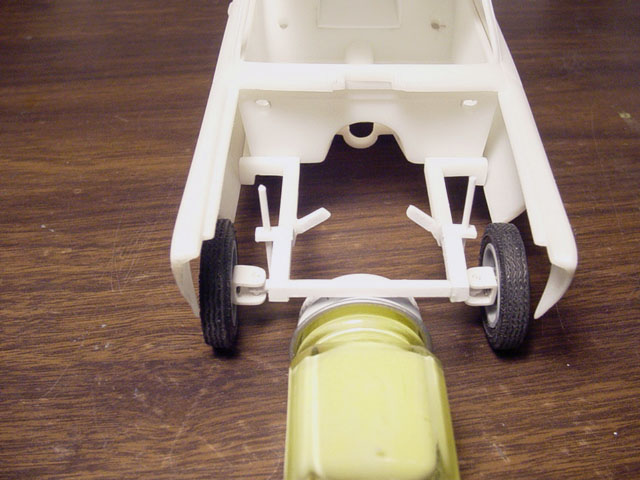
 Here's how everything looks so far.
 You can see that the Straight tube axle is way too long.
You will need to measure as to how far you want the tires to set back in the
wheel well.
 Cut the tube in half, glue a paper clip in one end of the hollow straight tube
(this is why you need a hollow tube).
Cut the tube in half, glue a paper clip in one end of the hollow straight tube
(this is why you need a hollow tube).
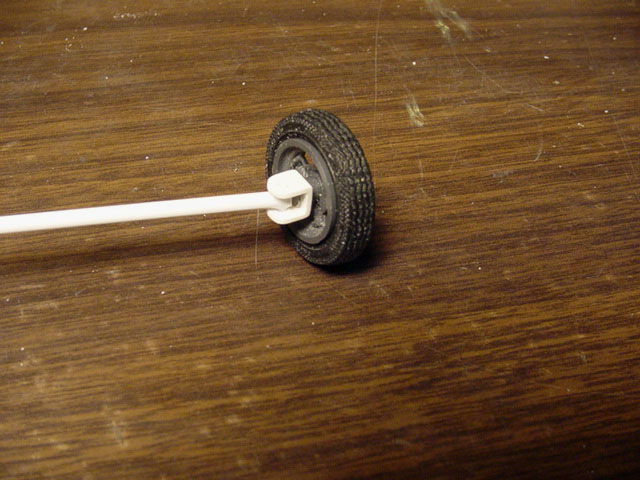
Now put the tires back on and make a new final measurement, mark on the hollow
tube where your cuts should be.
Glue the other side of the paper clip in the other end of the straight tube
axle, make sure that the spindles
are even & straight.
 I'm cutting the steering arms
off a tie rod from the "PARTS BOX", although you can use whatever
steering arms you want, or scratch build your own.
I'm cutting the steering arms
off a tie rod from the "PARTS BOX", although you can use whatever
steering arms you want, or scratch build your own.
 Drill 0.45" holes in
the ends of the steering arms.
Drill 0.45" holes in
the ends of the steering arms.
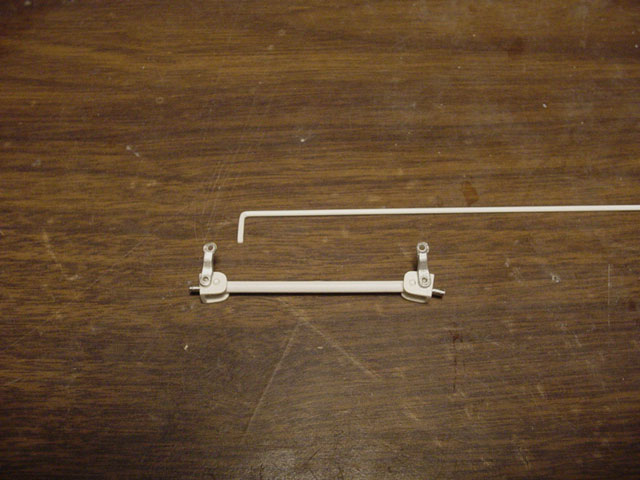
Use the same 0.45" plastic rod for the Tie Rod.
Carefully & slowly bend the rod to make an L shape and heat it for a split second with a cigarette lighter and let it cool.
 Set the spindles straight on the axle and mark where the other bend should be.
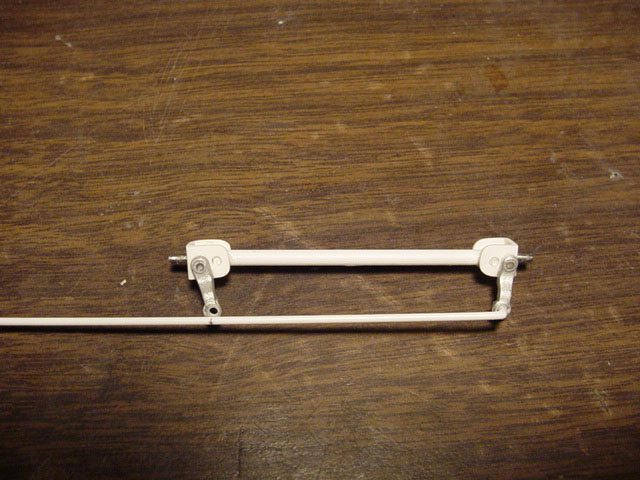
 Use a cigarette lighter to melt the ends of the tie rod and flatten with the metal end
of the lighter.
Use a cigarette lighter to melt the ends of the tie rod and flatten with the metal end
of the lighter.
(THIS NEEDS TO BE DONE FAST, AS YOU DONT WANT TO WARP
THE STEERING ARMS)
I set mine on fire for a fraction of a second.
Or you can heat up a razor knife and melt the ends of the tie rods, let it cool with the razor knife still on the part and twist off.
 Now were going to set
the ride height.
Now were going to set
the ride height.
This is the most challenging of the build....
but still fun !
Since this model has 1/4 elliptic springs, were going to set the height, by making shocks first.
(you may want to add your springs before
adding shocks as it may be easier).
Place something under the chassis to hold up the front of the model, as to how
high or low you want the front of the model to sit.
Mark on the frame, where to put the shock mounts, cut small pieces of plastic
strip (hanging over the frame).
Glue the plastic strip to the frame, and drill 0.45" holes (for
the shock ends to fit into).
 If you can't find shocks that fit, you can make our own shocks.... Here's how>
Using the same 3/32" Tube from the straight axle, and 0.45" Steering
Rod,
start by using the 0.45" Rod, slide the rod through the holes on the
shock mounts (on the frame) to meet the Straight
Axle. Glue the 0.45 Rod to the axle.
Now remove the entire Tube Axle Suspension, add 3/32" tube to the middle
of the 0.45" Rod (for the main shock unit),
creating new shocks.
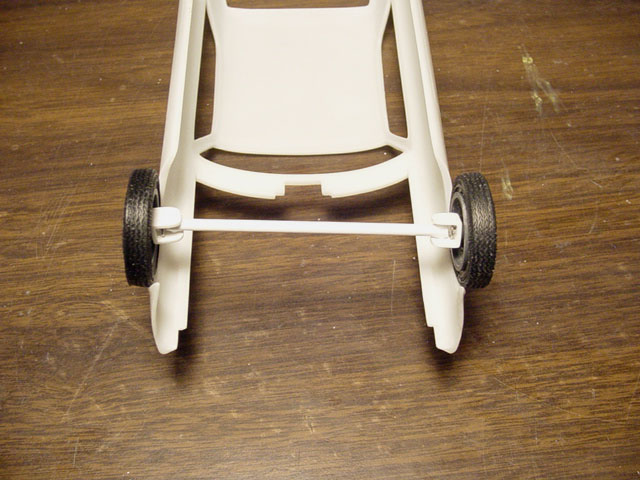
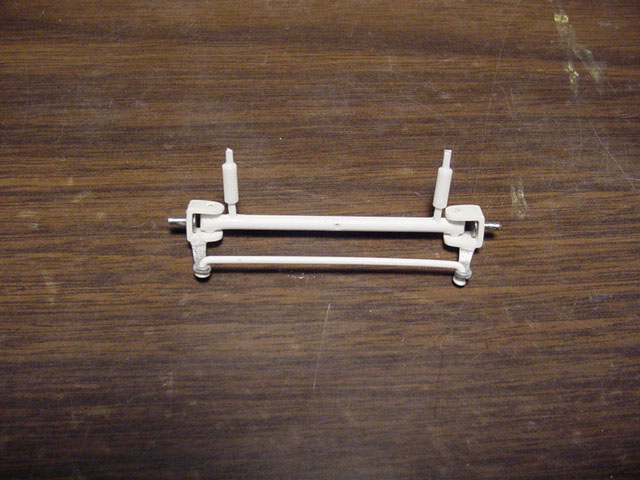 Here's how your new front tube straight axle may look like before painting.
Its up to you, as to how much detail you want to put into it.
You can also add steering linkage using the same method.
IF YOU WANT ROLLING WHEELS
Put a ring of grease around
the metal axle on the base of the spindle.
( don't get grease on the nail, or the glue wont stick )
Drop a small amount of super glue in the hole of the mag wheel,
apply mag wheel to axle and hold down nail head down for 60 seconds.
IF YOU DON'T WON'T ROLLING WHEELS
Super
glue the mag wheel straight to the metal axle.
Here's the "Straight Tube Axle" method, used on some of our resin models.

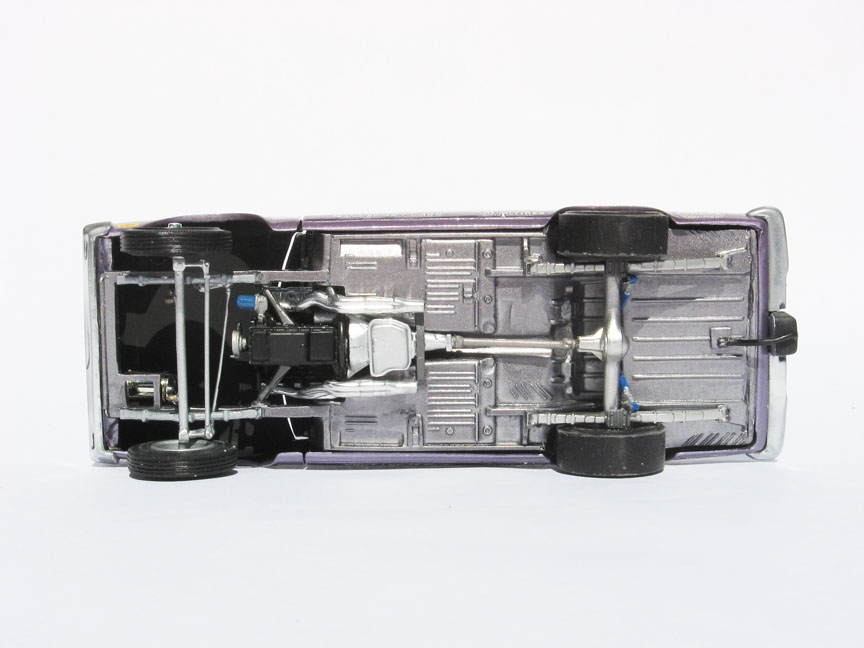


I hope to have encouraged you with this fairly simple method of doing your own "Straight Tube Axle".
As
always.......... Happy Modeling !
Become a member of the "SPEED CITY NEWSLETTER" and receive:
NEW PRODUCT ANNOUNCEMENT’S FOR ALL NEW ITEMS.
Automatically
delivered to your email inbox!
Email request to: skmodeler@sbcglobal.net
![]()
